• Home
  • Suggest A DIY
  • DIY Newsletter

Edible Crafts

Creative food craft ideas

  • About CraftGossip
  • Our Network
    • Bath & Body Crafts
    • Candle Making Ideas
    • Crochet Ideas
    • Cross Stitch
    • Edible Crafts
    • Felting Patterns
    • Glass Art
    • Home & Garden Ideas
    • Indie Crafts
    • Jewelry Making
    • Kids Crafts
    • Knitting Patterns
    • Lesson Plans
    • Needlework
    • Party Ideas
    • Polymer Clay
    • Quilting Ideas
    • Recycled Crafts
    • Scrapbooking
    • Sewing Patterns
    • Card Making
    • DIY Weddings
    • Not Craft Ideas
  • Giveaways
  • Roundups
  • Store
  • Search

How to prepare a grazing table

September 1, 2017 by Shellie Wilson

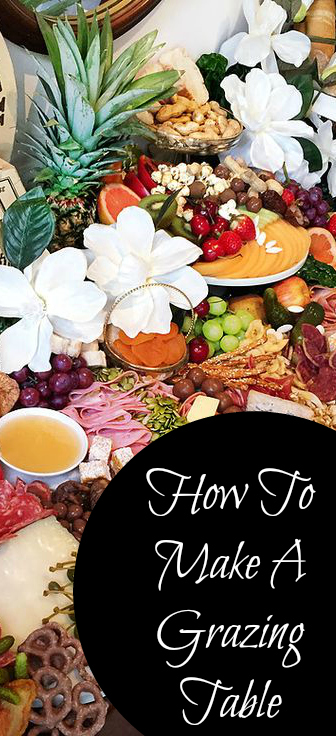
What is a Grazing table? basically a table filled with small (grazing) sizes pieces of food.

What types of things can go on your grazing table?

  • Assorted bread rolls, sliced artisan loaves, bread sticks and assorted crackers.

  • Platters of cold meat, thinly sliced hams and chunky salamis.

  • Fresh, marinated or pickled vegetables.

  • Platters of cheese from soft cheeses to wheels of hard cheese. Cheese can be expensive so work to your budget.

  • Sweet items such as chocolates, mini cakes, muffins or small cupcakes. Include fresh fruit (non juicy)

  • Assorted wafers, dried fruits & nuts.

  • Olives fresh and marinated.

  • Use fresh fruit, edible flowers, vegetables and herbs for decoration.

Prepare your grazing table

It does actually take quite a bit of food to fill a table, so pick a table size to suit your budget. You can also fill in space with large chopping boards, baskets of bread and flowers. You will need a clean table or a mix of chopping boards. You can also lay down some wrapping paper to form a clean patterned surface. 

How to lay out your grazing table

Start with the biggest items you have or any pieces you want to be the feature. Eg cupcakes or full sized cake. Lay these out on the table, scattered and in no particular order.  

Next you need to lay down your chopping boards or baskets. Then it’s just a case of filling in the gaps with your grazing table food. Try and separate crackers from cut fruit so they remain crisp and add chopped breads at the last minute or drape them with a damp towel to keep them moist until serving. Try and balance out your color as you go. The more food on your grazing table the better it looks.

There’s no easier way to impress and satisfy your party guests than with an amazing grazing table.

Tips to create an easy grazing table

1: Height – Elevation of your food helps to add dimension to the grazing table. Place height at the back of the table or in the middle of the grazing table if it is going to be a 360 walk around the table. Then work out towards the front getting lower. You may wish to round out the side to bring the dinner into the middle also.

2: Color – Pick a base color for your plates and crockery. Most platters are wood grain, marble or browns. You really want the color of your food to be the hero on a grazing table. Scatter colored foods out across the table to balance the look.

3: Props –  A great way to reduce the overall cost of food is to add props, generally fresh foliage flowers and special crockery pieces can add lots of businesses to your grazing table as busy is a good thing when it comes to creating your own table or platter.

Related Posts:

  • 30 Make Ahead Easy Brunch Ideas
  • 30 Easy Things To Make For A Brunch Potluck Share A Plate
«
»

Comments

  1. Nancy says

    September 2, 2017 at 10:26 am

    Grazing table? Makes us sound like we are all a herd of cattle. Smorgasbord is a much classer name for people eating finger foods and such.

  2. Emily says

    September 17, 2017 at 8:57 am

    Actually ‘grazing table’ is very much on trend at the moment. Smorgasbord is very old fashioned.

Have you read?

How Much Do You Really Need? A No-Stress Party Drinks Guide for Real Women Who Host

If there’s one thing I’ve learned over years of hosting everything from kids’ birthdays to backyard 50ths, it’s this: running out of drinks will haunt you forever, and overbuying means staring at a fridge full of lukewarm mixers for the next six months. Neither is fun. So I finally sat down—cup of tea in hand, Aloo asleep at my feet—and pulled together the no-nonsense drinks calculator I wish I’d had years ago.

This guide is written for the woman who does it all: planning, prepping, pouring, smiling through the chaos… while trying to make the whole thing feel effortless. Whether you’re throwing a birthday bash, retirement party, holiday get-together, or the classic “just because we need a night with the girls,” this calculator will take the guesswork out.

Let’s keep it simple, doable, and totally stress-free.

The 3-Rule Party Drink Calculator
(You can literally plan your whole bar with this.)

  1. Assume 2 drinks per guest in the first hour
    People arrive thirsty. They mingle. They top up.
  2. Then 1 drink per guest per hour after that
    This is where the pace naturally slows.
  3. Multiply by your party length
    Done. No apps, no math headaches, no complicated charts.

Quick Cheat Sheet: What to Buy for 10, 20, 30, or 50 Guests

For a 3-hour party:

10 Guests
– Wine: 3–4 bottles
– Beer/Cider: 12–18 bottles
– Spirits: 1 bottle vodka or gin + 2 mixers
– Soft drinks: 4–6 litres
– Water: 4–6 litres

20 Guests
– Wine: 6–8 bottles
– Beer/Cider: 24–36 bottles
– Spirits: 2 bottles + 4–5 mixers
– Soft drinks: 8–10 litres
– Water: 10 litres

30 Guests
– Wine: 10–12 bottles
– Beer/Cider: 36–48 bottles
– Spirits: 3 bottles + 6–8 mixers
– Soft drinks: 12–14 litres
– Water: 12–16 litres

50 Guests
– Wine: 15–20 bottles
– Beer/Cider: 60–80 bottles
– Spirits: 4–5 bottles + 10 mixers
– Soft drinks: 20 litres
– Water: 20–25 litres

If You’re Serving Mostly Wine
Go 60% white, 40% red unless it’s winter, then flip it.

For afternoon parties, rosé counts as a white—buy a couple bottles because someone always wants it.

If You’re Serving Cocktails
Stick to one signature cocktail plus a basic spirit (vodka or gin) with soda or tonic. Trust me, nobody needs a full bar unless you’re running a hotel.

For a 20-guest gathering:
– 2–3 bottles liquor for the signature cocktail
– Enough mixer to match (lemonade, juice, ginger beer, etc.)
– Garnishes: limes, lemons, mint, berries
– 2kg ice for shaking and topping

If You’re Serving Beer Drinkers
Plan for 1.5 bottles per person per hour if beer is the star of the show.
Beer-focused gatherings are thirstier gatherings. It’s science.

Don’t Forget Ice — Seriously
Ice is the one thing everyone underbuys. You need more than you think.

Ice Guide:
– Small gathering (10 guests): 3–4 kg
– Medium (20–30): 6–8 kg
– Large (50): 10–12 kg

If it’s summer, add another 20%.

Essential Mixers That Always Get Used
– Soda water
– Tonic
– Lemonade
– Cola
– Cranberry juice
– Orange juice
– Ginger beer
– Fresh citrus (honestly the unsung hero of any bar)

Keep it simple; nobody needs lychee cordial at a 60th birthday unless you really love lychee.

Water, Water, Water
Your future self will thank you. Hydrated guests dance more, complain less, and recover beautifully.

Plan for 1 litre per person minimum.
More if it’s hot, outdoors, or includes dancing (my favourite cardio).

When in Doubt, Buy a Little Extra
You can always send guests home with leftover cans and bottles. It doubles as a quiet nudge to clean your fridge.

The only time I truly regret buying extra is when Aloo gets into the recycling bin the next day and has the time of his life spreading cans around the backyard.

Hosting Made Easier
Once you’ve used this drinks calculator once or twice, it becomes instinctive. And honestly, when you’ve got the drinks sorted, the rest of the party feels lighter. No frantic runs to the bottle shop, no panic when the rosé runs out. You get to relax, enjoy, and actually be present at your own gathering—what a concept.


Categories

Baked candy chocolate Christmas cookies Craft Inspirations cupcakes Drinks Easter fruit Fun With Food Halloween Holidays kids More Recipes non-sweets Parties & entertaining Recipes Thanksgiving Valentines Day

Bacon Biscuit and Sweet Corn Ice Cream Sandwiches

How To Make Edible Orchids For Your Cake

Painted Cookies

Chocolate Mustaches

Harry Potter Inspired Acid Pops

RSS More Articles

  • The 5 Outlet Placement Mistakes You Don’t Want to Make
  • Celebrate the Spirit of the Southwest with These Stunning Indian Navajo Tribal Quilt Patterns
  • Pricing Handmade Sewing Items Without Undervaluing Yourself
  • Tips for Teaching the Alphabet to Kids
  • Yarn Sardines T-Shirt Review – A Whimsical Gift For Yarn Lovers
  • Cropped Chunky Granny Stitch Cardigan Crochet Pattern
  • Free Butterfly Digital Stamps for Card Making, Coloring and Paper Crafts
  • 14 Masculine Card Ideas for Guys
  • Juneteenth Cross Stitch Patterns
  • Ties to Knit for Father’s Day

Pick Your Blog

  • Sewing
  • Knitting
  • Quilting
  • Crochet
  • Home & Garden
  • Recycled Crafts
  • Scrapbooking
  • Card Making
  • Polymer Clay
  • Cross-Stitch
  • Edible Crafts
  • Felting
  • Glass Art
  • Indie Crafts
  • Kids Crafts
  • Jewelry Making
  • Lesson Plans
  • Needlework
  • Bath & Body
  • Party Ideas
  • Candle Making
  • DIY Weddings
  • Not Craft
  • Free Craft Projects

Explore Edible Crafts

breakfast cake candy chocolate Christmas cookie decorating cookies dessert Easter fruit Halloween Holidays kids lollipop sticks lunch packaging party summer Thanksgiving valentines

Copyright © 2026 · CraftGossip | Start Here | Contact Us | Link to Us | Your Editors | Privacy and affiliate policy