• Home
  • Suggest A DIY
  • DIY Newsletter

Edible Crafts

Creative food craft ideas

  • About CraftGossip
  • Our Network
    • Bath & Body Crafts
    • Candle Making Ideas
    • Crochet Ideas
    • Cross Stitch
    • Edible Crafts
    • Felting Patterns
    • Glass Art
    • Home & Garden Ideas
    • Indie Crafts
    • Jewelry Making
    • Kids Crafts
    • Knitting Patterns
    • Lesson Plans
    • Needlework
    • Party Ideas
    • Polymer Clay
    • Quilting Ideas
    • Recycled Crafts
    • Scrapbooking
    • Sewing Patterns
    • Card Making
    • DIY Weddings
    • Not Craft Ideas
  • Giveaways
  • Roundups
  • Store
  • Search

CraftGossip Exclusive: Homemade Easy S’mores Bar

June 20, 2016 by Shellie Wilson

easy-smores-cake-recipe-quick

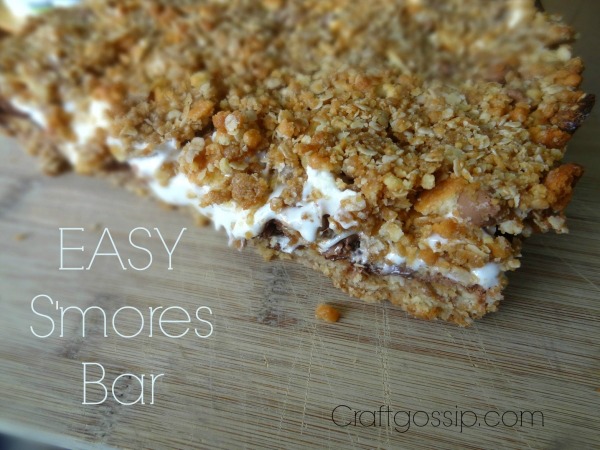
This easy s’more bar is the perfect sweet indulgence bar for a wet and rainy weekend. This is best eaten warm from the oven, but it tastes great cold too. If you want to slice it into squares then you will need to let it cool. We ate it straight out of the pan and just scooped it into a bowl as no one wanted to wait.

Base –

1 cup of quick oats

1 cup of plain flour with 1/2 tsp of baking soda or 1 cup of self raising flour.

pinch of salt

1/2 cup of softened butter

1/2 cup of brown sugar

1 tsp of vanilla extract

Take the base ingredients and mix until a dough-like texture. This layer will create the base of the slice. You need to press it firmly into a lined 8×8 tin. Bake for 15 mins until golden brown in a 350F oven.

Whilst you are waiting for that layer to bake you can go ahead and start the filling.

Filling –

1 1/2 cups of chopped Marshmallows

1 1/2 cups of chocolate chips. We used half of dark and half milk chocolate.

13474162_10208476902093137_1019961039_n

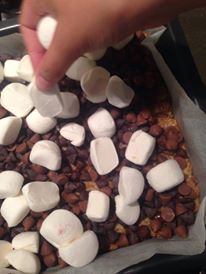
Once your base is golden brown, pull it out of the oven and layer the chocolate chips and marshmallows over the top. Pop it back in to the oven for 5 mins or until melted.

To finish off this slice/bar you need a top for this you need to mix the following.

120 grams of brown sugar

120 grams of butter

3/4 cup of quick oats

100 grams of flour

1 cup of crushed sweet biscuits. You could use graham crackers or shortbread.

Cream the butter and sugar together then add the remaining ingredients. This mixture should resemble a crumble. You then need to sprinkle it over the top of the slice. Try not to push it down too hard or the melted filling will ooze out too much. Once you have coated the top pop it back in the oven for 15 minutes or until golden.

Allow to cool for 10 mins before eating it warm and gooey or allow to cool for 1 hour to slice it.

Looking for more S’smores recipes? Check out these articles.

Looking for more ideas for Smores? Check out this S’mores cookbook we found on Amazon and let’s not forget my favorite snack Smores candy snack.  So yummy and ready to go!

So it turns out I have become a s’mores addict and now I am addicted to this S’mores dip. In fact, I do believe I have aided and abetted a few friends in this Smores dip addiction too.

Related Posts:

  • 20 Festive Things to Make with Canned Crescent Roll Dough
  • One Bowl Oatmeal Cookies Recipe (Soft, Chewy, and…
«
»

Have you read?

How to Make Thick Yoghurt Smoothie Bowls in the Ninja Slushie Maker

A quick, creamy breakfast with fresh fruit added on top

Smoothie bowls are one of those beautiful breakfasts that feel healthy and a little indulgent at the same time. Thick, cold, creamy, and pretty enough that you almost don’t want to eat them… almost.

The Ninja Slushie Maker takes all the effort out of it.
Instead of dealing with frozen fruit bricks or blenders that complain loudly, you simply mix your yoghurt base, chill it, and let the Ninja turn it into the perfect thick smoothie-bowl texture — no ice required.

If you are like me and come addicted to these smoothie bowls then you will want to invest in these double walled bowls, this is my favorite brand and these have been great. 

Then you top it with your fresh fruit afterwards so the bowl stays thick, cold, and spoon-worthy.

It’s easy, quick, and a lovely way to start the day.

Why Yoghurt Works So Well in the Ninja Slushie Maker

Yoghurt freezes into a silky, firm slush — similar to soft-serve but healthier and lighter. Because the machine creates the icy texture itself (instead of relying on ice cubes), the mixture never becomes watery or gritty.

Just smooth, cold, creamy perfection you can decorate to your heart’s content.

The Basic Yoghurt Slush Base

Once you learn this base recipe, you can create endless flavour combinations.

Ingredients

  • 2 cups plain or Greek yoghurt, chilled 
  • ½–1 cup milk of your choice (just enough to loosen the mixture) 
  • 1–3 tablespoons honey or maple syrup (optional) 
  • 1 teaspoon vanilla extract (optional) 

Method

  1. Stir all ingredients together until smooth. 
  2. Chill the mixture in the fridge until very cold. 
  3. Pour the chilled mixture into the Ninja Slushie Maker. 
  4. Blend on the slush setting until thick, creamy, and icy. 
  5. Spoon into a bowl and add your fruit and toppings. 

This base has enough body to hold granola, berries, and nut butter without sinking.

Topping Ideas (Add These After Blending)

Fresh Fruit

  • Strawberries 
  • Blueberries 
  • Banana slices 
  • Mango 
  • Kiwi 
  • Peaches 

Crunchy Toppers

  • Granola 
  • Toasted coconut 
  • Chopped nuts 
  • Cacao nibs 

Extras

  • Honey drizzle 
  • Peanut butter 
  • Chia seeds 
  • Freeze-dried fruit crumbs 

Easy Flavour Variations

Berries & Cream Smoothie Bowl

Use vanilla yoghurt as your base. Top with raspberries, strawberries, and a sprinkle of granola.

Tropical Coconut Bowl

Add a splash of coconut milk to the base. Top with mango, pineapple, kiwi, and toasted coconut flakes.

Chocolate Yoghurt Bowl

Mix 1 tablespoon cocoa powder or chocolate protein powder into the base. Top with banana slices and a peanut-butter drizzle.

Meal-Prep Tip

Prepare the yoghurt base the night before and store it in small jars.
In the morning, just pour one jar directly into the Ninja Slushie Maker and you’ve got a thick, cold, ready-to-top breakfast in minutes.


Categories

Baked candy chocolate Christmas cookies Craft Inspirations cupcakes Drinks Easter fruit Fun With Food Halloween Holidays kids More Recipes non-sweets Parties & entertaining Recipes Thanksgiving Valentines Day

Decorated Seashell Cookies

Pumpkin Puree

Homemade Goldfish Crackers

Frozen White Chocolate Strawberry Yogurt Bark

Ham and Brie Baguette

RSS More Articles

  • Cross Stitch Ice Cream and Frozen Treats
  • 15 Charity Sewing Projects That Let You Sew Something Useful For A Good Cause
  • Sunflower Ribbon Embroidery Tutorials and Kits to Brighten Your Hoop
  • Decorating Mistakes That Make Your Living Room Feel Cluttered
  • Remembering Jill Smokler, Founder Of Scary Mommy
  • In the Garden Layer Cake – A Bloom-Filled Fabric Collection for Spring Sewing
  • How To Do Kitchener Stitch: A Beginner-Friendly Guide To Grafting Knitting Seamlessly
  • Pattern Review: Georgie Granny Square Bucket Hat Crochet Pattern
  • 12 Handmade Patriotic 4th of July Card Ideas
  • Shark Week Learning for Kids

Pick Your Blog

  • Sewing
  • Knitting
  • Quilting
  • Crochet
  • Home & Garden
  • Recycled Crafts
  • Scrapbooking
  • Card Making
  • Polymer Clay
  • Cross-Stitch
  • Edible Crafts
  • Felting
  • Glass Art
  • Indie Crafts
  • Kids Crafts
  • Jewelry Making
  • Lesson Plans
  • Needlework
  • Bath & Body
  • Party Ideas
  • Candle Making
  • DIY Weddings
  • Not Craft
  • Free Craft Projects

Explore Edible Crafts

breakfast cake candy chocolate Christmas cookie decorating cookies dessert Easter fruit Halloween Holidays kids lollipop sticks lunch packaging party summer Thanksgiving valentines

Copyright © 2026 · CraftGossip | Start Here | Contact Us | Link to Us | Your Editors | Privacy and affiliate policy