• Home
  • Suggest A DIY
  • DIY Newsletter

Edible Crafts

Creative food craft ideas

  • About CraftGossip
  • Our Network
    • Bath & Body Crafts
    • Candle Making Ideas
    • Crochet Ideas
    • Cross Stitch
    • Edible Crafts
    • Felting Patterns
    • Glass Art
    • Home & Garden Ideas
    • Indie Crafts
    • Jewelry Making
    • Kids Crafts
    • Knitting Patterns
    • Lesson Plans
    • Needlework
    • Party Ideas
    • Polymer Clay
    • Quilting Ideas
    • Recycled Crafts
    • Scrapbooking
    • Sewing Patterns
    • Card Making
    • DIY Weddings
    • Not Craft Ideas
  • Giveaways
  • Roundups
  • Store
  • Search

AIRHEADS Candy Melting Snowmen

November 20, 2012 by Meaghan Mountford

You probably don’t know this about me, except that I say it every chance I get and seek credit whenever I am able, but I invented the melting snowman cookie. I’ve seen versions of the melting snowman cookie all over the internet, in national magazines, I even heard there was a melting snowman cookie kit for sale out there. Sigh. I’ve been chasing the cookie, whom I’ve named Mr. Melty, since I first created him back in 2008, HERE. I even made some updated cookies, and talked a bit about Mr. Melty’s journey, HERE.  Alas, Mr. Melty belongs to the world (picture me collapsing dramatically, arm draped over forehead).
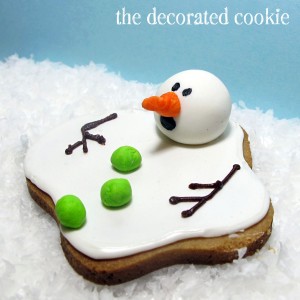
(my original melting snowman cookie, circa 2008)

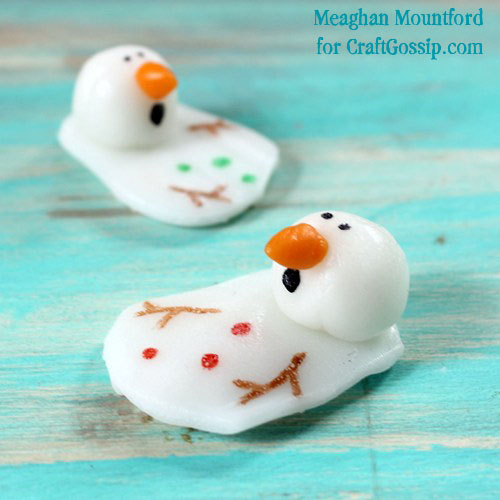
So I went back to the original to find an even easier way to make them, with Airheads candies. Not only can you simply follow the instructions for the original Mr. Melty, then use the White Airheads Bars in place of the fondant, but you can omit the cookie altogether and create a melting snowman entirely out of Airheads Candy.
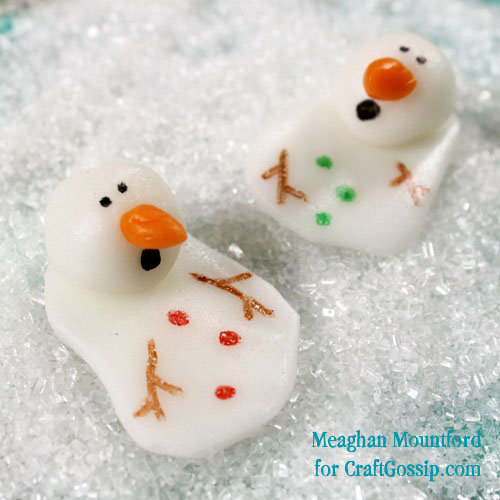
how to make a melting snowman from Airheads candy

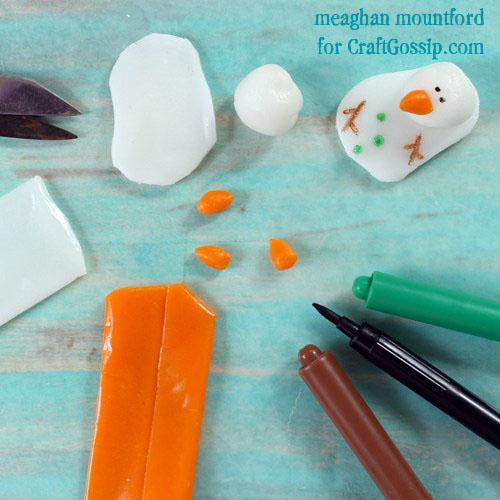
You will need:

white and orange Airheads Bars

scissors

food coloring pens*

light corn syrup (optional)


*Find the food coloring pens in the craft store or online.


What to do:

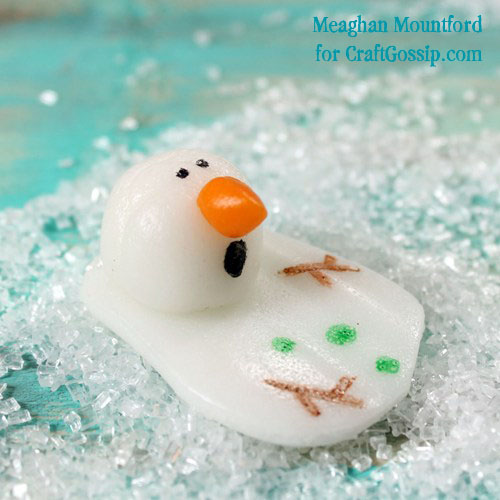
Snip about an inch off of a White Airheads Bar. Roll into a ball. If necessary, microwave for just a few seconds to make the candy easy to roll. From the remaining candy, cut out a wavy circle. Snip a bit off of an Orange Airheads Bar, and pinch into a cone. Smush the white ball on top of the white circle, then smush the orange cone onto the white ball. If needed, add a dab of light corn syrup to help the candy stick, but the candy should stick on its own. With food coloring pens, draw the face, stick arms and buttons.
«
»

Comments

  1. Linda V @ Bubble and Sweet says

    November 26, 2012 at 3:02 am

    Yup every time I see a Mr Melty I think of you 🙂

  2. Jaan L of Tx says

    November 29, 2012 at 9:40 pm

    I agree with Linda V. We know you gave us Mr. Melty, and we truly love him the best.

Have you read?

Mars Bar Dessert Cocktail – A Boozy Twist on a Classic Chocolate Bar

Mars Bars already have everything going for them: caramel, nougat, and silky milk chocolate. But when you turn them into a creamy, boozy cocktail? That’s when magic happens. This Mars Bar Dessert Cocktail is like drinking a chocolate bar milkshake—smooth, rich, and a little bit naughty.

It’s the kind of indulgent drink you make when you want to skip dessert altogether, or when you’re entertaining and need a show-stopping treat in a glass. One sip and you’ll understand why this cocktail is about to become your new guilty pleasure.

Why You’ll Love It

  • Tastes just like a Mars Bar – but with a boozy grown-up kick.

  • Quick to make – blend and pour, no fuss.

  • Perfect for dessert lovers – doubles as a drink and a sweet treat.

  • Customisable – adjust the liqueurs for more chocolate, caramel, or creaminess.

Ingredients (serves 2)

  • 2 x fun-sized Mars Bars, chopped

  • 60ml (2 oz) Baileys Irish Cream

  • 60ml (2 oz) Kahlúa (coffee liqueur)

  • 30ml (1 oz) Butterscotch schnapps (for caramel flavour)

  • ½ cup heavy cream (or vanilla ice cream for a milkshake version)

  • 1 tbsp chocolate syrup

  • Ice cubes

  • Extra chocolate syrup and whipped cream (optional, for garnish)

  • 1 fun-sized Mars Bar, sliced (for garnish)

Method

Step 1 – Prep the glasses
Drizzle chocolate syrup around the inside of two martini or dessert glasses. Pop them into the fridge to chill while you make the cocktail.

Step 2 – Blend it all together
In a blender, combine chopped Mars Bars, Baileys, Kahlúa, Butterscotch schnapps, cream, chocolate syrup, and ice cubes. Blend until smooth and creamy.

Step 3 – Pour and garnish
Divide between the chilled glasses. Top with whipped cream, drizzle of chocolate syrup, and a slice of Mars Bar perched on the rim or skewered on a cocktail stick.

Step 4 – Serve immediately
This cocktail is rich and indulgent—best enjoyed straight away while it’s frosty and fresh.

Variations to Try

  • Frozen Mars Cocktail – blend with extra ice for a thicker, slushy-style drink.

  • Extra Caramel Hit – add a swirl of caramel sauce in the glass before pouring.

  • Lighter Version – swap cream for milk or almond milk for a thinner sip.

  • Over-the-Top Dessert – serve with a scoop of vanilla ice cream right on top.

When to Serve

This Mars Bar Dessert Cocktail is perfect for:

  • Girls’ nights in with snacks and laughter.

  • A cheeky dessert replacement when you want chocolate and booze.

  • Date nights at home (bonus points if you share the last Mars Bar).

  • Festive parties or special occasions where indulgence is the goal.

Mars Bars have a way of making us feel nostalgic and a little bit cheeky—and this cocktail delivers both. Rich, chocolatey, caramel-y, and perfectly boozy, it’s dessert and drink rolled into one.

So if you’ve ever found yourself sneaking a mini Mars Bar from the pantry, imagine blending that same joy into a glass with a splash of liqueur. Trust me: it’s a recipe worth keeping.


Categories

Baked candy chocolate Christmas cookies Craft Inspirations cupcakes Drinks Easter fruit Fun With Food Halloween Holidays kids More Recipes non-sweets Parties & entertaining Recipes Thanksgiving Valentines Day

Menu-Wrapped Peach Placecards. And So Much More.

Mini Monster Cupcakes

Sewing and Quilting Cookies

Cold-Brew Coffee

Fortune Cookies

RSS More Articles

  • Everything You Need to Know about French Knots and Cross Stitch
  • Book Review Wednesday: Bead Jewelry Making For Beginners
  • Book Review Wednesday: Polymer Clay Jewelry
  • Knit a Pastel Plaid Sweater
  • 12 Scrapbookers You Should be Following on Instagram (where are all the blogs? pt. 2)
  • Spiderman Crochet Patterns For Little Superhero Fans
  • Shadow Knitting And Illusion Knitting Shawl Patterns With Hidden Designs
  • Quilting Needles Explained: How to Choose the Right Needle for Piecing and Quilting
  • Superhero Spiderman Star Afghan Pattern
  • Mattress Stitch Crochet: How To Join Crochet Pieces With A Nearly Invisible Seam

Pick Your Blog

  • Sewing
  • Knitting
  • Quilting
  • Crochet
  • Home & Garden
  • Recycled Crafts
  • Scrapbooking
  • Card Making
  • Polymer Clay
  • Cross-Stitch
  • Edible Crafts
  • Felting
  • Glass Art
  • Indie Crafts
  • Kids Crafts
  • Jewelry Making
  • Lesson Plans
  • Needlework
  • Bath & Body
  • Party Ideas
  • Candle Making
  • DIY Weddings
  • Not Craft
  • Free Craft Projects

Explore Edible Crafts

breakfast cake candy chocolate Christmas cookie decorating cookies dessert Easter fruit Halloween Holidays kids lollipop sticks lunch packaging party summer Thanksgiving valentines

Copyright © 2026 · CraftGossip | Start Here | Contact Us | Link to Us | Your Editors | Privacy and affiliate policy