• Home
  • Suggest A DIY
  • DIY Newsletter

Edible Crafts

Creative food craft ideas

  • About CraftGossip
  • Our Network
    • Bath & Body Crafts
    • Candle Making Ideas
    • Crochet Ideas
    • Cross Stitch
    • Edible Crafts
    • Felting Patterns
    • Glass Art
    • Home & Garden Ideas
    • Indie Crafts
    • Jewelry Making
    • Kids Crafts
    • Knitting Patterns
    • Lesson Plans
    • Needlework
    • Party Ideas
    • Polymer Clay
    • Quilting Ideas
    • Recycled Crafts
    • Scrapbooking
    • Sewing Patterns
    • Card Making
    • DIY Weddings
    • Not Craft Ideas
  • Giveaways
  • Roundups
  • Store
  • Search

How To Make Creamy Margarita Popsicles

June 13, 2015 by Carolyn Bickford

creamy margarita popsicles
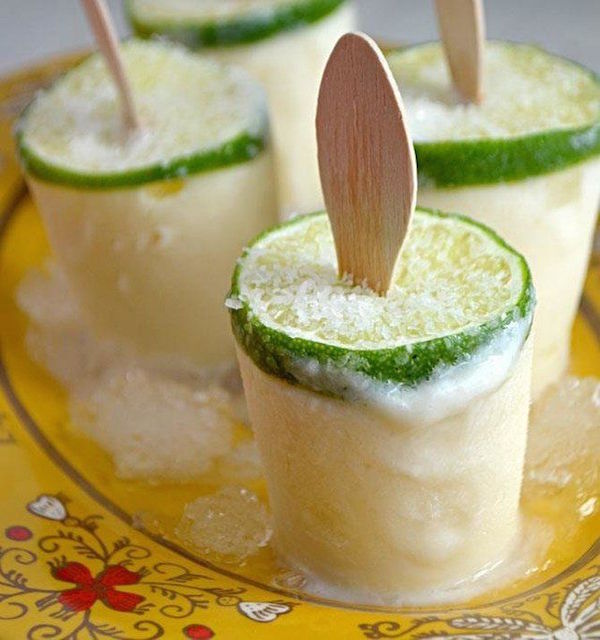
“It’s five o’clock somewhere….” I said that too many times these last couple of months. It did get me thinking about a feature to do on Friday and Saturday nights. I’m going to call it “It’s five o’clock somewhere post…” and will feature drinks for adults. These popsicles would be refreshing on a hot day. Just make sure to properly mark these as adult only, if there are children around.

Click here on Host the Toast for the recipe and directions.

Sugared Lime Rounds for Popsicle Toppings:

Ingredients:

  • 2-3 large limes
  • Granulated sugar
  • Water

Instructions:

  1. Slice the Limes:
    • Wash the limes thoroughly under running water to remove any dirt or residue.
    • Using a sharp knife, slice the limes into thin rounds, about 1/8 to 1/4 inch thick. Remove any seeds if present.
  2. Blanch the Lime Rounds:
    • In a small saucepan, bring water to a boil.
    • Carefully add the lime rounds to the boiling water and blanch them for about 2-3 minutes. This will help soften the peel and remove any bitterness.
  3. Shock the Lime Rounds:
    • After blanching, immediately remove the lime rounds from the boiling water and transfer them to a bowl of ice water. This will stop the cooking process and help retain the vibrant green color of the peel.
  4. Prepare the Sugar Coating:
    • While the lime rounds are chilling in the ice water, prepare a bowl of granulated sugar.
  5. Coat the Lime Rounds:
    • Once the lime rounds have cooled down, remove them from the ice water and pat them dry with a clean kitchen towel.
    • Dip each lime round into the granulated sugar, ensuring it is evenly coated on both sides.
  6. Dry the Sugared Lime Rounds:
    • Place the sugared lime rounds on a wire rack set over a baking sheet, ensuring they are spaced apart and not touching each other.
    • Allow the lime rounds to air dry for several hours or overnight until the sugar coating is dry and hardened.
  7. Use as Popsicle Toppings:
    • Once the sugared lime rounds are completely dry, they are ready to use as toppings for your popsicles.
    • Before serving, simply place a sugared lime round on top of each popsicle for a beautiful and flavorful decoration.
  8. Enjoy:
    • Serve your popsicles with sugared lime round toppings and enjoy the delightful combination of sweet and tangy flavors!

These sugared lime rounds will add a refreshing and vibrant touch to your popsicles, making them perfect for hot summer days or any occasion. Enjoy! 


Related Posts:

  • 20 Festive Things to Make with Canned Crescent Roll Dough
  • Margaritas Under the Mistletoe: Holiday Tequila…
«
»

Have you read?

How to Make Thick Yoghurt Smoothie Bowls in the Ninja Slushie Maker

A quick, creamy breakfast with fresh fruit added on top

Smoothie bowls are one of those beautiful breakfasts that feel healthy and a little indulgent at the same time. Thick, cold, creamy, and pretty enough that you almost don’t want to eat them… almost.

The Ninja Slushie Maker takes all the effort out of it.
Instead of dealing with frozen fruit bricks or blenders that complain loudly, you simply mix your yoghurt base, chill it, and let the Ninja turn it into the perfect thick smoothie-bowl texture — no ice required.

If you are like me and come addicted to these smoothie bowls then you will want to invest in these double walled bowls, this is my favorite brand and these have been great. 

Then you top it with your fresh fruit afterwards so the bowl stays thick, cold, and spoon-worthy.

It’s easy, quick, and a lovely way to start the day.

Why Yoghurt Works So Well in the Ninja Slushie Maker

Yoghurt freezes into a silky, firm slush — similar to soft-serve but healthier and lighter. Because the machine creates the icy texture itself (instead of relying on ice cubes), the mixture never becomes watery or gritty.

Just smooth, cold, creamy perfection you can decorate to your heart’s content.

The Basic Yoghurt Slush Base

Once you learn this base recipe, you can create endless flavour combinations.

Ingredients

  • 2 cups plain or Greek yoghurt, chilled 
  • ½–1 cup milk of your choice (just enough to loosen the mixture) 
  • 1–3 tablespoons honey or maple syrup (optional) 
  • 1 teaspoon vanilla extract (optional) 

Method

  1. Stir all ingredients together until smooth. 
  2. Chill the mixture in the fridge until very cold. 
  3. Pour the chilled mixture into the Ninja Slushie Maker. 
  4. Blend on the slush setting until thick, creamy, and icy. 
  5. Spoon into a bowl and add your fruit and toppings. 

This base has enough body to hold granola, berries, and nut butter without sinking.

Topping Ideas (Add These After Blending)

Fresh Fruit

  • Strawberries 
  • Blueberries 
  • Banana slices 
  • Mango 
  • Kiwi 
  • Peaches 

Crunchy Toppers

  • Granola 
  • Toasted coconut 
  • Chopped nuts 
  • Cacao nibs 

Extras

  • Honey drizzle 
  • Peanut butter 
  • Chia seeds 
  • Freeze-dried fruit crumbs 

Easy Flavour Variations

Berries & Cream Smoothie Bowl

Use vanilla yoghurt as your base. Top with raspberries, strawberries, and a sprinkle of granola.

Tropical Coconut Bowl

Add a splash of coconut milk to the base. Top with mango, pineapple, kiwi, and toasted coconut flakes.

Chocolate Yoghurt Bowl

Mix 1 tablespoon cocoa powder or chocolate protein powder into the base. Top with banana slices and a peanut-butter drizzle.

Meal-Prep Tip

Prepare the yoghurt base the night before and store it in small jars.
In the morning, just pour one jar directly into the Ninja Slushie Maker and you’ve got a thick, cold, ready-to-top breakfast in minutes.


Categories

Baked candy chocolate Christmas cookies Craft Inspirations cupcakes Drinks Easter fruit Fun With Food Halloween Holidays kids More Recipes non-sweets Parties & entertaining Recipes Thanksgiving Valentines Day

White Pizza Pull Apart Bread

Rudolph the Red-Nosed Reindeer Treats

DIY Conversation Hearts

Puppy Bento Box Idea

Thanksgiving Turkey Cupcakes

RSS More Articles

  • Cross Stitch Ice Cream and Frozen Treats
  • 15 Charity Sewing Projects That Let You Sew Something Useful For A Good Cause
  • Sunflower Ribbon Embroidery Tutorials and Kits to Brighten Your Hoop
  • Decorating Mistakes That Make Your Living Room Feel Cluttered
  • Remembering Jill Smokler, Founder Of Scary Mommy
  • In the Garden Layer Cake – A Bloom-Filled Fabric Collection for Spring Sewing
  • How To Do Kitchener Stitch: A Beginner-Friendly Guide To Grafting Knitting Seamlessly
  • Pattern Review: Georgie Granny Square Bucket Hat Crochet Pattern
  • 12 Handmade Patriotic 4th of July Card Ideas
  • Shark Week Learning for Kids

Pick Your Blog

  • Sewing
  • Knitting
  • Quilting
  • Crochet
  • Home & Garden
  • Recycled Crafts
  • Scrapbooking
  • Card Making
  • Polymer Clay
  • Cross-Stitch
  • Edible Crafts
  • Felting
  • Glass Art
  • Indie Crafts
  • Kids Crafts
  • Jewelry Making
  • Lesson Plans
  • Needlework
  • Bath & Body
  • Party Ideas
  • Candle Making
  • DIY Weddings
  • Not Craft
  • Free Craft Projects

Explore Edible Crafts

breakfast cake candy chocolate Christmas cookie decorating cookies dessert Easter fruit Halloween Holidays kids lollipop sticks lunch packaging party summer Thanksgiving valentines

Copyright © 2026 · CraftGossip | Start Here | Contact Us | Link to Us | Your Editors | Privacy and affiliate policy