• Home
  • Suggest A DIY
  • DIY Newsletter

Edible Crafts

Creative food craft ideas

  • About CraftGossip
  • Our Network
    • Bath & Body Crafts
    • Candle Making Ideas
    • Crochet Ideas
    • Cross Stitch
    • Edible Crafts
    • Felting Patterns
    • Glass Art
    • Home & Garden Ideas
    • Indie Crafts
    • Jewelry Making
    • Kids Crafts
    • Knitting Patterns
    • Lesson Plans
    • Needlework
    • Party Ideas
    • Polymer Clay
    • Quilting Ideas
    • Recycled Crafts
    • Scrapbooking
    • Sewing Patterns
    • Card Making
    • DIY Weddings
    • Not Craft Ideas
  • Giveaways
  • Roundups
  • Store
  • Search

How To Make Apple Cider Margaritas

September 24, 2015 by Carolyn Bickford

apple cider margarita
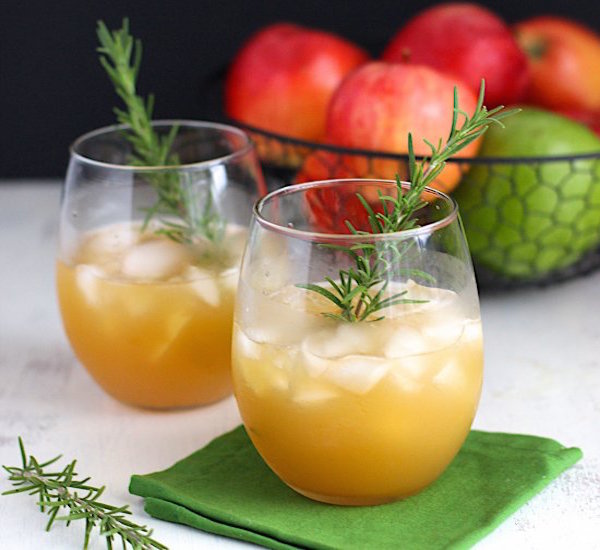
It’s five o’clock somewhere… Actually, it is past five here, but it’s been awhile for an adult beverage. I love apple cider cold or hot. I’m not a big fan of hard cider though! The taste and smell, just not for me. For a fall get together with friends, this would be the perfect beverage to enjoy. As always, drink responsibly!

Click here on A Nerd Cooks for the recipe and directions.


Sweet Sugared Rosemary Sprigs: The Perfect Margarita Cocktail Garnish

Description: Elevate your margarita cocktails with sugared rosemary sprigs. Follow these easy steps to create a beautiful and flavorful garnish that will add a touch of elegance to your drinks!

Ingredients:

  • Fresh rosemary sprigs
  • Granulated sugar
  • Water

Equipment:

  • Small saucepan
  • Spoon
  • Baking sheet
  • Parchment paper

Instructions:

  1. Prepare the Rosemary Sprigs:
    • Rinse the fresh rosemary sprigs under cold water to remove any dirt or debris. Pat them dry gently with a clean kitchen towel.
  2. Create the Sugar Syrup:
    • In a small saucepan, combine equal parts granulated sugar and water. Use enough sugar and water to coat the rosemary sprigs thoroughly. For example, you might start with 1 cup of each.
  3. Heat the Sugar Syrup:
    • Place the saucepan over medium heat and stir the mixture until the sugar is completely dissolved. This will create a simple syrup.
  4. Infuse with Rosemary:
    • Once the sugar has dissolved, add the fresh rosemary sprigs to the saucepan.
    • Allow the rosemary to steep in the sugar syrup for a few minutes to infuse the syrup with its flavor. Be careful not to let the syrup boil.
  5. Coat the Rosemary Sprigs:
    • Using a spoon, carefully remove the rosemary sprigs from the syrup and allow any excess syrup to drip off.
    • Roll each rosemary sprig in granulated sugar until it is completely coated. The sugar will stick to the syrup-infused rosemary, creating a sweet and aromatic coating.
  6. Arrange on Baking Sheet:
    • Line a baking sheet with parchment paper.
    • Place the sugared rosemary sprigs on the prepared baking sheet, ensuring they are spaced apart and not touching each other. This will allow them to dry evenly.
  7. Let Them Dry:
    • Allow the sugared rosemary sprigs to dry on the baking sheet for at least 1-2 hours, or until the sugar coating has hardened.
  8. Garnish Your Margarita:
    • Once the sugared rosemary sprigs are dry, they are ready to use as a garnish for your margarita cocktails.
    • Simply place a few sugared rosemary sprigs on the rim of each glass or float them in the drink for a beautiful presentation and a hint of sweetness and aroma.

Now you have a delightful garnish to enhance your margarita cocktails. These sugared rosemary sprigs will add a touch of elegance and flavor that will impress your guests. Enjoy! Cheers!

Related Posts:

  • 20 Festive Things to Make with Canned Crescent Roll Dough
  • 15 Apple Cider Recipes For Fall
«
»

Comments

  1. A_Nerd_Cooks says

    September 25, 2015 at 2:12 pm

    Thanks for the love!

  2. Carolyn Bickford says

    September 26, 2015 at 9:29 am

    Thanks for my new drink!

Have you read?

How to Make Thick Yoghurt Smoothie Bowls in the Ninja Slushie Maker

A quick, creamy breakfast with fresh fruit added on top

Smoothie bowls are one of those beautiful breakfasts that feel healthy and a little indulgent at the same time. Thick, cold, creamy, and pretty enough that you almost don’t want to eat them… almost.

The Ninja Slushie Maker takes all the effort out of it.
Instead of dealing with frozen fruit bricks or blenders that complain loudly, you simply mix your yoghurt base, chill it, and let the Ninja turn it into the perfect thick smoothie-bowl texture — no ice required.

If you are like me and come addicted to these smoothie bowls then you will want to invest in these double walled bowls, this is my favorite brand and these have been great. 

Then you top it with your fresh fruit afterwards so the bowl stays thick, cold, and spoon-worthy.

It’s easy, quick, and a lovely way to start the day.

Why Yoghurt Works So Well in the Ninja Slushie Maker

Yoghurt freezes into a silky, firm slush — similar to soft-serve but healthier and lighter. Because the machine creates the icy texture itself (instead of relying on ice cubes), the mixture never becomes watery or gritty.

Just smooth, cold, creamy perfection you can decorate to your heart’s content.

The Basic Yoghurt Slush Base

Once you learn this base recipe, you can create endless flavour combinations.

Ingredients

  • 2 cups plain or Greek yoghurt, chilled 
  • ½–1 cup milk of your choice (just enough to loosen the mixture) 
  • 1–3 tablespoons honey or maple syrup (optional) 
  • 1 teaspoon vanilla extract (optional) 

Method

  1. Stir all ingredients together until smooth. 
  2. Chill the mixture in the fridge until very cold. 
  3. Pour the chilled mixture into the Ninja Slushie Maker. 
  4. Blend on the slush setting until thick, creamy, and icy. 
  5. Spoon into a bowl and add your fruit and toppings. 

This base has enough body to hold granola, berries, and nut butter without sinking.

Topping Ideas (Add These After Blending)

Fresh Fruit

  • Strawberries 
  • Blueberries 
  • Banana slices 
  • Mango 
  • Kiwi 
  • Peaches 

Crunchy Toppers

  • Granola 
  • Toasted coconut 
  • Chopped nuts 
  • Cacao nibs 

Extras

  • Honey drizzle 
  • Peanut butter 
  • Chia seeds 
  • Freeze-dried fruit crumbs 

Easy Flavour Variations

Berries & Cream Smoothie Bowl

Use vanilla yoghurt as your base. Top with raspberries, strawberries, and a sprinkle of granola.

Tropical Coconut Bowl

Add a splash of coconut milk to the base. Top with mango, pineapple, kiwi, and toasted coconut flakes.

Chocolate Yoghurt Bowl

Mix 1 tablespoon cocoa powder or chocolate protein powder into the base. Top with banana slices and a peanut-butter drizzle.

Meal-Prep Tip

Prepare the yoghurt base the night before and store it in small jars.
In the morning, just pour one jar directly into the Ninja Slushie Maker and you’ve got a thick, cold, ready-to-top breakfast in minutes.


Categories

Baked candy chocolate Christmas cookies Craft Inspirations cupcakes Drinks Easter fruit Fun With Food Halloween Holidays kids More Recipes non-sweets Parties & entertaining Recipes Thanksgiving Valentines Day

Melted Witch Treats

Every Flavor Cake Labels

Leftover Champagne? Make Truffles

Finale Eggy Homage

PEEPS Holiday Art Contest

RSS More Articles

  • Cross Stitch Ice Cream and Frozen Treats
  • 15 Charity Sewing Projects That Let You Sew Something Useful For A Good Cause
  • Sunflower Ribbon Embroidery Tutorials and Kits to Brighten Your Hoop
  • Decorating Mistakes That Make Your Living Room Feel Cluttered
  • Remembering Jill Smokler, Founder Of Scary Mommy
  • In the Garden Layer Cake – A Bloom-Filled Fabric Collection for Spring Sewing
  • How To Do Kitchener Stitch: A Beginner-Friendly Guide To Grafting Knitting Seamlessly
  • Pattern Review: Georgie Granny Square Bucket Hat Crochet Pattern
  • 12 Handmade Patriotic 4th of July Card Ideas
  • Shark Week Learning for Kids

Pick Your Blog

  • Sewing
  • Knitting
  • Quilting
  • Crochet
  • Home & Garden
  • Recycled Crafts
  • Scrapbooking
  • Card Making
  • Polymer Clay
  • Cross-Stitch
  • Edible Crafts
  • Felting
  • Glass Art
  • Indie Crafts
  • Kids Crafts
  • Jewelry Making
  • Lesson Plans
  • Needlework
  • Bath & Body
  • Party Ideas
  • Candle Making
  • DIY Weddings
  • Not Craft
  • Free Craft Projects

Explore Edible Crafts

breakfast cake candy chocolate Christmas cookie decorating cookies dessert Easter fruit Halloween Holidays kids lollipop sticks lunch packaging party summer Thanksgiving valentines

Copyright © 2026 · CraftGossip | Start Here | Contact Us | Link to Us | Your Editors | Privacy and affiliate policy