• Home
  • Suggest A DIY
  • DIY Newsletter

Edible Crafts

Creative food craft ideas

  • About CraftGossip
  • Our Network
    • Bath & Body Crafts
    • Candle Making Ideas
    • Crochet Ideas
    • Cross Stitch
    • Edible Crafts
    • Felting Patterns
    • Glass Art
    • Home & Garden Ideas
    • Indie Crafts
    • Jewelry Making
    • Kids Crafts
    • Knitting Patterns
    • Lesson Plans
    • Needlework
    • Party Ideas
    • Polymer Clay
    • Quilting Ideas
    • Recycled Crafts
    • Scrapbooking
    • Sewing Patterns
    • Card Making
    • DIY Weddings
    • Not Craft Ideas
  • Giveaways
  • Roundups
  • Store
  • Search

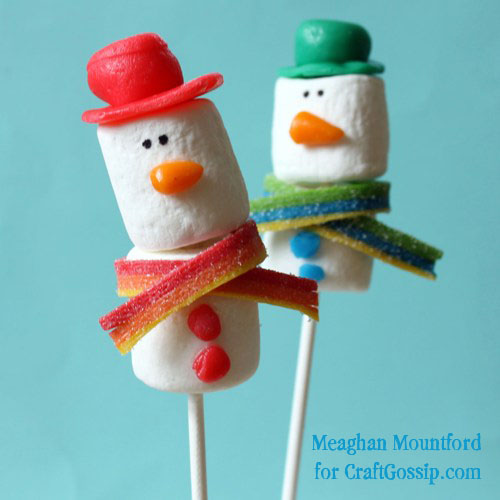
Snowman Marshmallow Pops with Airheads Accessories

November 16, 2012 by Meaghan Mountford

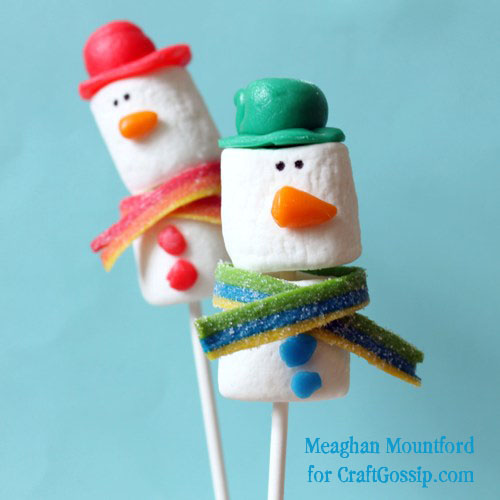
So Airheads sent me some free candy (yes, a lovely perk of this job), and naturally I thought, “What can I make with this?” Accessories for a snowman, of course, because Airheads candy is cut-able, bendable, and mold-able, so perfect for edible crafting. In my box o’ sweets, I got the Rainbow Berry Xtremes and a whole bunch of Airheads bars.

BTW, check out the Airheads seasonal app on Facebook here for some great crafts and contests.



To make snowman marshmallow pops with Airheads:

You will need:

Airheads Rainbow Berry Xtremes and Airheads bars

scissors

marshmallows

lollipop sticks*

black edible writer*

light corn syrup

shortening (optional)

*Find the lollipop sticks and edible writer in the craft store. Go for the 8-inch lollipop sticks if you can, to give you room to skewer the marshmallows.
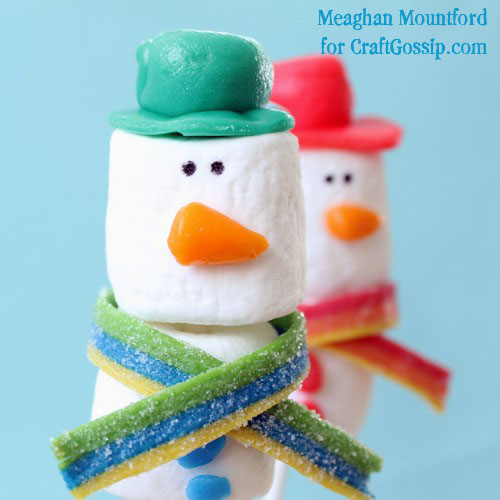
What to do:

Skewer two marshmallows with a lollipop stick. This is easier if you grease the end of the stick a bit with shortening. Then, make your Airheads accessories, attach them to the marshmallows with dabs of light corn syrup, rest on a piece of wax or parchment paper, and let set. Add eyes with the marker. See below for tips on making accessories.
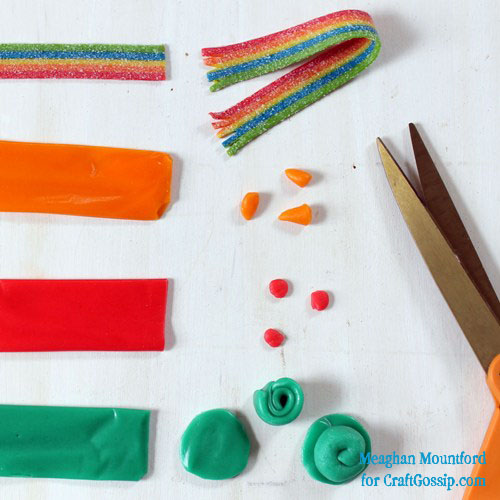
To make the scarf, take a piece of the Rainbow Berry Xtremes and use scissors to make fringe at each end. For slimmer scarves, cut the candy in half lengthwise. To make the carrot noses, snip off a piece of an orange Airheads Bar and use your fingers to mold a cone, flattening the end on the counter. To make the buttons, snip off a piece of any color Airheads Bar, roll a small ball and flatten with your thumb. To make the hat, snip off about 1-inch from any color Airheads Bar, and use scissors to cut a circle. Snip off about 2-inches from the bar, fold in half lengthwise and roll into a spiral, then use a dab of corn syrup to attach to the circle base.


«
»

Comments

  1. Karen Bailey says

    December 11, 2014 at 11:56 pm

    Meaghan, how long must you let the Airhead accessories set on the Marshmallow snowmen? I am wondering if these could be made by children in a group but must know how long it takes to set the pieces for hat, nose, buttons! These are darling!

  2. Carolyn Bickford says

    December 12, 2014 at 8:00 pm

    Karen,
    Unfortunately, Meaghan doesn’t work here anymore. If you give me a couple of days, I can do a test run for you. As long as you don’t use too much corn syrup, I’m guessing a few minutes. I should be able to e-mail you by the end of the weekend. Carolyn

  3. Meaghan Mountford says

    December 12, 2014 at 8:35 pm

    Hi Karen! This popped up in my email for some reason, so I knew to visit the post again! The corn syrup dries best overnight, but they would certainly set well enough for kids to take home (carefully) by the end of an activity. Just have them sit untouched for… maybe 15 to 30 minutes? Then you may want to bring paper cups or small plates for the kids to carry their snowmen home. And Carolyn is right, only a tiny dab of corn syrup is best or else the candy can slide off! A toothpick is the best way to adhere. If you ever have any questions, you’re always welcome to email me at [email protected]. Thanks so much ladies! 🙂

  4. Carolyn Bickford says

    December 13, 2014 at 9:39 am

    Thank you Meaghan! I’ll definitely keep your e-mail handy for other past post questions. I’ll also have to check out your website for ideas.

Have you read?

Quick and Easy Dubai Chocolate-Dipped Dates

I’m completely smitten with the idea of Dubai-style desserts — elegant, a touch exotic, and somehow always Instagram-ready. I haven’t made it to Dubai (yet), but these chocolate-dipped dates bring that luxe, golden glow right into my kitchen. They’re the kind of treat that looks like you spent hours making them, but really, you’re done in under twenty minutes.

They’re sweet, sticky, nutty, and just the right amount of fancy. Perfect for gifting, nibbling with coffee, or impressing that friend who thinks “homemade” means complicated.

Ingredients

  • 12 Medjool dates, pitted 
  • ¼ cup pistachios or almonds (to stuff inside) 
  • 100g dark chocolate (or milk chocolate if you prefer it sweet) 
  • 1 tsp coconut oil (optional, for smoother chocolate) 
  • Crushed pistachios, shredded coconut, or edible gold flakes for decoration 

Instructions

  1. Prep the Dates:
    Slice each date along one side to remove the pit, keeping the date mostly intact. Fill the cavity with a whole almond or a few chopped pistachios. Gently close the date back up.
  2. Melt the Chocolate:
    Place chocolate and coconut oil in a microwave-safe bowl. Heat in 30-second bursts, stirring between each, until smooth and glossy.
  3. Dip and Decorate:
    Dip each stuffed date halfway into the melted chocolate, letting the excess drip off. Lay them on a parchment-lined tray. Before the chocolate sets, sprinkle with crushed pistachios, coconut, or a pinch of edible gold flakes for that Dubai sparkle.
  4. Chill and Serve:
    Pop the tray into the fridge for about 10–15 minutes, just until the chocolate firms up. Serve on a pretty platter or package them in small gift boxes.

Optional Flavor Twists

  • Rose Touch: Add a drop of rose water to the melted chocolate for a floral note. 
  • Saffron Luxe: Dust the top with crushed saffron threads before chilling. 
  • Coffee Kick: Dip in mocha-flavored chocolate for a bolder bite. 

Why You’ll Love These

They’re everything Dubai desserts stand for — rich, refined, and effortlessly elegant. A little old-world tradition wrapped in modern chocolate bliss. Keep a few in the fridge for when you need something sweet but can’t be bothered to turn on the oven.


Categories

Baked candy chocolate Christmas cookies Craft Inspirations cupcakes Drinks Easter fruit Fun With Food Halloween Holidays kids More Recipes non-sweets Parties & entertaining Recipes Thanksgiving Valentines Day

Easter Egg Decorating Ideas: Natural Dyes

Black Beetle Cupcakes

Seven Layer Football Dip

Hot Chocolate Cupcakes

Rabbit Hole Pancakes

RSS More Articles

  • Honey Baby Bear Applique Machine Embroidery Design – Etsy Review
  • 80’s Inspired Boombox Shaped Mini Album
  • How to Crochet the Suzette Stitch: An Easy Textured Crochet Stitch for Beginners
  • Free Baby Star Crochet Pattern: A Cosy Hooded Cocoon for Newborns
  • Sewing Pattern Saturday Review: Snood with Ears Beanie Hat Sewing Pattern (PDF)
  • Peyote Stitch Ring Patterns: Tiny Seed Bead Projects You Can Finish Fast
  • Book Review- Scrappiness Is Happiness – Inside The Book
  • 13 Modern Western Crochet Patterns for Line Dancers, Cowgirls and Horse Lovers
  • 12 Quick Fingering Weight Yarn Knitting Patterns For Using Up Sock Yarn
  • Free Labradoodle Digital Stamps for Card Making and Paper Crafts

Pick Your Blog

  • Sewing
  • Knitting
  • Quilting
  • Crochet
  • Home & Garden
  • Recycled Crafts
  • Scrapbooking
  • Card Making
  • Polymer Clay
  • Cross-Stitch
  • Edible Crafts
  • Felting
  • Glass Art
  • Indie Crafts
  • Kids Crafts
  • Jewelry Making
  • Lesson Plans
  • Needlework
  • Bath & Body
  • Party Ideas
  • Candle Making
  • DIY Weddings
  • Not Craft
  • Free Craft Projects

Explore Edible Crafts

breakfast cake candy chocolate Christmas cookie decorating cookies dessert Easter fruit Halloween Holidays kids lollipop sticks lunch packaging party summer Thanksgiving valentines

Copyright © 2026 · CraftGossip | Start Here | Contact Us | Link to Us | Your Editors | Privacy and affiliate policy