• Home
  • Suggest A DIY
  • DIY Newsletter

Edible Crafts

Creative food craft ideas

  • About CraftGossip
  • Our Network
    • Bath & Body Crafts
    • Candle Making Ideas
    • Crochet Ideas
    • Cross Stitch
    • Edible Crafts
    • Felting Patterns
    • Glass Art
    • Home & Garden Ideas
    • Indie Crafts
    • Jewelry Making
    • Kids Crafts
    • Knitting Patterns
    • Lesson Plans
    • Needlework
    • Party Ideas
    • Polymer Clay
    • Quilting Ideas
    • Recycled Crafts
    • Scrapbooking
    • Sewing Patterns
    • Card Making
    • DIY Weddings
    • Not Craft Ideas
  • Giveaways
  • Roundups
  • Store
  • Search

Easy Way to Clean Corn on the Cob

July 11, 2014 by Carolyn Bickford

Remove-the-Husk-from-the-Cob

The things I learn from Pinterest are wonderful. I can’t get enough of that site, which isn’t always a good thing.

Today, I found what I think is an amazing discovery on Pinterest. I found an easier way to clean the corn and I never knew you could steam the corn in the microwave. All these years, I’ve been husking the corn for steaming on the stove.

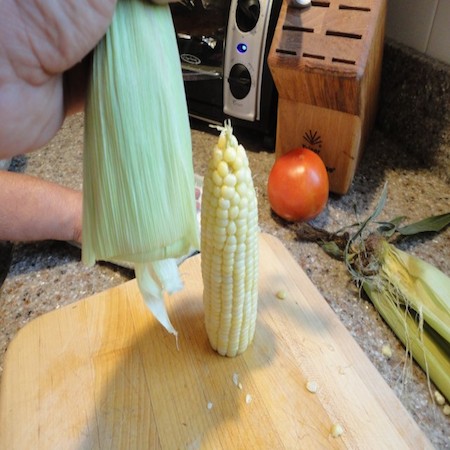
We are not Foodies shows us how to clean the corn hassle free. It took 35 years to come up with this wonderful concept, but I’m thankful they were willing to share it. Before they cleaned the corn and then steam it in the microwave. Now they put the corn, husk all, into the microwave. They steam the corn in the microwave for at least 3 1/2 minutes. Remember all microwaves are different, so it may take longer or less for some. After steaming in the microwave, remove the corn, cut the bottom and slide out the clean corn.

I can’t wait to get fresh corn on the cob from the Farmer’s Market.

Click on the webpage in blue for direction and some other recipes.

Check out this Corn on the Cob cookbook.

Related Posts:

  • How To Make Stovetop Popcorn at Home
  • 35 Make Ahead Christmas Brunch Ideas
«
»

Comments

  1. Beverly Morgan says

    July 12, 2014 at 7:53 pm

    Woops! Sorry to tell you, but all these tips that talk about leaving the husk on the corn to cook it, forget one important danger with this. All corn, except for totally organically grown corn, has been dusted with pesticides to kill corn worms. Before corn is cooked, it needs to have the husk and silk removed and cut off the pointed tip end. This is the open end where the pesticide dust is applied. To cook corn safely, after you’ve husked, silked, & sliced off the tip end (about 1/2 inch), wash thoroughly with a vegetable brush, wrap each ear in waxed paper, place on a paper plate and microwave for about 3 1/2 minutes or until tender. I am a retired University Food Safety Agent.

  2. P Bernard says

    July 20, 2014 at 3:12 pm

    In response to the pesticides on corn – Purchase organic corn. Organic corn isn’t full of pesticides. The microwave cooking method is just great, and the corn has a nice flavor. I soak the corn unhusked in water for a few minutes, cut off the tip end where there usually are no kernels and cut the ‘handle’ end off. I cook the corn in the microwave 2.5 minutes on one side then turn it over for about the same time on the other side. Usually the corn steams a bit while dinner preparation is completed. Take a terry kitchen towel with one hand and push the husks off with the other hand. These cooking thoughts are for one or two ears of corn.

Have you read?

How to Make Thick Yoghurt Smoothie Bowls in the Ninja Slushie Maker

A quick, creamy breakfast with fresh fruit added on top

Smoothie bowls are one of those beautiful breakfasts that feel healthy and a little indulgent at the same time. Thick, cold, creamy, and pretty enough that you almost don’t want to eat them… almost.

The Ninja Slushie Maker takes all the effort out of it.
Instead of dealing with frozen fruit bricks or blenders that complain loudly, you simply mix your yoghurt base, chill it, and let the Ninja turn it into the perfect thick smoothie-bowl texture — no ice required.

If you are like me and come addicted to these smoothie bowls then you will want to invest in these double walled bowls, this is my favorite brand and these have been great. 

Then you top it with your fresh fruit afterwards so the bowl stays thick, cold, and spoon-worthy.

It’s easy, quick, and a lovely way to start the day.

Why Yoghurt Works So Well in the Ninja Slushie Maker

Yoghurt freezes into a silky, firm slush — similar to soft-serve but healthier and lighter. Because the machine creates the icy texture itself (instead of relying on ice cubes), the mixture never becomes watery or gritty.

Just smooth, cold, creamy perfection you can decorate to your heart’s content.

The Basic Yoghurt Slush Base

Once you learn this base recipe, you can create endless flavour combinations.

Ingredients

  • 2 cups plain or Greek yoghurt, chilled 
  • ½–1 cup milk of your choice (just enough to loosen the mixture) 
  • 1–3 tablespoons honey or maple syrup (optional) 
  • 1 teaspoon vanilla extract (optional) 

Method

  1. Stir all ingredients together until smooth. 
  2. Chill the mixture in the fridge until very cold. 
  3. Pour the chilled mixture into the Ninja Slushie Maker. 
  4. Blend on the slush setting until thick, creamy, and icy. 
  5. Spoon into a bowl and add your fruit and toppings. 

This base has enough body to hold granola, berries, and nut butter without sinking.

Topping Ideas (Add These After Blending)

Fresh Fruit

  • Strawberries 
  • Blueberries 
  • Banana slices 
  • Mango 
  • Kiwi 
  • Peaches 

Crunchy Toppers

  • Granola 
  • Toasted coconut 
  • Chopped nuts 
  • Cacao nibs 

Extras

  • Honey drizzle 
  • Peanut butter 
  • Chia seeds 
  • Freeze-dried fruit crumbs 

Easy Flavour Variations

Berries & Cream Smoothie Bowl

Use vanilla yoghurt as your base. Top with raspberries, strawberries, and a sprinkle of granola.

Tropical Coconut Bowl

Add a splash of coconut milk to the base. Top with mango, pineapple, kiwi, and toasted coconut flakes.

Chocolate Yoghurt Bowl

Mix 1 tablespoon cocoa powder or chocolate protein powder into the base. Top with banana slices and a peanut-butter drizzle.

Meal-Prep Tip

Prepare the yoghurt base the night before and store it in small jars.
In the morning, just pour one jar directly into the Ninja Slushie Maker and you’ve got a thick, cold, ready-to-top breakfast in minutes.


Categories

Baked candy chocolate Christmas cookies Craft Inspirations cupcakes Drinks Easter fruit Fun With Food Halloween Holidays kids More Recipes non-sweets Parties & entertaining Recipes Thanksgiving Valentines Day

Potato Chip Blondie Christmas Tree

Halloween Candy Wrapper Templates

White Chocolate Candy Apple Mummy

Orange Velvet Whoopie Pie Pumpkins

Rainbow Cake on a Stick

RSS More Articles

  • Cross Stitch Ice Cream and Frozen Treats
  • 15 Charity Sewing Projects That Let You Sew Something Useful For A Good Cause
  • Sunflower Ribbon Embroidery Tutorials and Kits to Brighten Your Hoop
  • Decorating Mistakes That Make Your Living Room Feel Cluttered
  • Remembering Jill Smokler, Founder Of Scary Mommy
  • In the Garden Layer Cake – A Bloom-Filled Fabric Collection for Spring Sewing
  • How To Do Kitchener Stitch: A Beginner-Friendly Guide To Grafting Knitting Seamlessly
  • Pattern Review: Georgie Granny Square Bucket Hat Crochet Pattern
  • 12 Handmade Patriotic 4th of July Card Ideas
  • Shark Week Learning for Kids

Pick Your Blog

  • Sewing
  • Knitting
  • Quilting
  • Crochet
  • Home & Garden
  • Recycled Crafts
  • Scrapbooking
  • Card Making
  • Polymer Clay
  • Cross-Stitch
  • Edible Crafts
  • Felting
  • Glass Art
  • Indie Crafts
  • Kids Crafts
  • Jewelry Making
  • Lesson Plans
  • Needlework
  • Bath & Body
  • Party Ideas
  • Candle Making
  • DIY Weddings
  • Not Craft
  • Free Craft Projects

Explore Edible Crafts

breakfast cake candy chocolate Christmas cookie decorating cookies dessert Easter fruit Halloween Holidays kids lollipop sticks lunch packaging party summer Thanksgiving valentines

Copyright © 2026 · CraftGossip | Start Here | Contact Us | Link to Us | Your Editors | Privacy and affiliate policy