• Home
  • Suggest A DIY
  • DIY Newsletter

Edible Crafts

Creative food craft ideas

  • About CraftGossip
  • Our Network
    • Bath & Body Crafts
    • Candle Making Ideas
    • Crochet Ideas
    • Cross Stitch
    • Edible Crafts
    • Felting Patterns
    • Glass Art
    • Home & Garden Ideas
    • Indie Crafts
    • Jewelry Making
    • Kids Crafts
    • Knitting Patterns
    • Lesson Plans
    • Needlework
    • Party Ideas
    • Polymer Clay
    • Quilting Ideas
    • Recycled Crafts
    • Scrapbooking
    • Sewing Patterns
    • Card Making
    • DIY Weddings
    • Not Craft Ideas
  • Giveaways
  • Roundups
  • Store
  • Search

Simple Perfect Pancake Recipe

September 28, 2015 by Carolyn Bickford

simple perfect pancakes
We love pancakes, but don’t eat them often. I admit that we use Bisquick mix to make our pancakes. We both grew up with pancakes made that way. How were we supposed to know that you could make your own? I’ve never been that confident in the kitchen, but I’m getting better and trying new things. Thankfully, I haven’t sent anyone to the hospital with food poisoning. I’ll be trying to make pancakes from scratch and Bisquick, and see if they can tell the difference.

Click here on Mini Pie Kitchen for the recipe and directions.

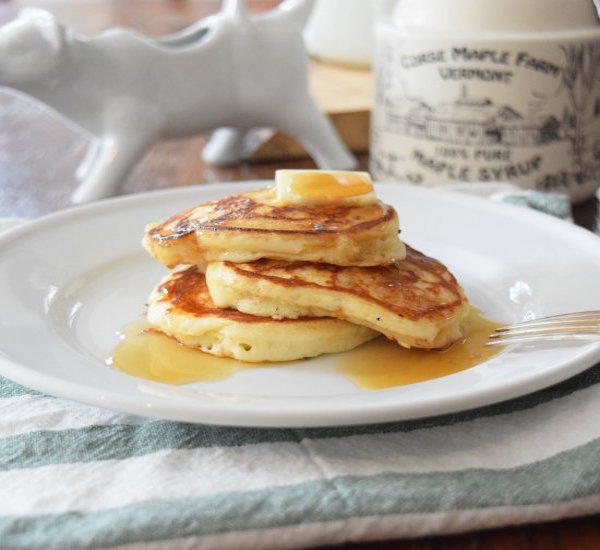
Here’s a fail-proof recipe reminiscent of grandma’s kitchen, ensuring light and airy pancakes every time.

Basic Pancake Recipe

Ingredients:

  • 1 ½ cups all-purpose flour
  • 3 ½ teaspoons baking powder
  • 1 tablespoon white sugar
  • ¼ teaspoon salt
  • 1 ¼ cups milk
  • 1 large egg
  • 3 tablespoons butter, melted
  • 1 teaspoon pure vanilla extract (optional)

Instructions:

  1. Prepare Dry Ingredients: In a large bowl, sift together the flour, baking powder, sugar, and salt.
  2. Combine Wet Ingredients: In a separate bowl, whisk the milk, egg, melted butter, and vanilla extract until well combined.
  3. Mix Batter: Create a well in the center of the dry ingredients and pour in the wet mixture. Stir gently until just combined; the batter should remain slightly lumpy to ensure fluffiness.
  4. Rest Batter: Allow the batter to rest for about 5 minutes. This helps in achieving a lighter texture.
  5. Heat Griddle: Preheat a non-stick skillet or griddle over medium-high heat and lightly grease it with butter or oil.
  6. Cook Pancakes: Pour approximately ¼ cup of batter onto the griddle for each pancake. Cook until bubbles form on the surface and the edges appear set, about 2-3 minutes. Flip and cook the other side until golden brown.
  7. Serve: Serve warm with your choice of toppings, such as maple syrup, fresh berries, or a pat of butter.

This recipe is inspired by traditional methods that emphasize simplicity and quality ingredients, ensuring each pancake is tender and flavorful.

Related Posts:

  • 20 Palate Pleasing Slab Pies
  • 30 Easy Things To Make For A Brunch Potluck Share A Plate
«
»

Comments

  1. Barb Destin says

    September 29, 2015 at 8:00 am

    This is the recipe I learned as a very young girl and had no trouble remembering:

    1 c. milk
    1 egg
    1 tsp baking powder
    I c. flour

    Over the years I got a feel for when the local conditions meant that I should add an extra spoonful of flour or milk.

    To make sure that they won’t stick to the pan get the pan hot before you add the oil and the oil hot before you add the batter.

    In home ec. I learned that you don’t flip them until you notice that the batter on the edges is no longer liquid.

  2. Carolyn Bickford says

    September 29, 2015 at 10:01 am

    Barb, Thank you for your recipe and information. It is a very easy recipe to remember.

Have you read?

How to Make Thick Yoghurt Smoothie Bowls in the Ninja Slushie Maker

A quick, creamy breakfast with fresh fruit added on top

Smoothie bowls are one of those beautiful breakfasts that feel healthy and a little indulgent at the same time. Thick, cold, creamy, and pretty enough that you almost don’t want to eat them… almost.

The Ninja Slushie Maker takes all the effort out of it.
Instead of dealing with frozen fruit bricks or blenders that complain loudly, you simply mix your yoghurt base, chill it, and let the Ninja turn it into the perfect thick smoothie-bowl texture — no ice required.

If you are like me and come addicted to these smoothie bowls then you will want to invest in these double walled bowls, this is my favorite brand and these have been great. 

Then you top it with your fresh fruit afterwards so the bowl stays thick, cold, and spoon-worthy.

It’s easy, quick, and a lovely way to start the day.

Why Yoghurt Works So Well in the Ninja Slushie Maker

Yoghurt freezes into a silky, firm slush — similar to soft-serve but healthier and lighter. Because the machine creates the icy texture itself (instead of relying on ice cubes), the mixture never becomes watery or gritty.

Just smooth, cold, creamy perfection you can decorate to your heart’s content.

The Basic Yoghurt Slush Base

Once you learn this base recipe, you can create endless flavour combinations.

Ingredients

  • 2 cups plain or Greek yoghurt, chilled 
  • ½–1 cup milk of your choice (just enough to loosen the mixture) 
  • 1–3 tablespoons honey or maple syrup (optional) 
  • 1 teaspoon vanilla extract (optional) 

Method

  1. Stir all ingredients together until smooth. 
  2. Chill the mixture in the fridge until very cold. 
  3. Pour the chilled mixture into the Ninja Slushie Maker. 
  4. Blend on the slush setting until thick, creamy, and icy. 
  5. Spoon into a bowl and add your fruit and toppings. 

This base has enough body to hold granola, berries, and nut butter without sinking.

Topping Ideas (Add These After Blending)

Fresh Fruit

  • Strawberries 
  • Blueberries 
  • Banana slices 
  • Mango 
  • Kiwi 
  • Peaches 

Crunchy Toppers

  • Granola 
  • Toasted coconut 
  • Chopped nuts 
  • Cacao nibs 

Extras

  • Honey drizzle 
  • Peanut butter 
  • Chia seeds 
  • Freeze-dried fruit crumbs 

Easy Flavour Variations

Berries & Cream Smoothie Bowl

Use vanilla yoghurt as your base. Top with raspberries, strawberries, and a sprinkle of granola.

Tropical Coconut Bowl

Add a splash of coconut milk to the base. Top with mango, pineapple, kiwi, and toasted coconut flakes.

Chocolate Yoghurt Bowl

Mix 1 tablespoon cocoa powder or chocolate protein powder into the base. Top with banana slices and a peanut-butter drizzle.

Meal-Prep Tip

Prepare the yoghurt base the night before and store it in small jars.
In the morning, just pour one jar directly into the Ninja Slushie Maker and you’ve got a thick, cold, ready-to-top breakfast in minutes.


Categories

Baked candy chocolate Christmas cookies Craft Inspirations cupcakes Drinks Easter fruit Fun With Food Halloween Holidays kids More Recipes non-sweets Parties & entertaining Recipes Thanksgiving Valentines Day

Cupcakes in the Evening

Edible Crafts – Christmas Fruit Wreath

Midweek Easy Dinner – Cheese And Mac Toasties

Message Brownie Bites

Hand Painted Cookies

RSS More Articles

  • Cross Stitch Ice Cream and Frozen Treats
  • 15 Charity Sewing Projects That Let You Sew Something Useful For A Good Cause
  • Sunflower Ribbon Embroidery Tutorials and Kits to Brighten Your Hoop
  • Decorating Mistakes That Make Your Living Room Feel Cluttered
  • Remembering Jill Smokler, Founder Of Scary Mommy
  • In the Garden Layer Cake – A Bloom-Filled Fabric Collection for Spring Sewing
  • How To Do Kitchener Stitch: A Beginner-Friendly Guide To Grafting Knitting Seamlessly
  • Pattern Review: Georgie Granny Square Bucket Hat Crochet Pattern
  • 12 Handmade Patriotic 4th of July Card Ideas
  • Shark Week Learning for Kids

Pick Your Blog

  • Sewing
  • Knitting
  • Quilting
  • Crochet
  • Home & Garden
  • Recycled Crafts
  • Scrapbooking
  • Card Making
  • Polymer Clay
  • Cross-Stitch
  • Edible Crafts
  • Felting
  • Glass Art
  • Indie Crafts
  • Kids Crafts
  • Jewelry Making
  • Lesson Plans
  • Needlework
  • Bath & Body
  • Party Ideas
  • Candle Making
  • DIY Weddings
  • Not Craft
  • Free Craft Projects

Explore Edible Crafts

breakfast cake candy chocolate Christmas cookie decorating cookies dessert Easter fruit Halloween Holidays kids lollipop sticks lunch packaging party summer Thanksgiving valentines

Copyright © 2026 · CraftGossip | Start Here | Contact Us | Link to Us | Your Editors | Privacy and affiliate policy