• Home
  • Suggest A DIY
  • DIY Newsletter

Edible Crafts

Creative food craft ideas

  • About CraftGossip
  • Our Network
    • Bath & Body Crafts
    • Candle Making Ideas
    • Crochet Ideas
    • Cross Stitch
    • Edible Crafts
    • Felting Patterns
    • Glass Art
    • Home & Garden Ideas
    • Indie Crafts
    • Jewelry Making
    • Kids Crafts
    • Knitting Patterns
    • Lesson Plans
    • Needlework
    • Party Ideas
    • Polymer Clay
    • Quilting Ideas
    • Recycled Crafts
    • Scrapbooking
    • Sewing Patterns
    • Card Making
    • DIY Weddings
    • Not Craft Ideas
  • Giveaways
  • Roundups
  • Store
  • Search

How To Make A Peach Margarita

May 5, 2016 by Carolyn Bickford

peach margarita
Normally I try to post drinks after five, but it’s Cinco de Mayo. A celebration of Mexico defeating France in 1862 during the Mexico-France War on May 5th. Yes, we can be educational and enjoy playing with food. This margarita drink is brought to you by the letter C for Celebrating Sweets. Thank you Allison for sharing this recipe and links to other recipes to enjoy Cinco de Mayo.

Click here on Celebrating Sweets for the recipe and directions.


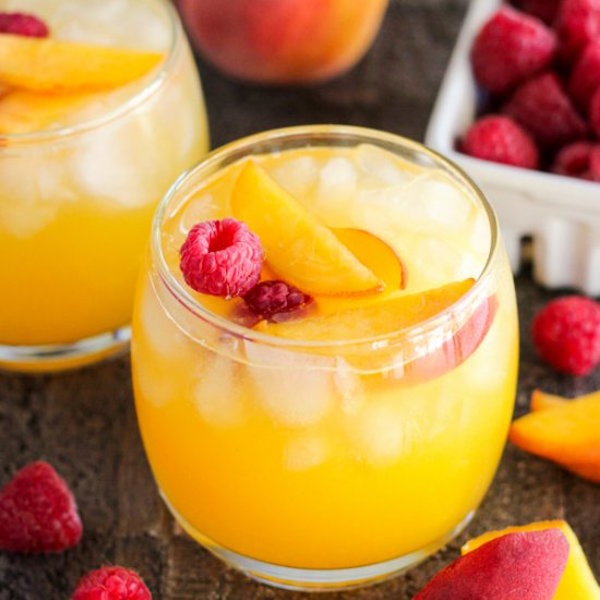
Homemade DIY Dry Peaches for the Perfect Peach Margarita

Description: Elevate your peach margarita game with these DIY dried peaches. Learn how to make them at home and infuse your cocktails with intense peach flavor that will impress your guests!

Ingredients:

  • Ripe peaches
  • Lemon juice (optional, for preserving color)
  • Sugar (optional, for added sweetness)

Equipment:

  • Sharp knife
  • Cutting board
  • Baking sheet
  • Parchment paper
  • Oven or food dehydrator

Instructions:

  1. Prepare the Peaches:
    • Wash the peaches thoroughly under cold water to remove any dirt or residue.
    • Pat the peaches dry with a clean kitchen towel.
  2. Slice the Peaches:
    • Using a sharp knife and cutting board, slice the peaches into thin, even slices. Aim for slices that are around 1/4 to 1/8 inch thick. Discard the pits.
  3. Optional: Treat with Lemon Juice:
    • To prevent the peaches from oxidizing and maintain their vibrant color, you can dip the peach slices in lemon juice. Simply place the slices in a bowl and toss them with lemon juice until coated.
  4. Preheat Your Oven or Food Dehydrator:
    • If using an oven, preheat it to the lowest setting, typically around 140°F (60°C) or the lowest temperature available.
    • If using a food dehydrator, follow the manufacturer’s instructions for preheating.
  5. Arrange the Peach Slices:
    • Line a baking sheet with parchment paper or prepare the trays of your food dehydrator.
    • Arrange the peach slices in a single layer, ensuring they are not touching or overlapping. This allows for proper air circulation and even drying.
  6. Dry the Peaches:
    • Place the baking sheet in the preheated oven or load the trays into the food dehydrator.
    • Let the peaches dry slowly until they are shriveled and no longer moist. This process can take anywhere from 6 to 12 hours, depending on the thickness of the slices and the humidity levels.
  7. Optional: Dust with Sugar:
    • If you prefer sweeter dried peaches, you can lightly dust them with granulated sugar after they have dried. This adds a touch of sweetness and enhances the flavor.
  8. Store the Dried Peaches:
    • Once the peach slices are completely dried and cooled, transfer them to an airtight container or resealable plastic bags.
    • Store the dried peaches in a cool, dry place away from direct sunlight. They will keep for several months if properly stored.

Now that you have your homemade dried peaches, you can use them to garnish your peach margaritas or enjoy them as a snack on their own. Get ready to take your cocktails to the next level with these deliciously fruity additions! Cheers!

Related Posts:

  • 20 Festive Things to Make with Canned Crescent Roll Dough
  • The Ultimate Ninja Slushie Maker Recipe Guide
«
»

Have you read?

How to Make Thick Yoghurt Smoothie Bowls in the Ninja Slushie Maker

A quick, creamy breakfast with fresh fruit added on top

Smoothie bowls are one of those beautiful breakfasts that feel healthy and a little indulgent at the same time. Thick, cold, creamy, and pretty enough that you almost don’t want to eat them… almost.

The Ninja Slushie Maker takes all the effort out of it.
Instead of dealing with frozen fruit bricks or blenders that complain loudly, you simply mix your yoghurt base, chill it, and let the Ninja turn it into the perfect thick smoothie-bowl texture — no ice required.

If you are like me and come addicted to these smoothie bowls then you will want to invest in these double walled bowls, this is my favorite brand and these have been great. 

Then you top it with your fresh fruit afterwards so the bowl stays thick, cold, and spoon-worthy.

It’s easy, quick, and a lovely way to start the day.

Why Yoghurt Works So Well in the Ninja Slushie Maker

Yoghurt freezes into a silky, firm slush — similar to soft-serve but healthier and lighter. Because the machine creates the icy texture itself (instead of relying on ice cubes), the mixture never becomes watery or gritty.

Just smooth, cold, creamy perfection you can decorate to your heart’s content.

The Basic Yoghurt Slush Base

Once you learn this base recipe, you can create endless flavour combinations.

Ingredients

  • 2 cups plain or Greek yoghurt, chilled 
  • ½–1 cup milk of your choice (just enough to loosen the mixture) 
  • 1–3 tablespoons honey or maple syrup (optional) 
  • 1 teaspoon vanilla extract (optional) 

Method

  1. Stir all ingredients together until smooth. 
  2. Chill the mixture in the fridge until very cold. 
  3. Pour the chilled mixture into the Ninja Slushie Maker. 
  4. Blend on the slush setting until thick, creamy, and icy. 
  5. Spoon into a bowl and add your fruit and toppings. 

This base has enough body to hold granola, berries, and nut butter without sinking.

Topping Ideas (Add These After Blending)

Fresh Fruit

  • Strawberries 
  • Blueberries 
  • Banana slices 
  • Mango 
  • Kiwi 
  • Peaches 

Crunchy Toppers

  • Granola 
  • Toasted coconut 
  • Chopped nuts 
  • Cacao nibs 

Extras

  • Honey drizzle 
  • Peanut butter 
  • Chia seeds 
  • Freeze-dried fruit crumbs 

Easy Flavour Variations

Berries & Cream Smoothie Bowl

Use vanilla yoghurt as your base. Top with raspberries, strawberries, and a sprinkle of granola.

Tropical Coconut Bowl

Add a splash of coconut milk to the base. Top with mango, pineapple, kiwi, and toasted coconut flakes.

Chocolate Yoghurt Bowl

Mix 1 tablespoon cocoa powder or chocolate protein powder into the base. Top with banana slices and a peanut-butter drizzle.

Meal-Prep Tip

Prepare the yoghurt base the night before and store it in small jars.
In the morning, just pour one jar directly into the Ninja Slushie Maker and you’ve got a thick, cold, ready-to-top breakfast in minutes.


Categories

Baked candy chocolate Christmas cookies Craft Inspirations cupcakes Drinks Easter fruit Fun With Food Halloween Holidays kids More Recipes non-sweets Parties & entertaining Recipes Thanksgiving Valentines Day

Easier-Than-You-Think Fancy Chocolate-Covered Oreos

The Best Turkey Burger Recipes

Mug O’ Cake from Your Microwave

Music and Cocktails, Made for Each Other

Buddha Pudding Molds

RSS More Articles

  • Cross Stitch Ice Cream and Frozen Treats
  • 15 Charity Sewing Projects That Let You Sew Something Useful For A Good Cause
  • Sunflower Ribbon Embroidery Tutorials and Kits to Brighten Your Hoop
  • Decorating Mistakes That Make Your Living Room Feel Cluttered
  • Remembering Jill Smokler, Founder Of Scary Mommy
  • In the Garden Layer Cake – A Bloom-Filled Fabric Collection for Spring Sewing
  • How To Do Kitchener Stitch: A Beginner-Friendly Guide To Grafting Knitting Seamlessly
  • Pattern Review: Georgie Granny Square Bucket Hat Crochet Pattern
  • 12 Handmade Patriotic 4th of July Card Ideas
  • Shark Week Learning for Kids

Pick Your Blog

  • Sewing
  • Knitting
  • Quilting
  • Crochet
  • Home & Garden
  • Recycled Crafts
  • Scrapbooking
  • Card Making
  • Polymer Clay
  • Cross-Stitch
  • Edible Crafts
  • Felting
  • Glass Art
  • Indie Crafts
  • Kids Crafts
  • Jewelry Making
  • Lesson Plans
  • Needlework
  • Bath & Body
  • Party Ideas
  • Candle Making
  • DIY Weddings
  • Not Craft
  • Free Craft Projects

Explore Edible Crafts

breakfast cake candy chocolate Christmas cookie decorating cookies dessert Easter fruit Halloween Holidays kids lollipop sticks lunch packaging party summer Thanksgiving valentines

Copyright © 2026 · CraftGossip | Start Here | Contact Us | Link to Us | Your Editors | Privacy and affiliate policy