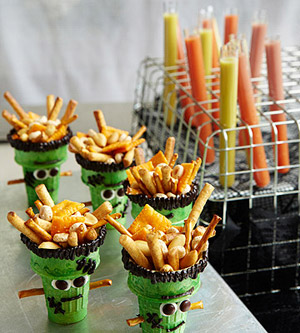
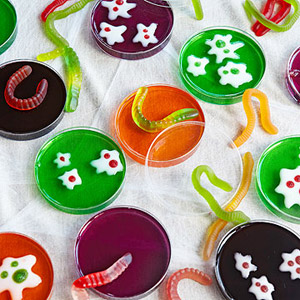
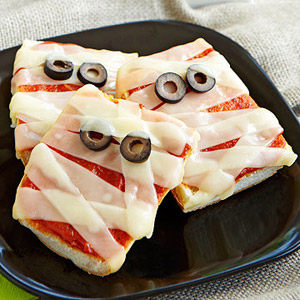
Find a roundup of Halloween decorations and party treat ideas HERE at Parents, including these Frankenstein “nuts and bolts” snacks, petri dish jigglers, and mummy pizza.
Creative food craft ideas
Find a roundup of Halloween decorations and party treat ideas HERE at Parents, including these Frankenstein “nuts and bolts” snacks, petri dish jigglers, and mummy pizza.
There is something ridiculously satisfying about pulling a tray of homemade granola from the oven.
Maybe it is the smell of toasted oats and cinnamon. Maybe it is the fact that you can finally make a batch with exactly the right amount of nuts, fruit and crunchy clusters instead of buying a bag where all the good bits seem to have disappeared before you even open it.
And homemade granola really isn’t complicated.
At its most basic, granola is rolled oats tossed with a little oil and sweetener, then baked until golden and crisp. From there you can add nuts, seeds, coconut, dried fruit, chocolate, spices or pretty much whatever is hanging around in the pantry.
If you’ve been wondering how to make granola at home, these recipes are a very good place to start.
Most homemade granola recipes start with old-fashioned rolled oats rather than quick oats. The oats are mixed with ingredients such as nuts, seeds and coconut, then coated with a combination of oil and a sweetener such as honey or maple syrup before baking.
One little trick worth remembering: add dried fruit after baking. It doesn’t need the extra oven time and can become hard or overly chewy if baked with the oats.
And if those lovely chunky granola clusters are your favourite part, resist the temptation to stir the tray constantly. Pressing the mixture together and allowing it to cool before breaking it apart helps create bigger pieces. Love & Lemons uses almond butter as an additional binder and presses the granola into a thick layer to encourage clusters.
This is the sort of granola recipe I’d recommend to someone making homemade granola for the very first time.
Cookie and Kate’s version uses rolled oats, nuts, coconut oil and maple syrup or honey, with plenty of room to change the nuts and dried fruit depending on what you already have. It makes a generous batch too, which is handy if granola tends to mysteriously disappear from the pantry at your house.
The recipe is naturally sweetened rather than relying on refined sugar, and the method is straightforward enough for beginner cooks.
If you are the person who digs through the granola bag looking for the enormous crunchy pieces, try this one.
Love & Lemons combines rolled oats, walnuts, coconut, maple syrup and almond butter. The almond butter helps everything stick together, while the granola is initially baked in a pressed layer before being gently broken apart.
It is also one of those useful base recipes where you can swap walnuts for almonds, change the dried fruit or use peanut butter instead of almond butter.
Honey and almonds are a classic granola combination for good reason.
This is the kind of simple batch I’d keep around for sprinkling over Greek yogurt, adding to breakfast parfaits or simply eating by the handful while supposedly looking for something else in the pantry.
It is especially good if you prefer honey over maple syrup and want a traditional crunchy homemade granola without a huge ingredient list.
Orange zest is such a clever way of changing the flavour of an otherwise simple batch of granola.
This recipe combines orange and honey with toasted almonds, vanilla and cinnamon, giving you something that feels a little more special without requiring unusual ingredients.
I’d serve this one with thick yogurt and fresh berries, or pop it into jars for an easy homemade food gift. The recipe makes around eight cups, so there’s plenty to share.
Peanut butter lovers, this one is worth bookmarking.
Ambitious Kitchen’s recipe uses just five main ingredients and adds chia seeds to the mix. It takes around 25 minutes from start to finish, making it particularly handy when you’ve reached into the cereal cupboard and discovered someone has finished everything again.
Peanut butter also helps give homemade granola those satisfying chunky pieces, and this version works beautifully over banana and yogurt.
Granola doesn’t always have to pretend it is terribly sensible.
This chocolate version from Sally’s Baking combines cocoa with oats, coconut oil, brown sugar and honey before adding chocolate chips and chocolate-covered raisins.
Adding some of the chocolate while the granola is still warm allows it to melt into the mixture and helps create those larger chocolatey clusters. I’d happily serve this as breakfast, but it could just as easily pass as an afternoon snack or a crunchy topping for vanilla ice cream.
Chocolate and peanut butter rarely need much convincing.
This seven-ingredient granola combines peanut butter, cocoa, oats, honey and coconut oil, with optional chocolate chips and an extra peanut butter drizzle.
The recipe makes around three to four cups and is particularly good if you want homemade granola that feels a little more like a treat while still being based around pantry staples.
This is the granola to make when pumpkin spice season rolls around.
Two Peas & Their Pod uses pumpkin puree, applesauce and maple syrup with pumpkin pie spice, cinnamon and nutmeg. Dried cranberries and pepitas are stirred through once the granola has baked.
Interestingly, the pumpkin and applesauce help bind the oats without needing butter or oil. The finished granola works beautifully with yogurt, milk or simply eaten as a crunchy snack.
Granola without oats sounds slightly wrong until you try it.
This Minimalist Baker recipe uses nuts, seeds and coconut instead, creating a crunchy grain-free alternative that can be ready in about 30 minutes.
It’s naturally sweetened and also happens to be vegan and gluten-free, making it a useful recipe when you’re catering for different dietary requirements.
And finally, here’s one for anyone who doesn’t want to turn the oven on.
This granola is cooked on the stovetop in around 15 minutes. Rolled oats are gently toasted before coconut oil, maple syrup, pistachios, coconut, cinnamon and goji berries are added.
It’s a clever method for making a smaller batch quickly, and you can easily replace the goji berries with another dried fruit already sitting in your cupboard.
There are a few little things that make a surprisingly big difference.
Spread the granola in an even layer so it cooks consistently. Don’t drown the oats in liquid, but make sure everything is properly coated. Bake at a moderate temperature rather than trying to rush things with a very hot oven.
Most importantly, let the granola cool completely before storing it.
Granola continues to crisp as it cools. Love & Lemons specifically recommends allowing its granola to sit on the baking tray after baking so it becomes crisp and toasty.
Once you’ve found a basic recipe you like, this is where things become dangerous for the pantry.
Try adding chopped almonds, pecans, walnuts, pistachios, pumpkin seeds or sunflower seeds before baking.
Coconut flakes are another favourite.
After baking, stir through dried cranberries, raisins, chopped apricots, dried cherries, dried apple, chocolate chips or cacao nibs.
For flavour, cinnamon is the obvious starting point, but ginger, cardamom, pumpkin pie spice, vanilla, orange zest and even a pinch of sea salt can completely change a batch.
Storage time depends on the particular recipe and ingredients used, so follow the instructions given with the recipe you’re making.
As one example, Well Plated recommends storing its classic homemade granola in an airtight container at room temperature for up to two weeks, while Sally’s chocolate peanut butter version gives a room-temperature storage period of up to three weeks.
The important part is letting the granola cool completely before putting it into a jar or container. Trapping steam inside is a very quick way to lose all that crunch you just worked for.
Obviously there’s yogurt and milk, but granola has far more possibilities than breakfast cereal.
Try scattering it over smoothie bowls, chopped fruit, baked apples or chia pudding. Add a handful to lunchboxes for a crunchy snack, use it as the topping on a fruit parfait, or sprinkle a slightly sweeter granola over ice cream.
You can even package homemade granola in a glass jar with a handwritten label for an easy kitchen-made gift.
And this is perhaps my favourite thing about learning how to make granola: once you know the basic method, you don’t really need to buy somebody else’s idea of the perfect granola again.
Too many raisins? Leave them out.
Want ridiculous amounts of almonds? Add them.
Chocolate for breakfast?
I’m certainly not going to stop you.