• Home
  • Suggest A DIY
  • DIY Newsletter

Edible Crafts

Creative food craft ideas

  • About CraftGossip
  • Our Network
    • Bath & Body Crafts
    • Candle Making Ideas
    • Crochet Ideas
    • Cross Stitch
    • Edible Crafts
    • Felting Patterns
    • Glass Art
    • Home & Garden Ideas
    • Indie Crafts
    • Jewelry Making
    • Kids Crafts
    • Knitting Patterns
    • Lesson Plans
    • Needlework
    • Party Ideas
    • Polymer Clay
    • Quilting Ideas
    • Recycled Crafts
    • Scrapbooking
    • Sewing Patterns
    • Card Making
    • DIY Weddings
    • Not Craft Ideas
  • Giveaways
  • Roundups
  • Store
  • Search

Easy To Make- Easter Bunny Footprint Cookies

January 27, 2018 by Shellie Wilson

Easter baking does not have to mean spending three hours in the kitchen with flour in your hair and royal icing slowly taking over the bench. These easy Easter bunny footprint cookies are a sweet, simple way to make a festive treat that still looks adorable on a dessert table, in a lunchbox, or wrapped up as a little handmade Easter gift.

Bunny footprint cookies are one of those clever Easter cookie ideas that feel playful without being too fussy. They’re perfect for kids’ Easter parties, spring bake sales, classroom treats, or a fun weekend baking project when you want something cute but not overly complicated. A few simple decorating details can turn ordinary cookies into tiny bunny tracks, and honestly, that is exactly the kind of edible craft magic we love.

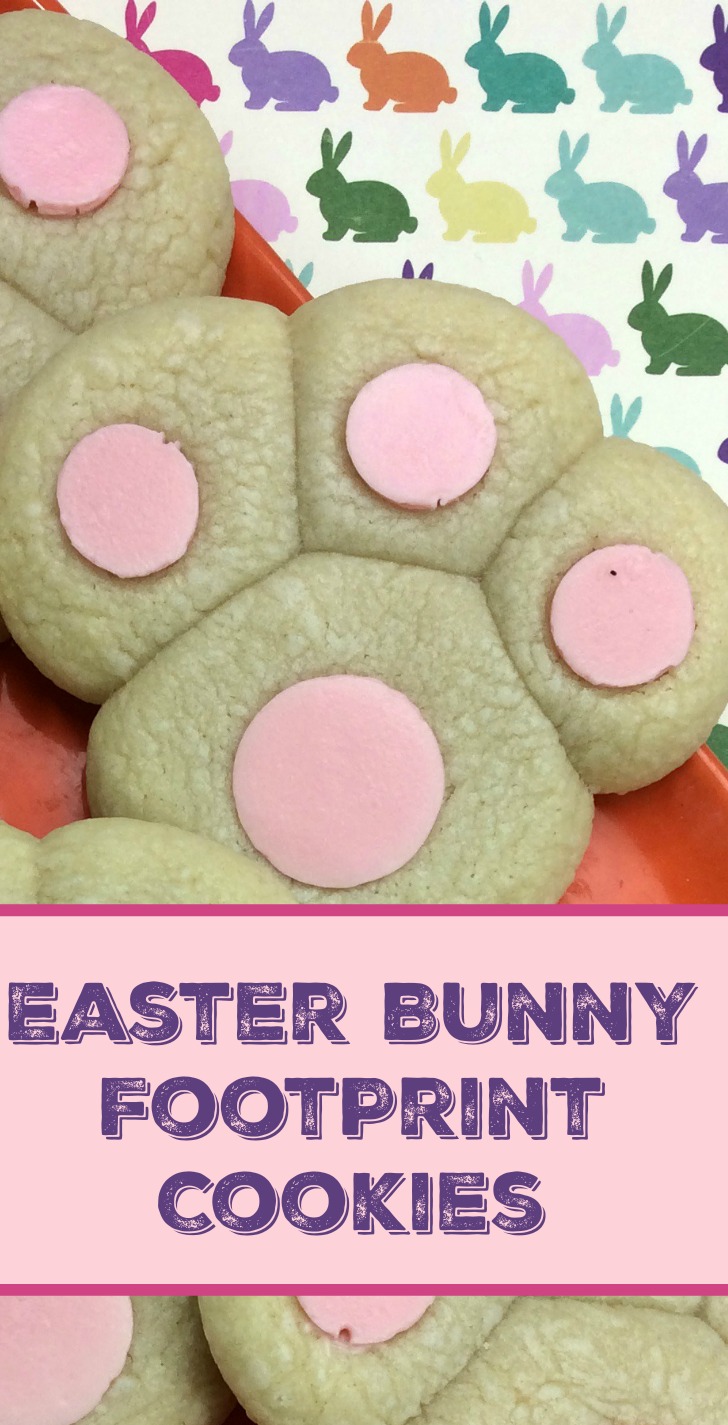
You can make these with homemade sugar cookies, store-bought cookies, or even a basic biscuit base if you’re in a hurry. Add pastel icing, candy melts, mini marshmallows, or little pink details for the toes, and suddenly you have a plate full of adorable Easter bunny cookies that look like the Easter Bunny hopped right across your kitchen counter.

For more seasonal inspiration, you might also enjoy our Easter edible craft ideas and these fun Easter cookie decorating ideas for more sweet treats to make, share, and tuck into Easter baskets.

Makes 12-18 bunny feet

Ingredients

1 C unsalted sweet cream butter
1 1/2 C powder sugar
2 tsp vanilla extract
1 large egg
2 1/2 C flour
1tsp cream of tarter
1 tsp baking soda
1 bag of bright pink candy melts
1 wilton number 3 piping tip
1 cookie sheet fitted with parchment paper

Directions

Preheat oven to 350 degrees

Using a standing mixer, cream together the butter, powder sugar, vanilla and egg together until creamy and combined.

In a large bowl, mix together the flour, cream of tarter and baking soda

Gradually mix in the flour mixture into the wet ingredients until combined and a dough forms

Using a tablespoon, scoop out some dough and form into a ball.

Using a teaspoon, scoop out some dough and round it out. You will need about 3 small balls of dough for every big dough ball

Place a large dough ball onto the cookie sheet and add 3 small dough balls and lightly push down so that when it bakes they bake into each other

Bake in the oven for 8-12 minutes or until golden brown

While the cookies are baking place the pink candy melts onto a paper towel

Using 4 candy melts per cookies, leaving 1 candy melt for the middle of the paw

Using the tip, push it down into the remaining candy melts so that you have 3 small dots for the toes of the paws

Once the cookies are done baking, place the large candy melt into the center of the cookie and then the little candy melts into the toes of the cookie

Let cookies cool completely before enjoying!

Related Posts:

  • 4th of July Cookie Ideas for Parties, BBQs, and…
  • 7 Chocolate Bar Cookie Mix Gifts in a Jar That Are…
«
»

Have you read?

How to Make Thick Yoghurt Smoothie Bowls in the Ninja Slushie Maker

A quick, creamy breakfast with fresh fruit added on top

Smoothie bowls are one of those beautiful breakfasts that feel healthy and a little indulgent at the same time. Thick, cold, creamy, and pretty enough that you almost don’t want to eat them… almost.

The Ninja Slushie Maker takes all the effort out of it.
Instead of dealing with frozen fruit bricks or blenders that complain loudly, you simply mix your yoghurt base, chill it, and let the Ninja turn it into the perfect thick smoothie-bowl texture — no ice required.

If you are like me and come addicted to these smoothie bowls then you will want to invest in these double walled bowls, this is my favorite brand and these have been great. 

Then you top it with your fresh fruit afterwards so the bowl stays thick, cold, and spoon-worthy.

It’s easy, quick, and a lovely way to start the day.

Why Yoghurt Works So Well in the Ninja Slushie Maker

Yoghurt freezes into a silky, firm slush — similar to soft-serve but healthier and lighter. Because the machine creates the icy texture itself (instead of relying on ice cubes), the mixture never becomes watery or gritty.

Just smooth, cold, creamy perfection you can decorate to your heart’s content.

The Basic Yoghurt Slush Base

Once you learn this base recipe, you can create endless flavour combinations.

Ingredients

  • 2 cups plain or Greek yoghurt, chilled 
  • ½–1 cup milk of your choice (just enough to loosen the mixture) 
  • 1–3 tablespoons honey or maple syrup (optional) 
  • 1 teaspoon vanilla extract (optional) 

Method

  1. Stir all ingredients together until smooth. 
  2. Chill the mixture in the fridge until very cold. 
  3. Pour the chilled mixture into the Ninja Slushie Maker. 
  4. Blend on the slush setting until thick, creamy, and icy. 
  5. Spoon into a bowl and add your fruit and toppings. 

This base has enough body to hold granola, berries, and nut butter without sinking.

Topping Ideas (Add These After Blending)

Fresh Fruit

  • Strawberries 
  • Blueberries 
  • Banana slices 
  • Mango 
  • Kiwi 
  • Peaches 

Crunchy Toppers

  • Granola 
  • Toasted coconut 
  • Chopped nuts 
  • Cacao nibs 

Extras

  • Honey drizzle 
  • Peanut butter 
  • Chia seeds 
  • Freeze-dried fruit crumbs 

Easy Flavour Variations

Berries & Cream Smoothie Bowl

Use vanilla yoghurt as your base. Top with raspberries, strawberries, and a sprinkle of granola.

Tropical Coconut Bowl

Add a splash of coconut milk to the base. Top with mango, pineapple, kiwi, and toasted coconut flakes.

Chocolate Yoghurt Bowl

Mix 1 tablespoon cocoa powder or chocolate protein powder into the base. Top with banana slices and a peanut-butter drizzle.

Meal-Prep Tip

Prepare the yoghurt base the night before and store it in small jars.
In the morning, just pour one jar directly into the Ninja Slushie Maker and you’ve got a thick, cold, ready-to-top breakfast in minutes.


Categories

Baked candy chocolate Christmas cookies Craft Inspirations cupcakes Drinks Easter fruit Fun With Food Halloween Holidays kids More Recipes non-sweets Parties & entertaining Recipes Thanksgiving Valentines Day

Cupcake Liner Giveaway at Sweetopia

Christmas Tree Cinnamon Roll

Rocketship Sandwich

Millenium Falcon Cake

Welsh “Rabbit”

RSS More Articles

  • Book Review: The Book Book of Beginner Amigurumi
  • Bird Embroidery Blank Laser Cut Pattern
  • 4 FREE Vintage Masculine Summer Pattern Papers
  • My Fabric Buying Rules (That I Break All the Time)
  • Free Trauma Teddy Knitting Pattern – A Simple Comfort Bear To Knit And Donate
  • Etsy Feature – Pottery Border Rollers Set (6 or 12 Designs)
  • 25+ Easy Crochet Flower Patterns For Beginners
  • How to Bind a Junk Journal (5 Easy Methods for Beginners)
  • Sewing Pattern Saturday Review: DIY Reusable Period Pad Sewing Pattern
  • Using Pizza and Pretend Play to Learn about Fractions

Pick Your Blog

  • Sewing
  • Knitting
  • Quilting
  • Crochet
  • Home & Garden
  • Recycled Crafts
  • Scrapbooking
  • Card Making
  • Polymer Clay
  • Cross-Stitch
  • Edible Crafts
  • Felting
  • Glass Art
  • Indie Crafts
  • Kids Crafts
  • Jewelry Making
  • Lesson Plans
  • Needlework
  • Bath & Body
  • Party Ideas
  • Candle Making
  • DIY Weddings
  • Not Craft
  • Free Craft Projects

Explore Edible Crafts

breakfast cake candy chocolate Christmas cookie decorating cookies dessert Easter fruit Halloween Holidays kids lollipop sticks lunch packaging party summer Thanksgiving valentines

Copyright © 2026 · CraftGossip | Start Here | Contact Us | Link to Us | Your Editors | Privacy and affiliate policy