• Home
  • Suggest A DIY
  • DIY Newsletter

Edible Crafts

Creative food craft ideas

  • About CraftGossip
  • Our Network
    • Bath & Body Crafts
    • Candle Making Ideas
    • Crochet Ideas
    • Cross Stitch
    • Edible Crafts
    • Felting Patterns
    • Glass Art
    • Home & Garden Ideas
    • Indie Crafts
    • Jewelry Making
    • Kids Crafts
    • Knitting Patterns
    • Lesson Plans
    • Needlework
    • Party Ideas
    • Polymer Clay
    • Quilting Ideas
    • Recycled Crafts
    • Scrapbooking
    • Sewing Patterns
    • Card Making
    • DIY Weddings
    • Not Craft Ideas
  • Giveaways
  • Roundups
  • Store
  • Search

DIY Unicorn Sprinkle Cookies

July 25, 2018 by Shellie Wilson

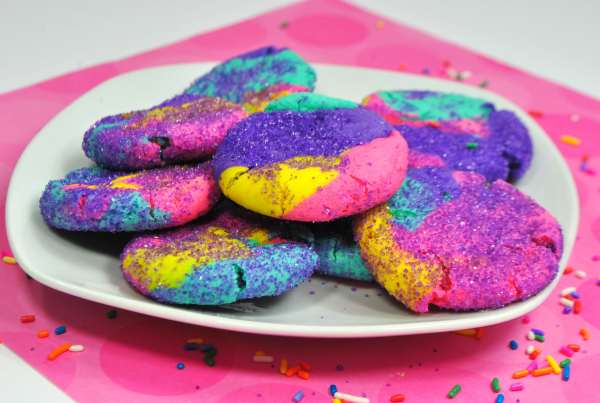
These Unicorn sugar cookies are perfect for a Unicorn party or Rainbow party. Of course, these are not made from real unicorns but from a Vanilla cake mix, which makes these party cookies so easy to make. You do not need any fancy skills to make these Unicorn rainbow cookies as they are so easy to make.  It’s a good idea to assemble all of your equipment and food colors and ingredients before you start. You will need a bowl for every color you intend to use.  The swirly colors make a rainbow or tye dye effect across your cookie. These cookies are great for gifting as party favors too.

We love our Unicorn parties around here so much that we decided to create our own DIY Unicorn Party  Pinterest board. This means we have literally 100’s of our favorite Unicorn ideas, party decorations, Unicorn cakes, and other Unicorn tutorials and crafts all in one spot. You can check them all out here DIY Party Ideas – Unicorn.  Or check out these Unicorn Crafts and these fun Unicorn Party decorations.

Unicorn sugar cookie ingredients

1 box of french vanilla cake mix

1/3 C Canola oil

2 large eggs

Pink, Yellow, Purple, and Teal gel food coloring

1 container of Purple sanding sugar

5 small bowls. 4 bowls to mix the colors of the dough in and a bowl for the sanding sugar

Cookie sheet lined with parchment paper

Cookie Instructions

Preheat oven at 350º F.

Line a cookie sheet with parchment paper and set aside

Using a standing mixer, combine cake mix, vegetable oil, and 2 eggs until combined.


Divide the batter into four separate bowls.

Mix Pink food coloring into one bowl

Mix Purple food coloring into the second bowl

Mix Teal food coloring into the third bowl

Mix Yellow food coloring into the fourth bowl

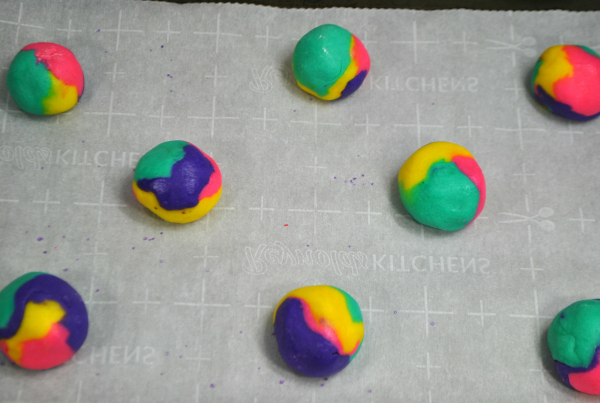
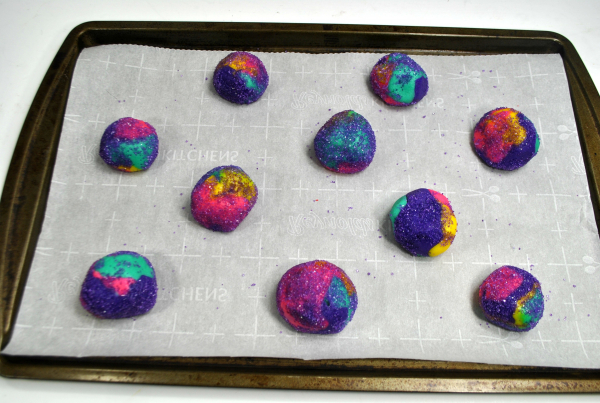
Take about 1 TSP of each color of dough and form into tablespoon sized balls.

Pour sanding sugar into a bowl.

Roll the cookie dough into the sanding sugar then onto the cookie sheet about 2 inches apart from each other

Bake for 7 to 8 minutes.

Let cookies cool completely before enjoying.

Related Posts:

  • 5 Easy No-Bake Slices You Can Make and Gift This…
  • 20 Festive Things to Make with Canned Crescent Roll Dough
«
»

Have you read?

How to Make Thick Yoghurt Smoothie Bowls in the Ninja Slushie Maker

A quick, creamy breakfast with fresh fruit added on top

Smoothie bowls are one of those beautiful breakfasts that feel healthy and a little indulgent at the same time. Thick, cold, creamy, and pretty enough that you almost don’t want to eat them… almost.

The Ninja Slushie Maker takes all the effort out of it.
Instead of dealing with frozen fruit bricks or blenders that complain loudly, you simply mix your yoghurt base, chill it, and let the Ninja turn it into the perfect thick smoothie-bowl texture — no ice required.

If you are like me and come addicted to these smoothie bowls then you will want to invest in these double walled bowls, this is my favorite brand and these have been great. 

Then you top it with your fresh fruit afterwards so the bowl stays thick, cold, and spoon-worthy.

It’s easy, quick, and a lovely way to start the day.

Why Yoghurt Works So Well in the Ninja Slushie Maker

Yoghurt freezes into a silky, firm slush — similar to soft-serve but healthier and lighter. Because the machine creates the icy texture itself (instead of relying on ice cubes), the mixture never becomes watery or gritty.

Just smooth, cold, creamy perfection you can decorate to your heart’s content.

The Basic Yoghurt Slush Base

Once you learn this base recipe, you can create endless flavour combinations.

Ingredients

  • 2 cups plain or Greek yoghurt, chilled 
  • ½–1 cup milk of your choice (just enough to loosen the mixture) 
  • 1–3 tablespoons honey or maple syrup (optional) 
  • 1 teaspoon vanilla extract (optional) 

Method

  1. Stir all ingredients together until smooth. 
  2. Chill the mixture in the fridge until very cold. 
  3. Pour the chilled mixture into the Ninja Slushie Maker. 
  4. Blend on the slush setting until thick, creamy, and icy. 
  5. Spoon into a bowl and add your fruit and toppings. 

This base has enough body to hold granola, berries, and nut butter without sinking.

Topping Ideas (Add These After Blending)

Fresh Fruit

  • Strawberries 
  • Blueberries 
  • Banana slices 
  • Mango 
  • Kiwi 
  • Peaches 

Crunchy Toppers

  • Granola 
  • Toasted coconut 
  • Chopped nuts 
  • Cacao nibs 

Extras

  • Honey drizzle 
  • Peanut butter 
  • Chia seeds 
  • Freeze-dried fruit crumbs 

Easy Flavour Variations

Berries & Cream Smoothie Bowl

Use vanilla yoghurt as your base. Top with raspberries, strawberries, and a sprinkle of granola.

Tropical Coconut Bowl

Add a splash of coconut milk to the base. Top with mango, pineapple, kiwi, and toasted coconut flakes.

Chocolate Yoghurt Bowl

Mix 1 tablespoon cocoa powder or chocolate protein powder into the base. Top with banana slices and a peanut-butter drizzle.

Meal-Prep Tip

Prepare the yoghurt base the night before and store it in small jars.
In the morning, just pour one jar directly into the Ninja Slushie Maker and you’ve got a thick, cold, ready-to-top breakfast in minutes.


Categories

Baked candy chocolate Christmas cookies Craft Inspirations cupcakes Drinks Easter fruit Fun With Food Halloween Holidays kids More Recipes non-sweets Parties & entertaining Recipes Thanksgiving Valentines Day

Autumn Turkey Soup

Super Mom 100 Cookies Cookie Mix

Christmas Holiday Snowman Breakfast Idea

How to Can Fruit

Cheesy Pepperoni Pizza Sticks

RSS More Articles

  • Cross Stitch Ice Cream and Frozen Treats
  • 15 Charity Sewing Projects That Let You Sew Something Useful For A Good Cause
  • Sunflower Ribbon Embroidery Tutorials and Kits to Brighten Your Hoop
  • Decorating Mistakes That Make Your Living Room Feel Cluttered
  • Remembering Jill Smokler, Founder Of Scary Mommy
  • In the Garden Layer Cake – A Bloom-Filled Fabric Collection for Spring Sewing
  • How To Do Kitchener Stitch: A Beginner-Friendly Guide To Grafting Knitting Seamlessly
  • Pattern Review: Georgie Granny Square Bucket Hat Crochet Pattern
  • 12 Handmade Patriotic 4th of July Card Ideas
  • Shark Week Learning for Kids

Pick Your Blog

  • Sewing
  • Knitting
  • Quilting
  • Crochet
  • Home & Garden
  • Recycled Crafts
  • Scrapbooking
  • Card Making
  • Polymer Clay
  • Cross-Stitch
  • Edible Crafts
  • Felting
  • Glass Art
  • Indie Crafts
  • Kids Crafts
  • Jewelry Making
  • Lesson Plans
  • Needlework
  • Bath & Body
  • Party Ideas
  • Candle Making
  • DIY Weddings
  • Not Craft
  • Free Craft Projects

Explore Edible Crafts

breakfast cake candy chocolate Christmas cookie decorating cookies dessert Easter fruit Halloween Holidays kids lollipop sticks lunch packaging party summer Thanksgiving valentines

Copyright © 2026 · CraftGossip | Start Here | Contact Us | Link to Us | Your Editors | Privacy and affiliate policy