• Home
  • Suggest A DIY
  • DIY Newsletter

Edible Crafts

Creative food craft ideas

  • About CraftGossip
  • Our Network
    • Bath & Body Crafts
    • Candle Making Ideas
    • Crochet Ideas
    • Cross Stitch
    • Edible Crafts
    • Felting Patterns
    • Glass Art
    • Home & Garden Ideas
    • Indie Crafts
    • Jewelry Making
    • Kids Crafts
    • Knitting Patterns
    • Lesson Plans
    • Needlework
    • Party Ideas
    • Polymer Clay
    • Quilting Ideas
    • Recycled Crafts
    • Scrapbooking
    • Sewing Patterns
    • Card Making
    • DIY Weddings
    • Not Craft Ideas
  • Giveaways
  • Roundups
  • Store
  • Search

Alternative Cake – Ferrero Rocher Cake Tower

May 23, 2018 by Shellie Wilson

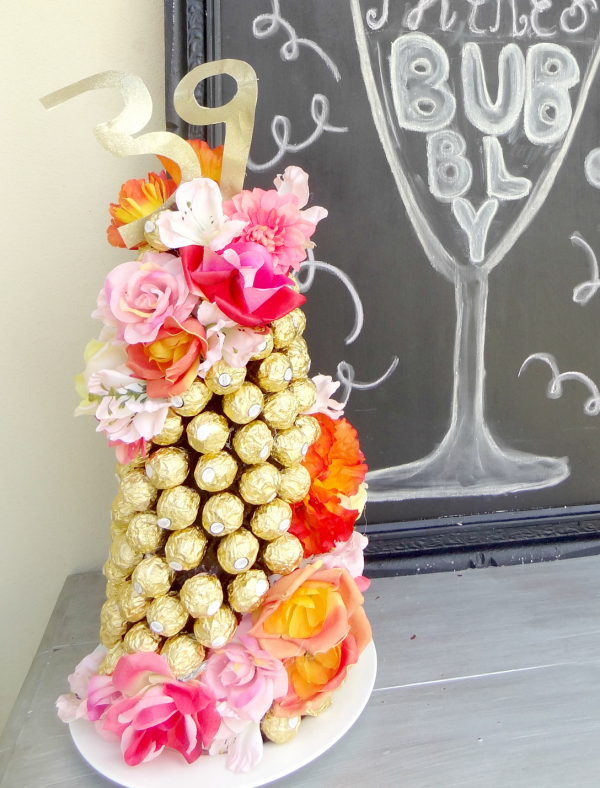
This Giant Ferrero rocher cake tower is the perfect alternative to a traditional cake. What inspired me to make this tower is that for my Birthday (yes, I am 39) I planned to spend the day chilling with my best friend (whose birthday is 2 days before mine). But my birthday falls on the 23rd of December. Which means it’s a crazy time of year. And to make it even busier, I had my youngest child on the 22nd of December so he has his Birthday too.

With this cake, I was able to make it literally months in advance. I could easily find the time to make it in November so it was one big project I could get out the way.

What you will need:

Flowers

Hot melt

44 Ferreo Rocher Chocolates

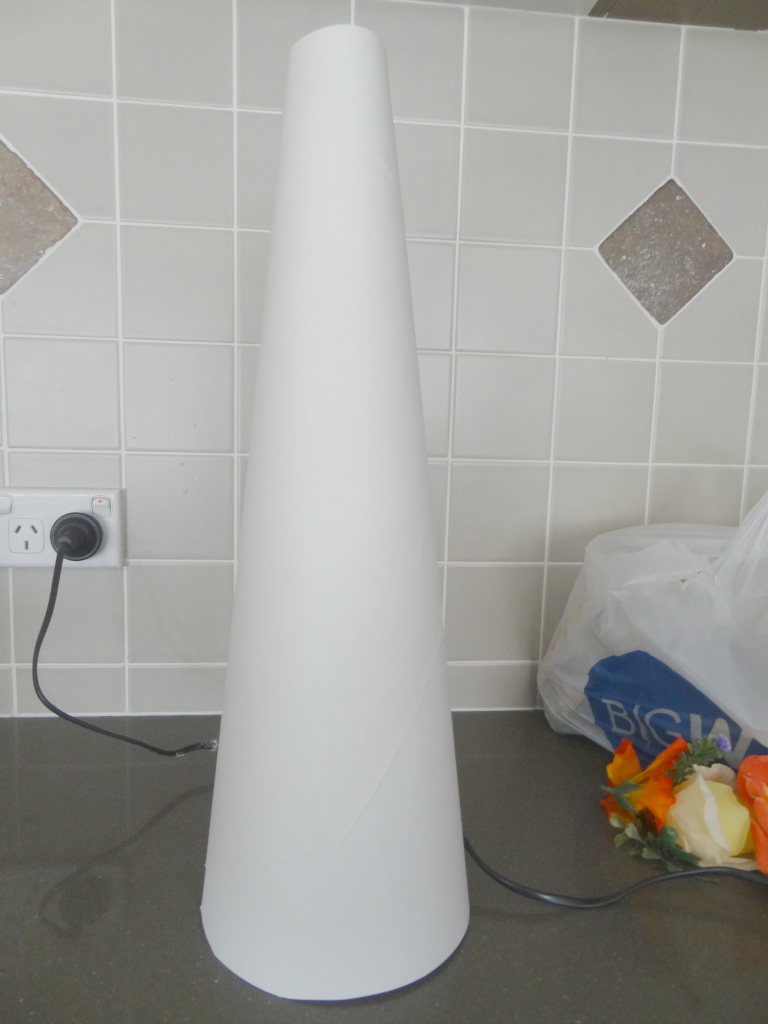
Large Cone or DIY cardboard cone

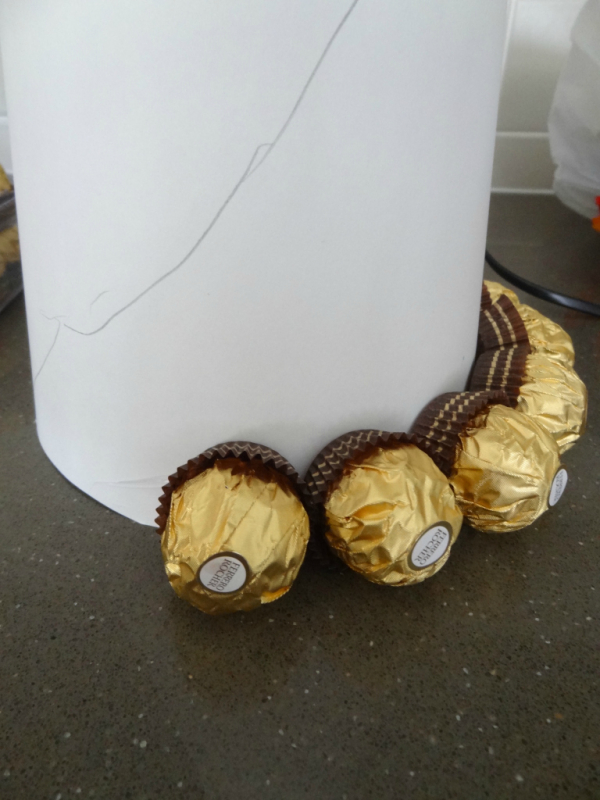
For my cake tower I had planned to add flowers cascading down the cone. There is one great advantage to doing this is that it saves you heaps of chocolates. I used 44 chocolates for my tower. I used a pencil to mark out where my flowers would sit, so I could leave the spaces.


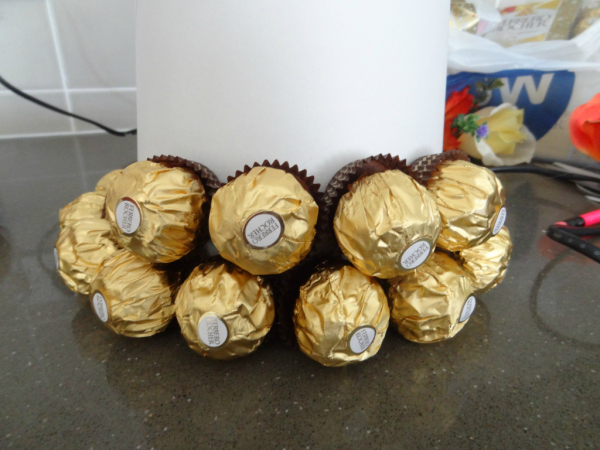
Start by glueing the first layer down. make sure the cone is flat on its final surface so that the chocolates sit flush with the plate or cake stand. The second layer should sit off centre to the layer below filling in any gaps.


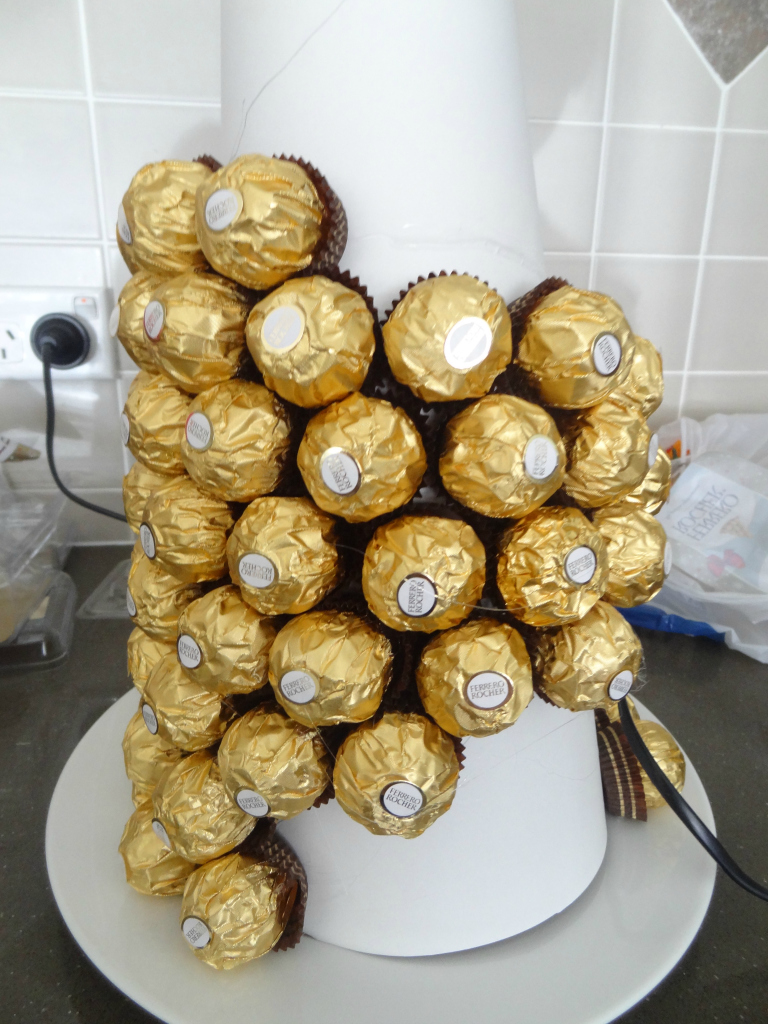
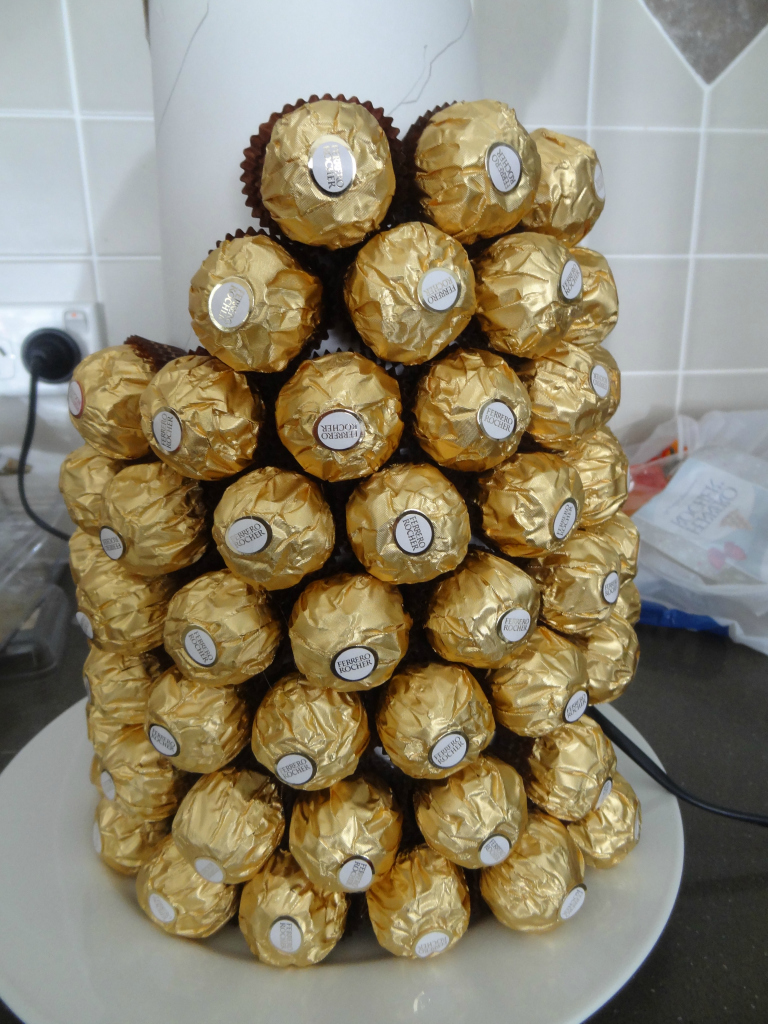
Continue this until the tower is full

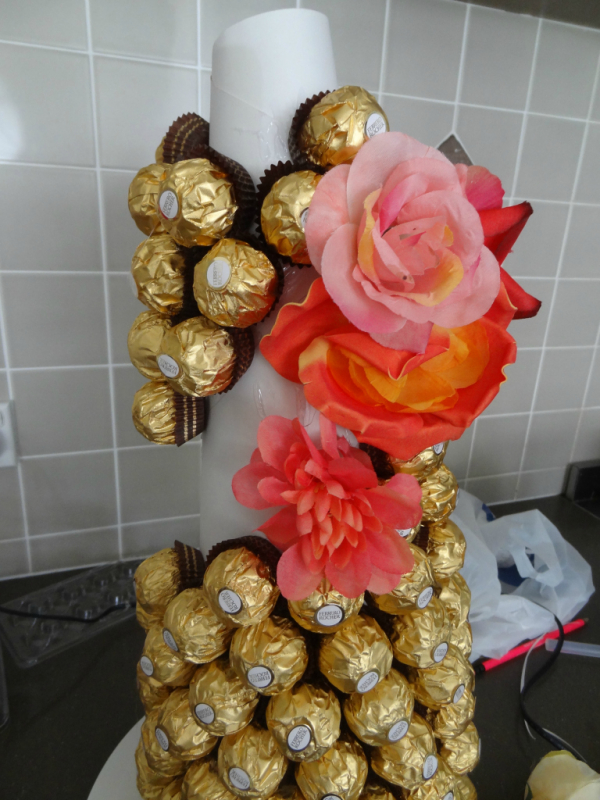
Once the chocolates are stuck in place, start laying out your flowers. Glue them in place. Until the cone is filled. Pop some flowers on the very top to finish off the top section. I added some gold numbers to mine which is totally optional. 

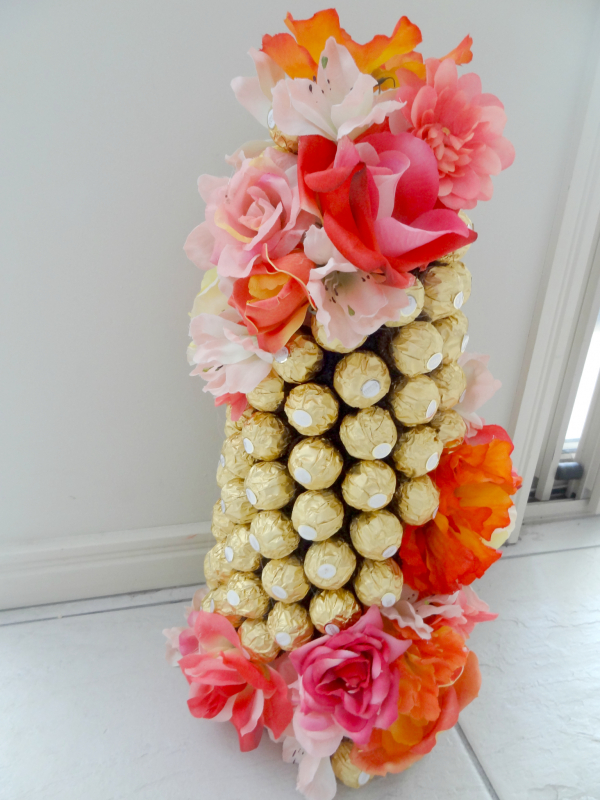
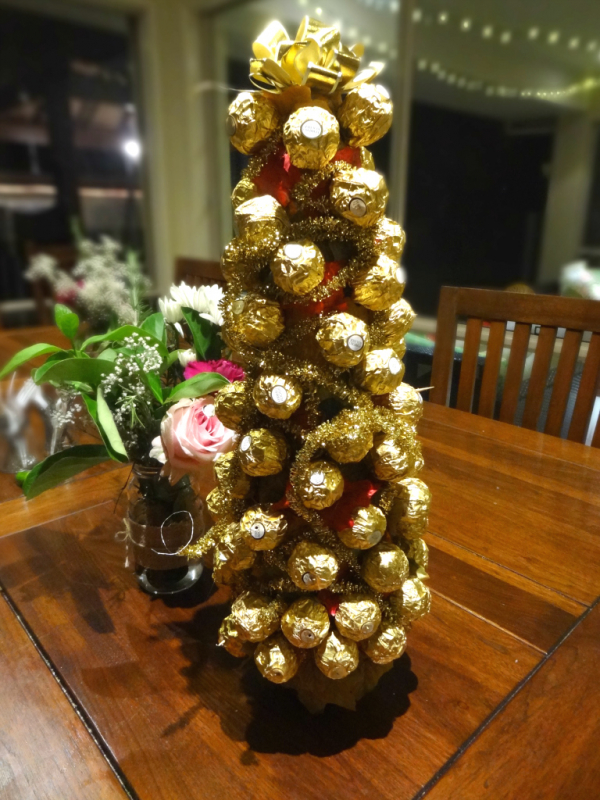
Here is a Christmas version we created too.


Related Posts:

  • 20 Festive Things to Make with Canned Crescent Roll Dough
  • 30 Make Ahead Easy Brunch Ideas
«
»

Have you read?

How to Make Thick Yoghurt Smoothie Bowls in the Ninja Slushie Maker

A quick, creamy breakfast with fresh fruit added on top

Smoothie bowls are one of those beautiful breakfasts that feel healthy and a little indulgent at the same time. Thick, cold, creamy, and pretty enough that you almost don’t want to eat them… almost.

The Ninja Slushie Maker takes all the effort out of it.
Instead of dealing with frozen fruit bricks or blenders that complain loudly, you simply mix your yoghurt base, chill it, and let the Ninja turn it into the perfect thick smoothie-bowl texture — no ice required.

If you are like me and come addicted to these smoothie bowls then you will want to invest in these double walled bowls, this is my favorite brand and these have been great. 

Then you top it with your fresh fruit afterwards so the bowl stays thick, cold, and spoon-worthy.

It’s easy, quick, and a lovely way to start the day.

Why Yoghurt Works So Well in the Ninja Slushie Maker

Yoghurt freezes into a silky, firm slush — similar to soft-serve but healthier and lighter. Because the machine creates the icy texture itself (instead of relying on ice cubes), the mixture never becomes watery or gritty.

Just smooth, cold, creamy perfection you can decorate to your heart’s content.

The Basic Yoghurt Slush Base

Once you learn this base recipe, you can create endless flavour combinations.

Ingredients

  • 2 cups plain or Greek yoghurt, chilled 
  • ½–1 cup milk of your choice (just enough to loosen the mixture) 
  • 1–3 tablespoons honey or maple syrup (optional) 
  • 1 teaspoon vanilla extract (optional) 

Method

  1. Stir all ingredients together until smooth. 
  2. Chill the mixture in the fridge until very cold. 
  3. Pour the chilled mixture into the Ninja Slushie Maker. 
  4. Blend on the slush setting until thick, creamy, and icy. 
  5. Spoon into a bowl and add your fruit and toppings. 

This base has enough body to hold granola, berries, and nut butter without sinking.

Topping Ideas (Add These After Blending)

Fresh Fruit

  • Strawberries 
  • Blueberries 
  • Banana slices 
  • Mango 
  • Kiwi 
  • Peaches 

Crunchy Toppers

  • Granola 
  • Toasted coconut 
  • Chopped nuts 
  • Cacao nibs 

Extras

  • Honey drizzle 
  • Peanut butter 
  • Chia seeds 
  • Freeze-dried fruit crumbs 

Easy Flavour Variations

Berries & Cream Smoothie Bowl

Use vanilla yoghurt as your base. Top with raspberries, strawberries, and a sprinkle of granola.

Tropical Coconut Bowl

Add a splash of coconut milk to the base. Top with mango, pineapple, kiwi, and toasted coconut flakes.

Chocolate Yoghurt Bowl

Mix 1 tablespoon cocoa powder or chocolate protein powder into the base. Top with banana slices and a peanut-butter drizzle.

Meal-Prep Tip

Prepare the yoghurt base the night before and store it in small jars.
In the morning, just pour one jar directly into the Ninja Slushie Maker and you’ve got a thick, cold, ready-to-top breakfast in minutes.


Categories

Baked candy chocolate Christmas cookies Craft Inspirations cupcakes Drinks Easter fruit Fun With Food Halloween Holidays kids More Recipes non-sweets Parties & entertaining Recipes Thanksgiving Valentines Day

Make Your Own Barbie Candy Dress Cake

Chocolate. Simply Chocolate.

Veggie Flower Bouquet

Jam Cocktail

Licorice Baskets

RSS More Articles

  • Super Simple Baby Blanket Knitting Pattern
  • DIY Wax Cord Bracelets
  • Cross Stitch Cards for All Occasions
  • Free Oven Mitt Sewing Pattern: A Fat Quarter Friendly Kitchen Gift You’ll Actually Use
  • What Does PSSO Mean In Knitting? How To Pass A Slipped Stitch Over
  • Sophie Hood Pattern Free: Knit And Crochet Hooded Scarf Patterns For The Viral Winter Look
  • Coca-Cola Foot Soak Recipe: The Viral Fizzy Foot Hack For Tired, Rough Feet
  • 3 FREE Dark Romantasy Coloring Pages
  • Needle Felted Tropical Hibiscus Flower Tutorial
  • 12 Masculine Scrapbook Layouts for Men

Pick Your Blog

  • Sewing
  • Knitting
  • Quilting
  • Crochet
  • Home & Garden
  • Recycled Crafts
  • Scrapbooking
  • Card Making
  • Polymer Clay
  • Cross-Stitch
  • Edible Crafts
  • Felting
  • Glass Art
  • Indie Crafts
  • Kids Crafts
  • Jewelry Making
  • Lesson Plans
  • Needlework
  • Bath & Body
  • Party Ideas
  • Candle Making
  • DIY Weddings
  • Not Craft
  • Free Craft Projects

Explore Edible Crafts

breakfast cake candy chocolate Christmas cookie decorating cookies dessert Easter fruit Halloween Holidays kids lollipop sticks lunch packaging party summer Thanksgiving valentines

Copyright © 2026 · CraftGossip | Start Here | Contact Us | Link to Us | Your Editors | Privacy and affiliate policy