• Home
  • Suggest A DIY
  • DIY Newsletter

Edible Crafts

Creative food craft ideas

  • About CraftGossip
  • Our Network
    • Bath & Body Crafts
    • Candle Making Ideas
    • Crochet Ideas
    • Cross Stitch
    • Edible Crafts
    • Felting Patterns
    • Glass Art
    • Home & Garden Ideas
    • Indie Crafts
    • Jewelry Making
    • Kids Crafts
    • Knitting Patterns
    • Lesson Plans
    • Needlework
    • Party Ideas
    • Polymer Clay
    • Quilting Ideas
    • Recycled Crafts
    • Scrapbooking
    • Sewing Patterns
    • Card Making
    • DIY Weddings
    • Not Craft Ideas
  • Giveaways
  • Roundups
  • Store
  • Search

Rainbow Pancakes Recipe

October 6, 2016 by Carolyn Bickford

photo credit: Jennifer Meyering

photo credit: Jennifer Meyering

What a fun way to enjoy breakfast! These would be cute for a party, instead of a birthday cake. Of course, if it is a sleepover than this could be a breakfast. This would also be a fun addition to your brunch this weekend. Jennifer at Jennifer Meyering just uses a basic pancake mix and food coloring.

Click here on Jennifer Meyering for the recipe and directions.

Hosting a Rainbow party? Check out these Rainbow party articles over on our Party Ideas Blog and these Rainbow party decorations we found on Amazon and these fun Rainbow party items from Etsy.

Creating vibrant, naturally colored foods is a delightful way to enhance your culinary creations while avoiding artificial additives. Utilizing natural ingredients not only provides rich hues but also adds subtle flavors and nutritional benefits. Here’s a guide to achieving a spectrum of colors using everyday kitchen items:

Red and Pink

Beets: Beet juice or beetroot powder offers a deep red to pink color, depending on concentration. It’s ideal for coloring cakes, frostings, and beverages. The earthy flavor is mild and often undetectable in small amounts.

Orange

Carrots: Carrot juice or finely grated carrots impart a warm orange hue. They’re perfect for batters and doughs, adding both color and a hint of sweetness.

Annatto: Derived from the seeds of the achiote tree, annatto provides an orange-red tint. It’s commonly used in cheeses and baked goods. Beyond its coloring properties, annatto contains antioxidants and may offer antimicrobial benefits.

Yellow

Turmeric: This spice yields a bright yellow color. A small amount can color rice, sauces, and baked goods without imparting a strong flavor.

Green

Spinach: Blended fresh spinach or spinach powder provides a vibrant green shade. It’s suitable for pastas, doughs, and smoothies, offering color with a mild taste.

Matcha: This finely ground green tea powder delivers a rich green color along with a distinct, slightly bitter flavor. It’s excellent for desserts and beverages.

Blue and Purple

Red Cabbage: Red cabbage juice can produce blue tones when mixed with baking soda. Adjusting the pH allows for a range of colors from blue to purple.

Blueberries: Mashed or juiced blueberries offer a purple-blue tint, ideal for pastries and frostings.

Brown

Cocoa or Coffee: Both provide rich brown hues, perfect for enhancing the color and flavor of baked goods and confections.
Application Tips

Concentration: The intensity of the color depends on the amount used. Start with small quantities and adjust to achieve the desired shade.

Flavor Balance: Some natural colorants can influence the taste of your dish. Consider the flavor profile of both the colorant and the food to ensure they complement each other.

Heat Sensitivity: Certain natural dyes may change color when exposed to heat. It’s advisable to test a small batch or add colorants after cooking when possible.
«
»

Have you read?

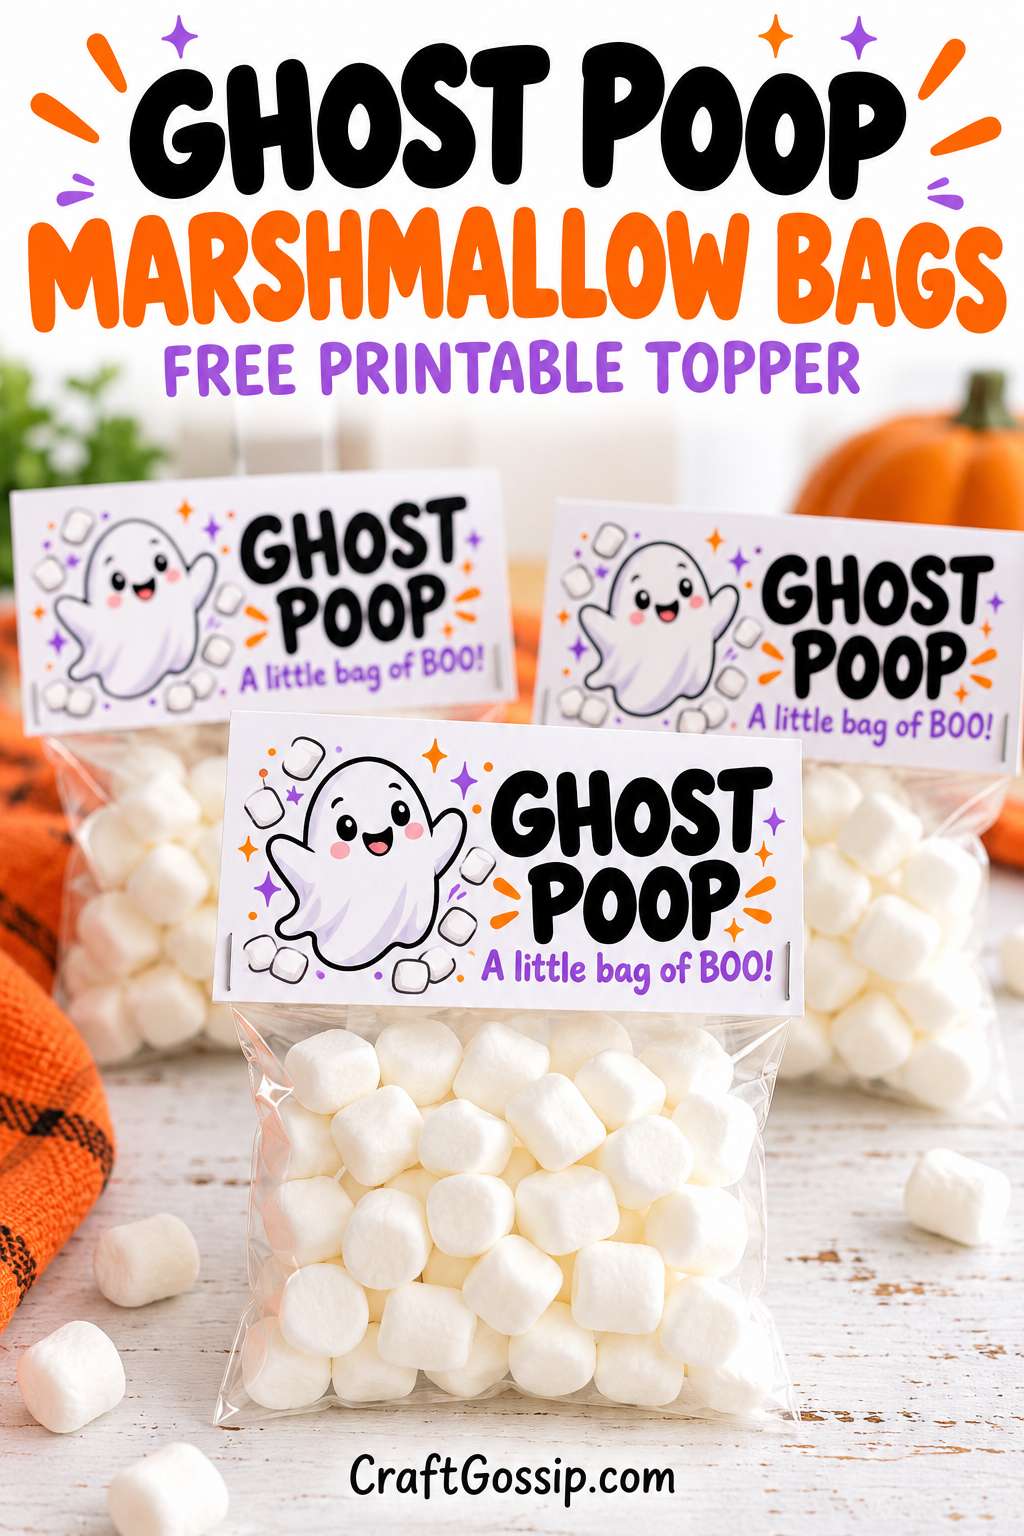
Ghost Poop Marshmallow Bags With a Free Printable Halloween Topper

If there is one thing that gets children giggling, it is giving an ordinary snack a slightly silly name. These “Ghost Poop” marshmallow bags turn a handful of white mini marshmallows into a funny little Halloween gift, with a smiling ghost topper to finish them off.

There is no baking, icing or fiddly decorating involved. Simply fill small clear bags with mini marshmallows, seal them and attach the free printable topper. It is the sort of project you can put together at the kitchen table while the kettle boils, especially if you print and cut the toppers beforehand.

The design features a friendly ghost, little marshmallow illustrations and orange and purple accents, with the wording “Ghost Poop — A little bag of BOO!” It is cheerful rather than spooky, making it a fun choice for family Halloween gatherings, party favours or little gifts for the grandchildren.

I also like that you can make as many or as few as you need. A packet of mini marshmallows, some treat bags and a sheet of cardstock are enough to get started. There is no need to buy a long list of ingredients or spend an afternoon making individual decorations.

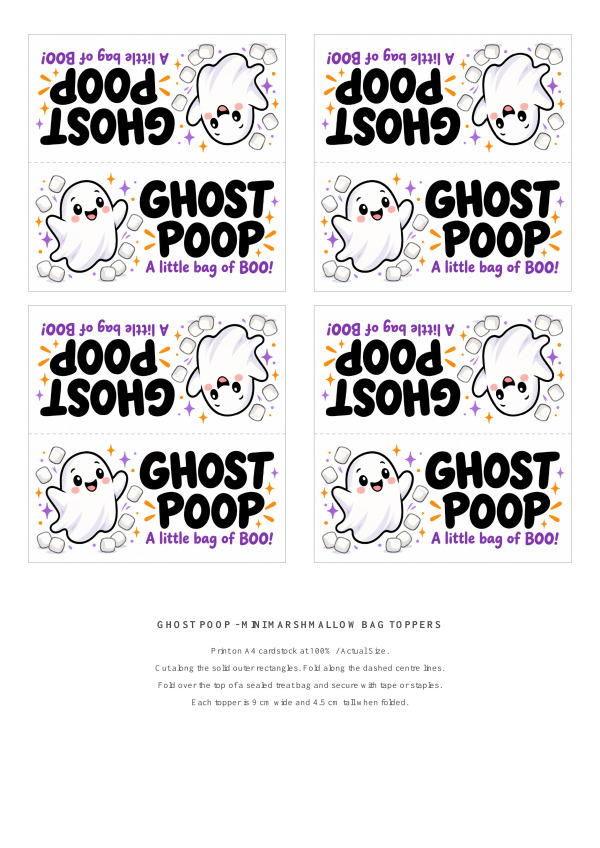
Our free printable includes four fold-over bag toppers on one A4 sheet, with the design printed on both the front and back.

What You’ll Need

  • White mini marshmallows
  • Clear food-safe treat bags, approximately 8–9 cm wide
  • A4 white cardstock suitable for your printer
  • Colour printer
  • Scissors or a paper trimmer
  • Double-sided tape or a stapler

Small resealable food bags are especially handy because you can close the bag before attaching the decorative topper. If you are using open-ended cellophane bags, secure the opening first with a suitable closure or fold and tape it shut.

Choose white mini marshmallows for the classic ghost-themed look. Their little rounded shapes are all the decoration the contents need.

Download the Free Ghost Poop Printable

Choose the format that works best for you:

Each sheet contains four toppers. The unfolded pieces measure 9 × 9 cm, and each finished topper measures 9 cm wide and 4.5 cm tall.

Print on A4 paper at 100% or Actual Size. Turn off “Fit to Page” if it changes the scale, so the toppers stay the intended size.

You will notice that one half of each topper appears upside down on the sheet. That is intentional: once folded over the bag, the design will be the right way up on both sides.

How to Make Ghost Poop Marshmallow Bags

1. Print the toppers

Print the sheet onto white cardstock using your printer’s colour setting.

Cardstock gives the finished topper a neat, sturdy shape. Ordinary printer paper can also be used, although it will feel softer and may crease more easily.

Let the ink dry before handling or folding the sheet.

2. Cut out each rectangle

Cut along the solid outer lines to separate the four toppers.

Keep both printed halves joined together. The dashed line through the middle marks the fold, rather than a cutting line.

A paper trimmer makes this step quick when you are preparing a whole batch, but scissors work perfectly well.

3. Fold the toppers

Fold each rectangle along the dashed centre line, with the printed sides facing outwards.

Line up the edges and press the fold firmly. You can use the back of a spoon or a bone folder to make a crisp crease.

Set the folded toppers aside while you fill the bags.

4. Fill the bags with mini marshmallows

Add a small handful of white mini marshmallows to each clear food-safe bag.

Leave enough empty space at the top to close the bag and attach the topper. Avoid packing the marshmallows right up to the opening, as that makes the finished bags harder to assemble neatly.

For a consistent batch, use the same small scoop or measuring cup to portion the marshmallows into each bag. The amount you need will depend on your bag size and how full you want the favours to look.

5. Seal the bags

Close each bag securely before adding the cardstock.

For resealable bags, press the closure all the way across. For open-ended treat bags, fold and secure the opening so the marshmallows stay enclosed.

The printable topper decorates the sealed bag; it does not need to act as the food packaging closure.

6. Attach the ghost topper

Slip the folded topper over the closed top of the bag, with one printed panel on each side.

Secure it with double-sided tape between the cardstock and the outside of the bag. Alternatively, place a staple near each end of the topper, through the empty section above the marshmallows.

Check that the wording is facing forward and the topper sits evenly across the bag.

That is your little bag of ghost poop ready to gift!

Tips for Making a Whole Batch

If you are preparing these for a party, work through one stage at a time. Print all the sheets, cut all the toppers, fold them, then fill and seal the bags.

Four toppers fit on each sheet, so three sheets will make twelve favours and five sheets will make twenty.

A clean, dry scoop makes filling the bags easier. You can also line the finished bags up in a shallow tray or basket so they stay tidy until you are ready to hand them out.

For children helping with the project, filling the bags and matching them with the ghost toppers are simple jobs. An adult can handle cutting and stapling.

Can You Make These Ahead of Time?

The paper toppers can be printed, cut and folded well ahead of your Halloween celebration.

Once the marshmallow bags are assembled, keep them sealed in a cool, dry place away from direct sunlight. Follow the storage guidance on the marshmallow packet and avoid leaving open bags exposed to air.

If you are making these for a group, keep the original packaging so you have the ingredient and allergen information available. Check any school or venue food requirements before bringing homemade favour bags.

Fun Ways to Gift Your Ghost Poop Bags

These little treats are an easy addition to a Halloween party table. Place one at each setting, tuck them into party bags or arrange them in a basket beside the door for invited guests.

You could also add one to a Halloween care package or a small BOO basket. Write the recipient’s name on the back of the topper for a personal touch.

For a family movie night, put a marshmallow bag beside each person’s snack bowl. It is a small detail, but the funny label makes an everyday treat feel part of the celebration.

If you enjoy making inexpensive seasonal gifts, this is a handy printable to keep with your Halloween craft supplies. A few white mini marshmallows and a smiling ghost are enough to create a little gift that is quick to assemble and almost guaranteed to raise a giggle.

Categories

Baked candy chocolate Christmas cookies Craft Inspirations cupcakes Drinks Easter fruit Fun With Food Halloween Holidays kids More Recipes non-sweets Parties & entertaining Recipes Thanksgiving Valentines Day

No Bake Lemon Blackberry Cheesecake Cups

Dense Chocolate Cake

Keto Snack – Turkey Lettuce Wraps

Cereal Taxonomy

Necktie Cookie on a Stick

RSS feed: More Articles More Articles

  • Book Review: The Festival of Lights
  • My Favorite Things Knitwear Review: Is This Pattern Website Worth Browsing?
  • DIY Thrifted Wool Blanket Christmas Trees
  • DIY Christmas Cherry Body Scrub
  • 3 FREE Dark Academia Coloring Pages
  • Designer Spotlight: Stitching Housewives
  • Easy Projects to Knit with a Square (or Two)
  • 10 Colorful Halloween Scrapbook Layout Ideas
  • Ghost Poop Marshmallow Bags With a Free Printable Halloween Topper
  • Knit Picks Friends & Family Sale: Save 20% on Your Next Knitting Project

Pick Your Blog

  • Sewing
  • Knitting
  • Quilting
  • Crochet
  • Home & Garden
  • Recycled Crafts
  • Scrapbooking
  • Card Making
  • Polymer Clay
  • Cross-Stitch
  • Edible Crafts
  • Felting
  • Glass Art
  • Indie Crafts
  • Kids Crafts
  • Jewelry Making
  • Lesson Plans
  • Needlework
  • Bath & Body
  • Party Ideas
  • Candle Making
  • DIY Weddings
  • Not Craft
  • Free Craft Projects

Explore Edible Crafts

breakfast cake candy chocolate Christmas cookie decorating cookies dessert Easter fruit Halloween Holidays kids lollipop sticks lunch packaging party summer Thanksgiving valentines

Copyright © 2026 · CraftGossip | Start Here | Contact Us | Link to Us | Your Editors | Privacy and affiliate policy