• Home
  • Suggest A DIY
  • DIY Newsletter

Edible Crafts

Creative food craft ideas

  • About CraftGossip
  • Our Network
    • Bath & Body Crafts
    • Candle Making Ideas
    • Crochet Ideas
    • Cross Stitch
    • Edible Crafts
    • Felting Patterns
    • Glass Art
    • Home & Garden Ideas
    • Indie Crafts
    • Jewelry Making
    • Kids Crafts
    • Knitting Patterns
    • Lesson Plans
    • Needlework
    • Party Ideas
    • Polymer Clay
    • Quilting Ideas
    • Recycled Crafts
    • Scrapbooking
    • Sewing Patterns
    • Card Making
    • DIY Weddings
    • Not Craft Ideas
  • Giveaways
  • Roundups
  • Store
  • Search

Christmas Elf Cookies

November 21, 2017 by Shellie Wilson

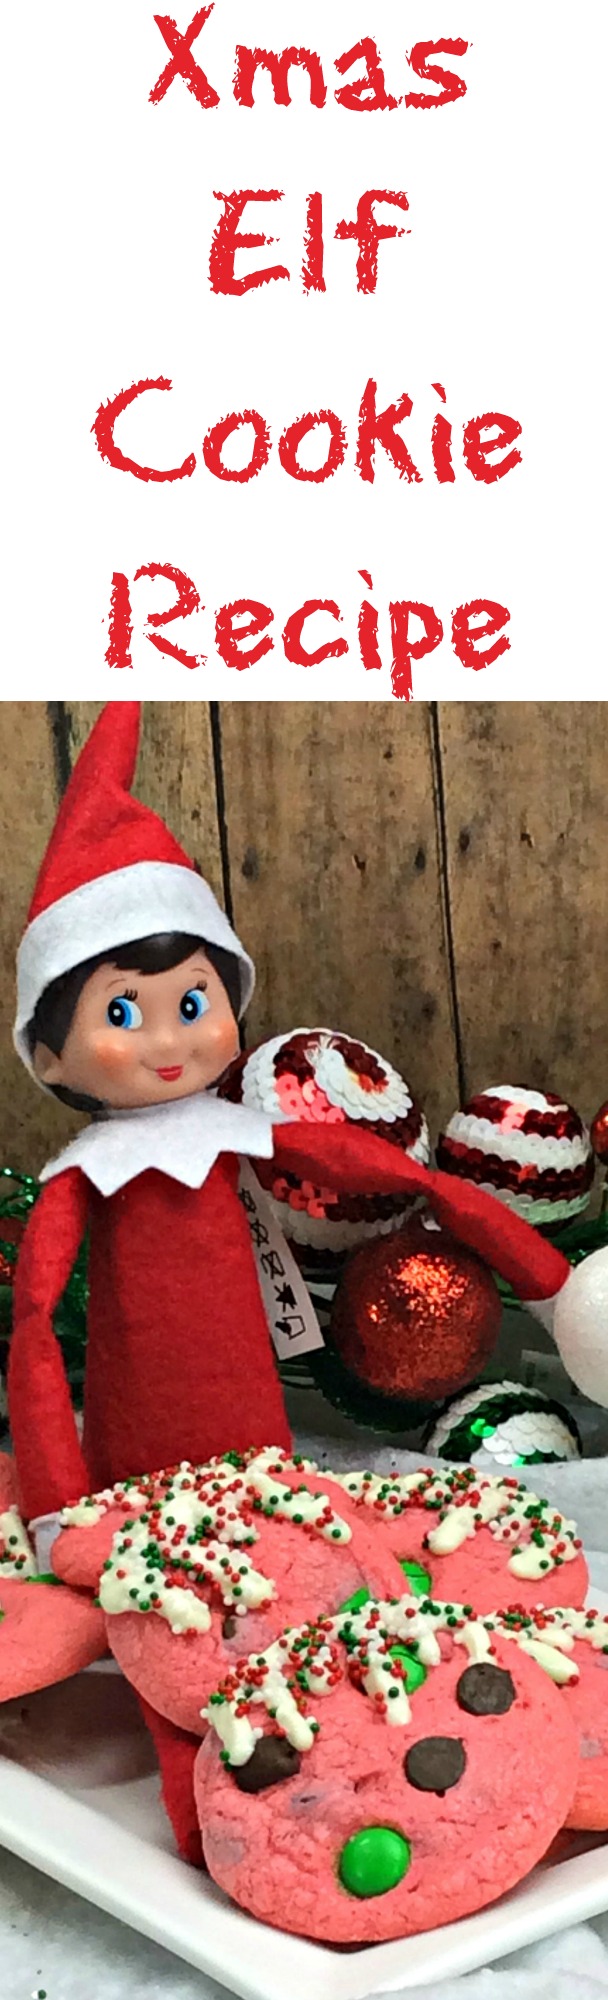
These Christmas Elf Cookies are such a fun little baking idea for the silly season, especially if your Christmas elf has a habit of causing chaos in the kitchen. They look a little like mini Christmas puddings, but with a cheeky red-and-green twist that makes them perfect for kids, classroom treats, Christmas parties, or a festive baking afternoon at home.

Made with a soft cookie base, peppermint flavor, chocolate chips, green M&M’s, white chocolate drizzle, and Christmas sprinkles, these cookies are bright, playful, and very much in the spirit of elf mischief. They are the kind of cookie that looks cute on a holiday dessert tray but is still simple enough to make without needing fancy decorating skills.

If you are looking for a Christmas elf baking idea, a fun holiday cookie recipe for kids, or something sweet to leave out as part of your Elf on the Shelf setup, these Christmas Elf Cookies are a delicious place to start.

These Christmas Cookies Look like plum puddings, but the naughty elf has turned them red. A fun Christmas elf idea for a Christmas Elf who likes to be in the kitchen.

Elf cookie

Ingredients:

3 C flour
1 TBSP baking powder
1 TBSP baking soda
½ TBSP ground cinnamon
1 tsp salt
1 C unsalted sweet cream butter, softened
1 ½ C sugar
1 ½ C packed brown sugar
3 large eggs, room temp
1 TBSP peppermint extract
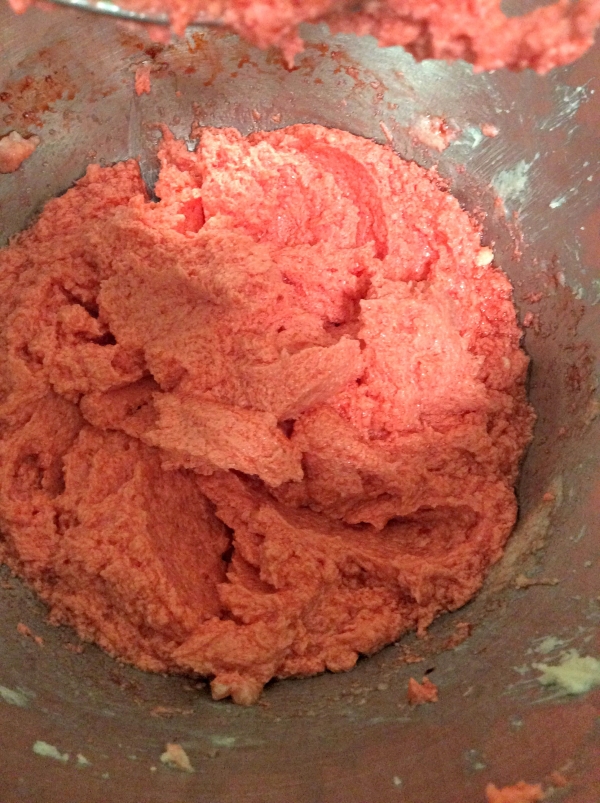
2-4 drops of red food coloring
2 C semisweet chocolate chips
1 C Green M&M’s
1 bag of Ghiradelli white chocolate
1 squeeze bottles
1 contanier of Christmas sprinkles

Directions:

Preheat oven to 350 degrees. Line large cookie sheet with parchment paper.

Combine flour, baking powder, baking soda, cinnamon and salt in a bowl. Whisk ingredients together. Set aside.

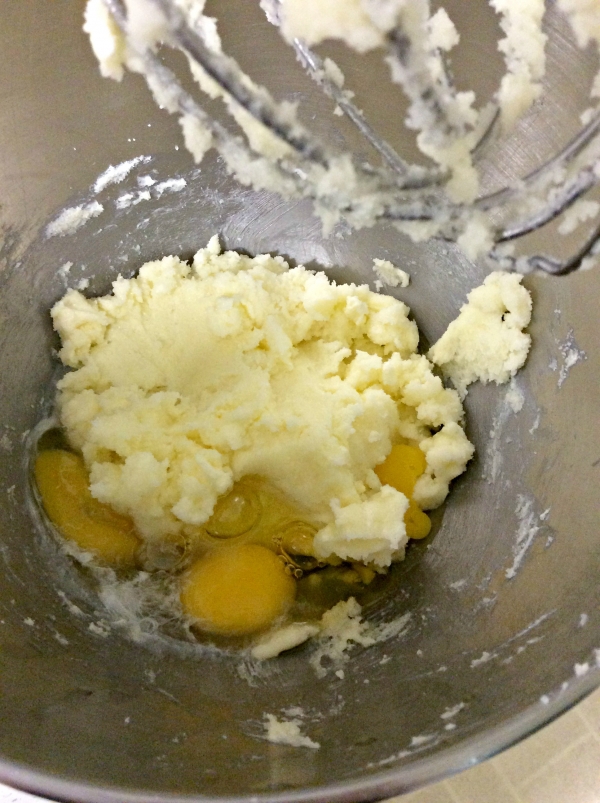
Using an electric mixer, beat the butter and both sugars until creamy.

Slowly add one egg at a time to the butter and sugar mixture, beating after each addition.

Add vanilla beating to incorporate with the butter, sugar, and egg mixture.

Slowly add the flour mixture, one cup at a time, stirring to combine after each addition.

Mix in the chocolate chips and M&M’s

Using a ¼ cup, scoop out the cookie dough and place on the lined cookie sheet allowing space for baking between each cookie.

Bake the cookies for 15 minutes or until the edges of the cookies are lightly brown.

Using a double boiler melt the white chocolate

Once melted, pour chocolate into the squeeze bottle

Wrap a paper towel around the bottle to keep your hands from burning.

pipe chocolate onto the cookie

Sprinkle the christmas sprinkles

Let dry completely for 30 minutes before enjoying!

Related Posts:

  • How to Make Banana Chips at Home
  • 4th of July Cookie Ideas for Parties, BBQs, and…
«
»

Have you read?

How to Make Thick Yoghurt Smoothie Bowls in the Ninja Slushie Maker

A quick, creamy breakfast with fresh fruit added on top

Smoothie bowls are one of those beautiful breakfasts that feel healthy and a little indulgent at the same time. Thick, cold, creamy, and pretty enough that you almost don’t want to eat them… almost.

The Ninja Slushie Maker takes all the effort out of it.
Instead of dealing with frozen fruit bricks or blenders that complain loudly, you simply mix your yoghurt base, chill it, and let the Ninja turn it into the perfect thick smoothie-bowl texture — no ice required.

If you are like me and come addicted to these smoothie bowls then you will want to invest in these double walled bowls, this is my favorite brand and these have been great. 

Then you top it with your fresh fruit afterwards so the bowl stays thick, cold, and spoon-worthy.

It’s easy, quick, and a lovely way to start the day.

Why Yoghurt Works So Well in the Ninja Slushie Maker

Yoghurt freezes into a silky, firm slush — similar to soft-serve but healthier and lighter. Because the machine creates the icy texture itself (instead of relying on ice cubes), the mixture never becomes watery or gritty.

Just smooth, cold, creamy perfection you can decorate to your heart’s content.

The Basic Yoghurt Slush Base

Once you learn this base recipe, you can create endless flavour combinations.

Ingredients

  • 2 cups plain or Greek yoghurt, chilled 
  • ½–1 cup milk of your choice (just enough to loosen the mixture) 
  • 1–3 tablespoons honey or maple syrup (optional) 
  • 1 teaspoon vanilla extract (optional) 

Method

  1. Stir all ingredients together until smooth. 
  2. Chill the mixture in the fridge until very cold. 
  3. Pour the chilled mixture into the Ninja Slushie Maker. 
  4. Blend on the slush setting until thick, creamy, and icy. 
  5. Spoon into a bowl and add your fruit and toppings. 

This base has enough body to hold granola, berries, and nut butter without sinking.

Topping Ideas (Add These After Blending)

Fresh Fruit

  • Strawberries 
  • Blueberries 
  • Banana slices 
  • Mango 
  • Kiwi 
  • Peaches 

Crunchy Toppers

  • Granola 
  • Toasted coconut 
  • Chopped nuts 
  • Cacao nibs 

Extras

  • Honey drizzle 
  • Peanut butter 
  • Chia seeds 
  • Freeze-dried fruit crumbs 

Easy Flavour Variations

Berries & Cream Smoothie Bowl

Use vanilla yoghurt as your base. Top with raspberries, strawberries, and a sprinkle of granola.

Tropical Coconut Bowl

Add a splash of coconut milk to the base. Top with mango, pineapple, kiwi, and toasted coconut flakes.

Chocolate Yoghurt Bowl

Mix 1 tablespoon cocoa powder or chocolate protein powder into the base. Top with banana slices and a peanut-butter drizzle.

Meal-Prep Tip

Prepare the yoghurt base the night before and store it in small jars.
In the morning, just pour one jar directly into the Ninja Slushie Maker and you’ve got a thick, cold, ready-to-top breakfast in minutes.


Categories

Baked candy chocolate Christmas cookies Craft Inspirations cupcakes Drinks Easter fruit Fun With Food Halloween Holidays kids More Recipes non-sweets Parties & entertaining Recipes Thanksgiving Valentines Day

“Eat Your Words” Foodie Challenge

8 Easy DIY Lollipops (No Thermometer Required)

Candy Corn Cotton Candy

Moon Pies for the Earth

Hurry!! Enter to Win Sweet Sugarbelle’s Ultimate Cookie Decorating Kit

RSS More Articles

  • 12 Handmade Patriotic 4th of July Card Ideas
  • Shark Week Learning for Kids
  • Book Review – Needle Felting Art: Mixed Media Woodland Creatures
  • Knit Summer Tops with Fun Necklines
  • DIY Pottery Clay Doily Platter with Pink Speckled Glaze
  • How to Make Thick Yoghurt Smoothie Bowls in the Ninja Slushie Maker
  • FREE 4×6 Printable Backgrounds – 4th of July Collection (Red, White and Blue Craft Papers)
  • Turtle Crochet Patterns That Are Slow, Sweet, And Totally Worth Making
  • Heirloom Keepsake Crafts: Pretty Ways To Upcycle Grandma’s Vintage Teaspoons
  • Book Review: The Book Book of Beginner Amigurumi

Pick Your Blog

  • Sewing
  • Knitting
  • Quilting
  • Crochet
  • Home & Garden
  • Recycled Crafts
  • Scrapbooking
  • Card Making
  • Polymer Clay
  • Cross-Stitch
  • Edible Crafts
  • Felting
  • Glass Art
  • Indie Crafts
  • Kids Crafts
  • Jewelry Making
  • Lesson Plans
  • Needlework
  • Bath & Body
  • Party Ideas
  • Candle Making
  • DIY Weddings
  • Not Craft
  • Free Craft Projects

Explore Edible Crafts

breakfast cake candy chocolate Christmas cookie decorating cookies dessert Easter fruit Halloween Holidays kids lollipop sticks lunch packaging party summer Thanksgiving valentines

Copyright © 2026 · CraftGossip | Start Here | Contact Us | Link to Us | Your Editors | Privacy and affiliate policy