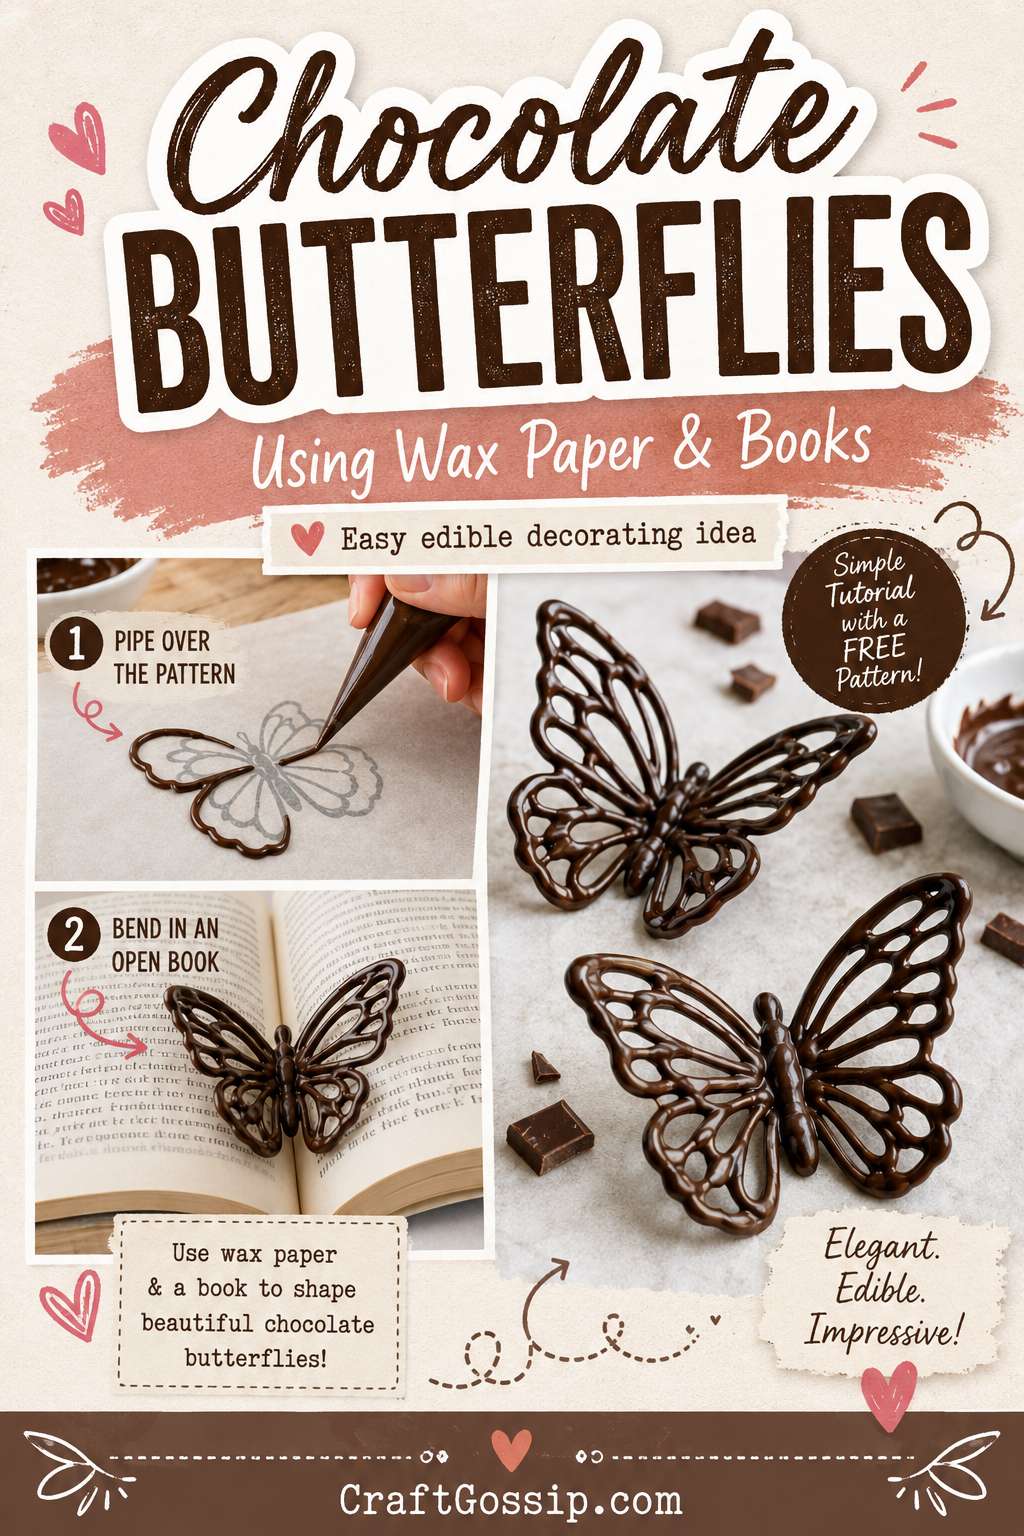
There are some cake decorating ideas that look far fancier than they actually are, and these chocolate butterfly cake toppers are exactly that kind of magic. They look delicate, pretty, and almost bakery-level fancy, but the secret is wonderfully simple: melted chocolate, wax paper, and a little shaping trick while the chocolate sets.
If you have ever looked at a plain cake or batch of cupcakes and thought, “This needs something pretty, but I do not have the patience for fondant,” then this is your sort of project. Chocolate butterflies are lovely for birthday cakes, garden party cupcakes, baby showers, spring desserts, fairy cakes, tea party treats, and even Mother’s Day baking.
They are also a great edible cake decoration for those of us who like impressive results without needing a cupboard full of professional cake tools. Honestly, if you can trace a shape and pipe a line, you can make these. Will the first butterfly be perfect? Possibly not. Will you still feel ridiculously clever when you lift it off the wax paper? Absolutely.
If you enjoy easy edible decorating ideas, you might also like these chocolate butterfly cupcake toppers or this pretty collection of cupcake topper ideas for party baking inspiration.
Why Chocolate Butterflies Work So Well For Cakes
Chocolate butterflies are one of those clever little cake decorating tricks that instantly make a dessert feel special. They add height, texture, and movement, which is exactly what a simple cake often needs.
They work beautifully on:
birthday cakes
cupcakes
spring party desserts
fairy garden cakes
floral cakes
butterfly-themed parties
Mother’s Day cupcakes
garden party treats
tea party dessert tables
The best part is that you can make them in different sizes and colors. Dark chocolate gives a classic elegant look, white chocolate can be tinted with oil-based candy coloring, and candy melts are brilliant if you want pink, purple, blue, yellow, or pastel butterflies.
If you are making party treats for kids, pair these with simple cupcake bases or even a boxed cake mix. And yes, if you are using a mix, this is a lovely way to make it look far more impressive. I have a soft spot for clever shortcuts, especially the kind that make everyone think you spent hours in the kitchen.
Supplies You Will Need
You do not need a professional cake decorating kit, but a few simple tools make this project much easier.
You will need:
wax paper or baking parchment
printed butterfly template or hand-drawn butterfly outline
melted chocolate, almond bark, or candy melts
small piping bag or zip-top bag
scissors
baking tray or flat board
an open book, folded cardboard, or V-shaped support
toothpick or skewer for tiny details
sprinkles, edible glitter, or sanding sugar, optional
A small disposable piping bag is handy here, but a zip-top bag with the tiniest corner snipped off works perfectly well. Just do not cut the hole too large at first. Chocolate is sneaky like that — one second you have a dainty piping line, the next second you have a butterfly that looks like it has been through a wind tunnel.
For supplies, this is a good place to add affiliate links naturally to candy melts, disposable piping bags, wax paper, edible glitter, and cake decorating tools. A small set of piping bags and couplers is one of those things that seems unnecessary until you use it once and wonder why you battled with sandwich bags for so long.
Best Chocolate To Use For Butterfly Cake Toppers
For beginner-friendly chocolate butterfly decorations, candy melts or chocolate almond bark are usually the easiest options. They melt smoothly, set firmly, and are less temperamental than real chocolate.
Chocolate chips can be used, but they are not always ideal for delicate toppers because they may set softer and break more easily. If you do use chocolate chips, add a small amount of coconut oil or shortening to help smooth the texture, but keep in mind that too much added fat can make the butterflies fragile.
Best options:
Candy melts for bright colors and easy shaping
Chocolate almond bark for strong, smooth toppers
Compound chocolate for beginner-friendly cake decorations
Tempered real chocolate for a more professional finish
If you are making these for a warm-weather party, go with candy melts or compound chocolate. Real chocolate can soften quickly, and nobody wants a butterfly slowly sliding down the side of a cake at a birthday party. Ask me how many dessert-table lessons have been learned the sticky way.
How To Make Chocolate Butterflies With Wax Paper
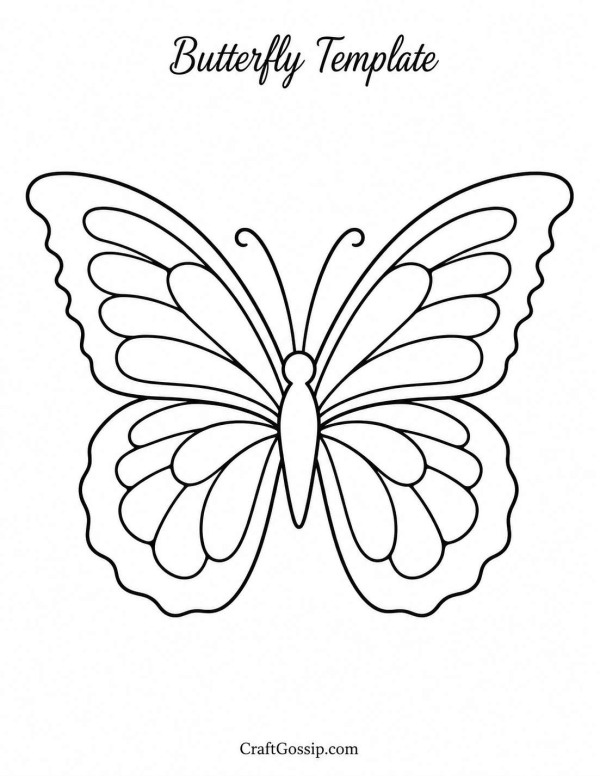
Start by printing or drawing a simple butterfly outline. You want a shape with clear wings and a fairly sturdy body. Thin delicate wing lines may look beautiful, but they are more likely to snap when you remove them from the paper.
Place wax paper over your butterfly template and secure it gently with tape so it does not slide around while you pipe.
Melt your chocolate or candy melts according to the packet instructions. Stir until smooth. If the chocolate is too thick to pipe neatly, warm it in very short bursts and stir well between each one.
Spoon the melted chocolate into a piping bag or zip-top bag. Snip a very small hole at the tip.
Pipe the outline of the butterfly first, following the template underneath the wax paper. Then add the wing details, making sure all the lines connect. This is important because disconnected chocolate lines are more likely to break when lifted.
Once the butterfly is piped, carefully lift the wax paper and place it into a folded position so the butterfly dries with raised wings. You can rest it inside an open book, between two folded pieces of cardboard, or in a shallow V-shaped support.
Place the shaped butterfly in the fridge for a few minutes, just until firm. Do not store it in the fridge for too long if you can avoid it, as chocolate can sometimes develop bloom or condensation.
When the butterfly is set, gently peel the wax paper away from the back rather than pulling the butterfly upward. This small detail makes a big difference and helps prevent broken wings.
The Folding Trick For 3D Butterfly Wings
The real charm of this project is the 3D wing shape. A flat chocolate butterfly is pretty, but a butterfly with lifted wings looks like it has just landed on your cupcake.
To get that shape, fold the wax paper gently along the butterfly’s body line after piping. The wings should angle upward on both sides. Rest the folded paper in an open book or a folded cardboard channel while the chocolate sets.
A book works because it naturally creates a soft V shape, but if you are worried about chocolate near your books — and fair enough, some of us have cookbooks that already look like they survived a frosting storm — use folded cardboard instead.
You can make several folded supports ahead of time if you are making a batch for a party. This is much easier than piping ten butterflies and then panicking about where to rest them while the chocolate is still soft.
Beginner Tips So Your Chocolate Butterflies Do Not Break
The most common problem with chocolate butterflies is breakage. They look delicate because they are delicate, but there are a few ways to make them sturdier.
Pipe thicker lines than you think you need. Very thin chocolate lines snap easily.
Make sure all wing sections connect to the body and outer edge.
Let the chocolate set fully before peeling it away.
Peel the wax paper away from the chocolate, not the other way around.
Make extra butterflies. Always. If you need six, make ten. This is not pessimism; this is cake decorating wisdom.
Avoid placing finished butterflies on warm frosting, whipped cream, or a cake sitting in direct sunlight.
If your kitchen is warm, work in smaller batches. Pipe a few, chill them briefly, then continue. Warm chocolate plus warm hands plus delicate wings can become a small emotional event.
For more edible decorating ideas, you may also enjoy these chocolate design cupcake toppers or these edible geode cupcake toppers if you want something sparkly and dramatic.
Decorating Ideas For Chocolate Butterfly Toppers
Once you have the basic technique, you can play around with different styles.
Try white chocolate butterflies on lemon cupcakes for a sweet spring look. Use pastel candy melts for baby showers or fairy parties. Pipe dark chocolate butterflies and add a dusting of edible gold for a more elegant birthday cake.
You can also sprinkle sanding sugar or edible glitter onto the chocolate before it sets. Just go lightly. The butterfly should still look delicate, not like it fell face-first into the craft glitter drawer.
Other pretty ideas:
pink and purple candy melt butterflies for fairy cupcakes
white chocolate butterflies for wedding cupcakes
dark chocolate butterflies for chocolate layer cakes
orange and black butterflies for autumn cakes
pastel butterflies for Easter desserts
tiny butterflies for mini cupcakes
large butterflies for a statement cake topper
These would look beautiful on a floral cake, especially with buttercream rosettes or piped leaves. You could also combine them with a simple butterfly cake idea for a full themed dessert table.
How Far Ahead Can You Make Chocolate Butterflies?
Chocolate butterflies are best made the day before or the day of your event. They can be made ahead, but because they are delicate, they need careful storage.
Store them in a cool, dry place in a single layer. Place them between sheets of parchment in a shallow container if needed, but do not stack too many on top of one another.
Avoid humid rooms, direct sunlight, warm kitchens, or long fridge storage. A short chill helps them set, but long refrigeration can cause condensation once they come back to room temperature.
If you are making these for a party, I would pipe them the day before, store them somewhere cool, and place them on the cake or cupcakes shortly before serving.
What To Do If Your Butterflies Crack
First, do not panic. Chocolate butterfly cracks happen to everyone.
If a wing breaks cleanly, you can sometimes repair it with a tiny dab of melted chocolate on the back. Let it set completely before moving it again.
If the butterfly is beyond saving, crumble it over ice cream, cupcakes, or pudding and call it chocolate garnish. We are not wasting chocolate in this house.
For the next batch, pipe the lines a little thicker, make sure every section connects, and chill them a little longer before peeling them off the wax paper.
Printable Template Tip
A simple butterfly outline works best. Look for a design that has:
wide wings
a solid body line
not too many tiny details
clear sections for piping
a size that fits your cupcake or cake
You can draw one by hand, use a basic clip-art style outline, or print several sizes on one sheet so you can make a mix of large and small toppers.
If you are using the same template multiple times, place it under a fresh sheet of wax paper each time. This keeps your chocolate clean and avoids any marker touching the edible part of the project.
Easy Ways To Use Chocolate Butterflies
These chocolate butterflies are perfect when you want a pretty dessert without a full cake decorating marathon.
Use them to decorate:
plain buttercream cupcakes
store-bought cupcakes
a simple chocolate cake
a garden party cake
fairy-themed desserts
tea party sweets
spring birthday treats
Mother’s Day cupcakes
baby shower cakes
They are also a lovely way to dress up cupcakes for school events, bake sales, or family birthdays. You can make the cake simple and let the toppers do all the showing off. That is my kind of decorating — maximum charm, minimum frosting-related stress.
For another cute butterfly-themed edible craft, take a peek at these M&M butterfly cupcake toppers, which are especially fun for kids’ parties.
A Sweet Little Cake Decorating Trick Worth Trying
Chocolate butterfly cake toppers are one of those projects that feel fancy but are secretly very doable. They are pretty, affordable, and easy to customize for almost any party theme.
Make a few extra, keep your piping lines sturdy, and do not be too precious about perfection. Real butterflies are not perfectly symmetrical either, and neither are most of my craft room drawers.
These little chocolate butterflies are a lovely way to turn a simple cake or cupcake into something that feels handmade, thoughtful, and just a little bit magical.