• Home
  • Suggest A DIY
  • DIY Newsletter

Edible Crafts

Creative food craft ideas

  • About CraftGossip
  • Our Network
    • Bath & Body Crafts
    • Candle Making Ideas
    • Crochet Ideas
    • Cross Stitch
    • Edible Crafts
    • Felting Patterns
    • Glass Art
    • Home & Garden Ideas
    • Indie Crafts
    • Jewelry Making
    • Kids Crafts
    • Knitting Patterns
    • Lesson Plans
    • Needlework
    • Party Ideas
    • Polymer Clay
    • Quilting Ideas
    • Recycled Crafts
    • Scrapbooking
    • Sewing Patterns
    • Card Making
    • DIY Weddings
    • Not Craft Ideas
  • Giveaways
  • Roundups
  • Store
  • Search

10 Delicious Brownie Recipes

April 14, 2015 by Larissa Coleman

brownies

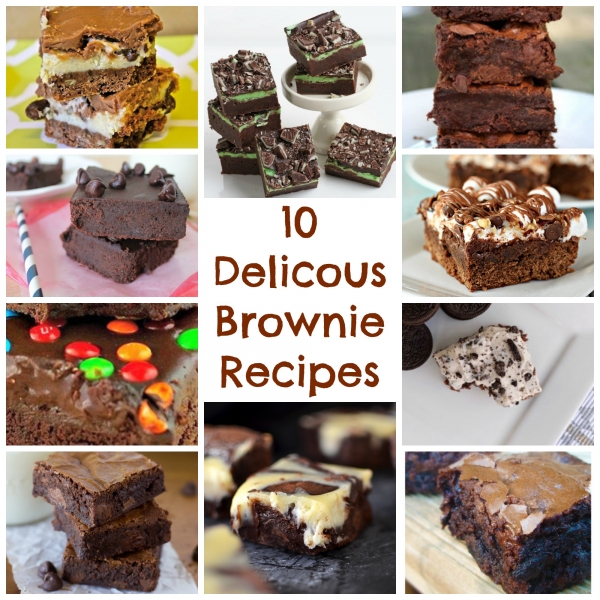
Having one of those days when you just need a really good chocolate fix?  This post gives you 10 different options for a variety of ways to put a twist on the usual brownie recipe.  Give one (or all) of them a try and come back and tell us what you think! If you are looking for a yummy tasting boxed brownie mix, because you are short on time or perhaps you are just no Martha Stewart then check out my all-time favorite Brownie box mix.

I hold no judgment for anyone who uses boxed mixes. It’s not how you made the brownie, the journey is not important, What matters is the end goal. Which is just eating it.

I remember the first time I ate the best brownies in the world. I was at my friend’s house, and she had made them from scratch. They were so moist and chocolatey, and I just couldn’t get enough. I told her she had to give me the recipe, and she did.

Ever since then, I have been making these brownies for myself and for other people. They always seem to be a hit, no matter who I make them for. I think it’s because they’re just so darn delicious. Every time I take a bite of one of these brownies, I just can’t help but smile.

If you’ve never had the chance to try these brownies, I highly recommend them. I promise you, they’ll be the best brownies you’ve ever eaten.


Check out our New Cooking and Baking Store  Discount items, **Free Worldwide Shipping**


layered

1-  Layered Brownies from Baked In Arizona – These brownies are a knockoff of the 7-layered brownies served at Mesa’s excellent Sweet Cakes Cafe.

mint

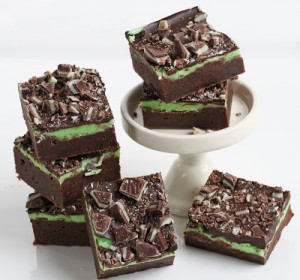
2- Mint Fudge Brownies from Glorious Treats These are dense, rich, and incredibly delicious! They can be cut into small squares and served on a dessert table or brought to a dinner party.

best

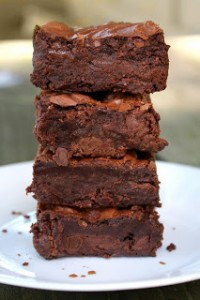
3- World’s Best Brownies from World’s Best Recipes

gluten

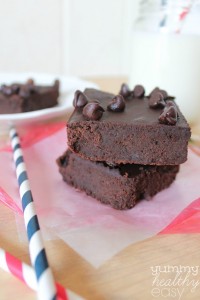
4- Gluten Free Black Bean Brownies from Yummy Healthy Easy A simple brownie recipe made entirely in the food processor and using a whole can of black beans…

rockyroad

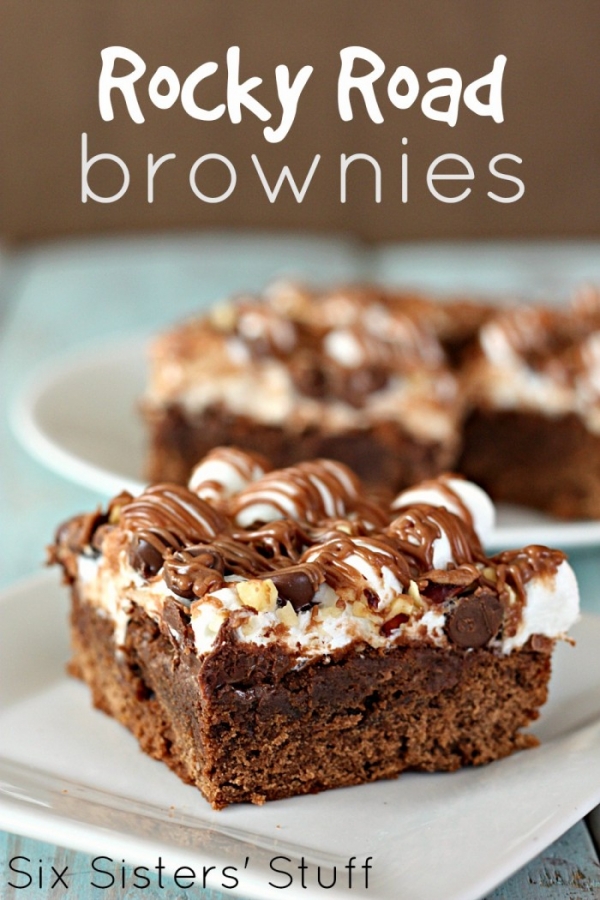
5- Rocky Road Brownies from Six Sisters Stuff . Of course, these brownies taste best when served fresh and cooked the same day. However, if you have any leftovers or want to serve them at a later time, they may and should be frozen.

cosmic

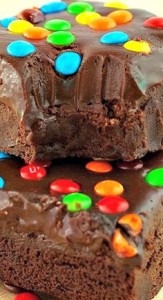
6- Copycat Cosmic Brownies from Baking Beauty. Thick, fudgy brownies topped with M&M candies and coated with silky smooth chocolate ganache. These are even better than your childhood Cosmic brownies.

cookies

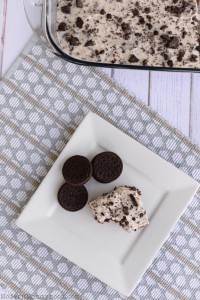
7- Cookies and Cream Oreo Brownie from Modern Mommyhood

boxed

8- Better Than Boxed Brownies from Life Made Simple. These Thick & Chewy “Better Than The Boxed” Homemade Brownies Are Easy To Make And Oh So Delicious.

cheesecake

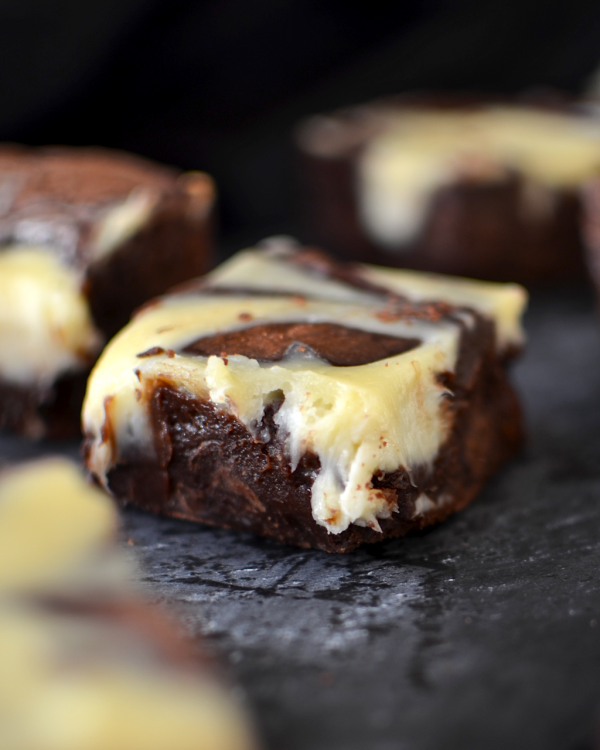
9- Cheesecake Swirl Brownies from Yammie’s Noshery This rich, fudgy brownie recipe is marbled with thick swirls of creamy cheesecake

double

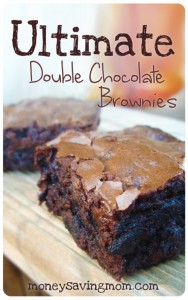
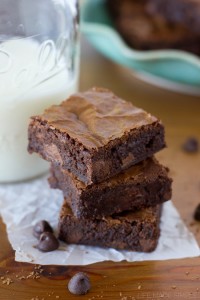
10- Double Chocolate Brownies from Money Saving Mom

Related Posts:

  • 7 Chocolate Bar Cookie Mix Gifts in a Jar That Are…
  • 30 Vegetarian Recipes For The Airfryer
«
»

Have you read?

How to Make a Dried Flower Bouquet with Mini Alcohol Bottles

This dried flower bouquet is a fun twist on a traditional gift bouquet, combining preserved flowers, fragrant lavender, and mini alcohol bottles into one eye-catching arrangement. It has that lovely handmade look, but it is also surprisingly easy to put together.

The dried flowers give it a soft, rustic feel, while the miniature bottles turn it into more of a gift bouquet than a floral one. It works well for birthdays, celebrations, thank-you gifts, party table displays, or as a creative handmade present when you want something a little different from the usual bottle-in-a-bag approach.

Supplies You Will Need

  • Dried flowers in mixed textures and colors
  • Dried lavender stems
  • Preserved baby’s breath or similar filler flowers
  • Dried eucalyptus or other greenery
  • Mini alcohol bottles
  • Floral tape 
  • Floral wire
  • Wooden skewers or thin dowels 
  • Twine, ribbon, or jute string
  • Wrapping paper, tissue paper, or florist wrap
  • Clear tape
  • Scissors
  • Optional: glue dots for positioning lightweight stems

Choosing Flowers for This Style of Bouquet

Because the mini bottles are the stars of this arrangement, the flowers work best when they look soft and airy rather than too bulky.

A good mix might include:

  • lavender for scent and color
  • baby’s breath for fullness
  • eucalyptus for shape and movement
  • dried daisies or tiny filler flowers
  • wispy grasses for texture

Try not to use flowers that are too stiff or heavy, otherwise the bouquet can start to feel crowded.

Step 1: Prepare the Mini Bottles

Start by attaching each mini bottle to a skewer or thin dowel so it can sit inside the bouquet like a stem. You can also uses these ready made stickers and the skewer just slips inside the tip. A faster and neater way to prepare your bouquets.

Use floral wire to wrap firmly around the neck of the bottle, then twist the wire around the skewer to hold it in place. Once secure, wrap floral tape around the wire and skewer to tidy it up and help everything blend in with the flower stems.

Make sure each bottle feels stable before adding it to the bouquet. You do not want one suddenly dropping out halfway through wrapping everything, because that changes the mood of the craft project very quickly.

Step 2: Create the Center of the Bouquet

Choose one or two mini bottles to form the center of the arrangement. Hold them in your hand and start adding dried flower stems around them.

Cross the stems naturally as you build, turning the bouquet slightly as you go. This helps create a rounded, balanced shape rather than a flat bunch.

Add a little baby’s breath or lavender between the bottles so they do not sit too tightly together.

Step 3: Add More Bottles One at a Time

Once the center is established, add the remaining mini bottles around the bouquet. Spread them out so they feel balanced and visible from the front.

It usually looks best to angle the bottles slightly outward instead of standing them perfectly upright. That makes the bouquet feel fuller and allows the labels or bottle shapes to show.

Keep the heavier bottles closer to the center where they are better supported by the stems.

Step 4: Fill in with Dried Flowers and Lavender

Now tuck in more flowers between the bottles to soften the arrangement. Use lavender, baby’s breath, grasses, and small dried blooms to fill gaps and hide any visible wires or skewers.

This is the stage where the bouquet starts looking more polished. The flowers help blend the gift elements into the arrangement so it feels intentional rather than like a bunch of bottles with a few random stems shoved in.

Step 5: Frame with Greenery

Add eucalyptus or other dried greenery around the outside edge of the bouquet. Longer stems work well here because they create that loose, abundant shape and help everything look more layered.

Greenery is also very useful for disguising the mechanics of the bouquet, especially around the bottle stems.

Step 6: Secure the Bouquet

When you are happy with the overall shape, wrap the stems tightly with floral tape near the base. Make sure the bottle skewers are fully included and secure.

Once taped, tie the bouquet with twine, ribbon, or jute string. Trim the bottoms of the stems and skewers so they are a similar length and sit neatly inside the wrapping.

Step 7: Wrap the Bouquet

Lay out wrapping paper or florist paper on a flat surface. Place the bouquet on top at an angle and fold the paper around the stems.

Kraft paper gives it a rustic feel, while white paper creates a cleaner modern look. Soft tissue paper underneath can make the bouquet feel fuller and more gift-like.

Secure the wrap with clear tape, then tie with ribbon or twine.

Step 8: Add a Finishing Touch

Finish the bouquet with a tag, a little handwritten note, or an extra sprig of lavender tucked into the ribbon.

That final detail makes it feel complete and gift-ready.

Tips for Making It Look Better

  • Keep the bottles evenly spaced so one side does not feel too heavy
  • Use filler flowers generously to soften the hard edges of the bottles
  • Attach each bottle very securely before you begin arranging
  • Let some greenery extend beyond the flowers for a looser, more natural shape
  • Check the bouquet from the front and sides as you build

Easy Variations

You can easily change the look of this bouquet depending on the style you want.

Try:

  • an all-lavender version with purple wrap
  • a rustic neutral bouquet with dried grasses and kraft paper
  • a celebration bouquet with brighter preserved flowers
  • a more elegant version using white filler flowers and silver ribbon

Why This Bouquet Works So Well

This type of bouquet has all the charm of dried flowers, but with a fun gift-bouquet twist. The flowers keep it feeling soft and handmade, while the mini bottles make it feel special and a bit unexpected.

It is one of those projects that looks much more complicated than it really is, which is always a nice bonus. And because dried flowers last so well, the bouquet can be enjoyed long after the celebration is over.


Categories

Baked candy chocolate Christmas cookies Craft Inspirations cupcakes Drinks Easter fruit Fun With Food Halloween Holidays kids More Recipes non-sweets Parties & entertaining Recipes Thanksgiving Valentines Day

SuperMom Homemade Pop Tarts With Nutella

5 Minute Tortilla Pizza with Roasted Red Peppers

Daffodil Marshmallow Pops

How to Make a Bunny Charcuterie Board for Easter

Kid-Friendly Halloween Food

RSS More Articles

  • Designer Spotlight: Silverberry Designs
  • Sewing Pattern Saturday Review: The Juniper Dress PDF Sewing Pattern
  • Crochet Siamese Cat – Emotional Support Kitty
  • Easy Fourth of July Ribbon Wreath – No-Sew Patriotic Door Decor
  • Book Review: 200 Sanity-Saving Tips, Tricks, and Hacks for Quilters
  • How to Make a Shirt Shaped Card for Father’s Day
  • Free Felting Tutorial Friday: Needle Felted Bear Face
  • Freebie Friday – Free Printable 4th of July Junk Journal Images
  • How to Make A Wedding Tag Mini Scrapbook Album
  • Try This Fun Bake Off Drawing Challenge with a Group of Kids

Pick Your Blog

  • Sewing
  • Knitting
  • Quilting
  • Crochet
  • Home & Garden
  • Recycled Crafts
  • Scrapbooking
  • Card Making
  • Polymer Clay
  • Cross-Stitch
  • Edible Crafts
  • Felting
  • Glass Art
  • Indie Crafts
  • Kids Crafts
  • Jewelry Making
  • Lesson Plans
  • Needlework
  • Bath & Body
  • Party Ideas
  • Candle Making
  • DIY Weddings
  • Not Craft
  • Free Craft Projects

Explore Edible Crafts

breakfast cake candy chocolate Christmas cookie decorating cookies dessert Easter fruit Halloween Holidays kids lollipop sticks lunch packaging party summer Thanksgiving valentines

Copyright © 2026 · CraftGossip | Start Here | Contact Us | Link to Us | Your Editors | Privacy and affiliate policy